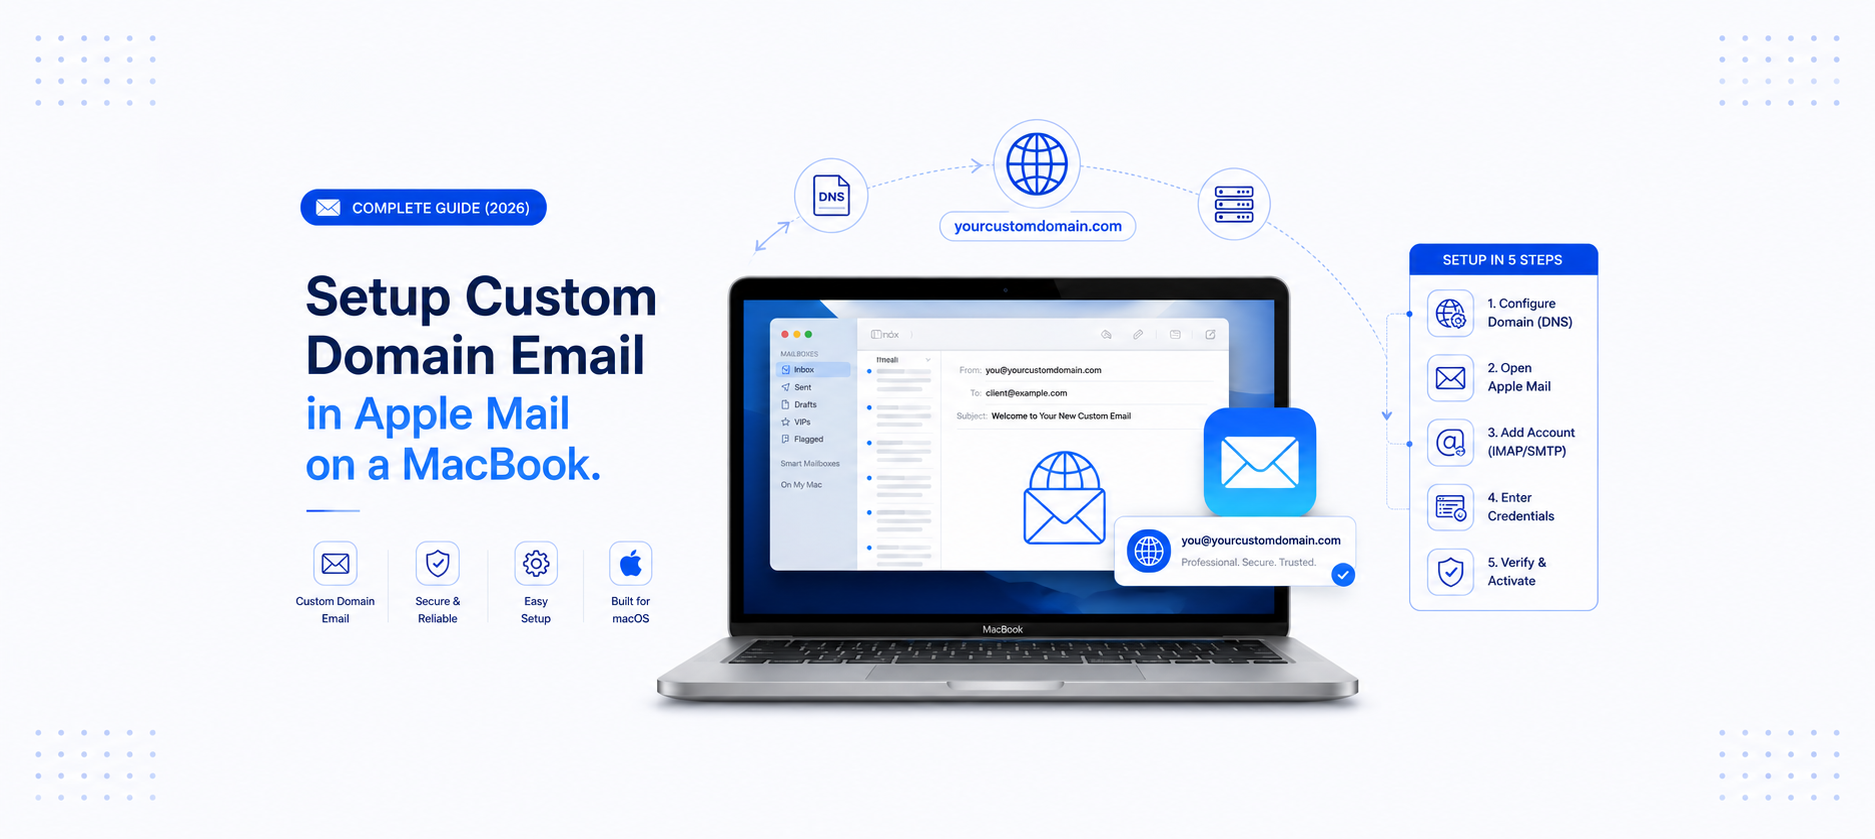

If you run a website with your own domain, your hosting provider likely gave you cPanel and the ability to create professional email addresses like [email protected]. When you are ready to ditch the clunky webmail interface, learning how to setup custom domain name email in apple mail on a MacBook is the best way to keep your communications centralized, fast, and professional.
The good news is that you can use that business email directly in Apple Mail on a MacBook, so you no longer have to log in to webmail every time you want to check or send messages. Once it is configured, mail arrives natively in your Mac’s Mail app, sits alongside your other accounts, and can sync seamlessly to your iPhone and iPad using the exact same settings.
This complete guide covers multiple methods to setup custom domain email in apple mail on a MacBook:
- Manual IMAP/SMTP setup (most reliable).
- Automatic setup using a cPanel configuration file (.mobileconfig).
- Apple Mail auto-discovery setup.
- Webmail-to-Apple-Mail quick setup method.
It also includes troubleshooting steps, SSL fixes, DNS checks, and best practices to ensure your email works correctly on macOs.
Why Use a Custom Domain Email on MacBook?
Using [email protected] instead of a free email service provides several advantages:
- Builds Trust and Credibility: A branded email address signals that your business is established, secure, and legitimate, rather than something set up anonymously in five minutes.
- Improves Your Business Branding: Every email you send becomes a touchpoint for direct marketing, constantly reinforcing your domain name in the recipient’s inbox.
- Keeps Personal and Work Email Separate: Routing client or business correspondence through its own address makes filtering, archiving, productivity management, and handing off work to teammates much simpler.
- Works Seamlessly Across Every Apple Device: Once it is set up correctly, the same account can be added to Apple Mail on iPhone, iPad, and any other MacBook, all staying instantly in sync.
- Syncs Across Devices with IMAP Protocols: Read a message on your phone and it shows as read on your MacBook too, because IMAP keeps the actual mailbox on the server rather than only on one physical device.
For example, [email protected] looks far more professional to a customer than a personal-looking address like [email protected] and it is much easier to hand over to a new employee if someone leaves the company.
Quick Answer: How to setup custom domain email in apple mail MacBook.
Looking for the fastest way to setup custom domain email in apple mail on a MacBook? Here is the step-by-step summary of what this guide covers:
1. The Easiest Method (Auto-Setup)
Log in to cPanel, navigate to Email Accounts → Connect Devices, and download the Apple Mail .mobileconfig file.Open it on your Mac and it will automatically fill in your incoming and outgoing server settings for you.
2. Manual Setup Essentials
If you are adding the account manually via Apple Mail (Settings → Accounts → Other Mail Account), you will need these core settings:
- Account Type: IMAP
- Username: Your full email address (e.g., [email protected]), not just the part before @ symbol.
- Incoming Server: mail.yourdomain.com, Port 993, SSL/TLS enabled.
- Outgoing Server: mail.yourdomain.com, Port 465, SSL/TLS enabled.
3. The Golden Rule
If your setup fails,
- Ensure you are using your full email address as the username (not just the local part before the
@). - Ensure a valid SSL certificate — ideally issued through AutoSSL — is active for
mail.yourdomain.comin cPanel.
Read on for the full step-by-step walkthrough, an explanation of IMAP vs. POP3, automatic auto-discovery methods, syncing to iPhone and iPad, and detailed troubleshooting for common connection errors.
What You’ll Need Before Starting
Before setting up your domain email account in Apple Mail, ensure you have the following prerequisites ready:
- Active hosting with cPanel access (provided by any hosting provider like KailashCloud, Hostinger, GoDaddy etc).
- Your domain already pointed to that hosting (DNS propagated).
- An active domain email account created inside cPanel.
- A MacBook running macOS with the default Apple Mail app installed.
- Your cPanel login (username + password), usually emailed to you when you signed up for hosting.
Pro Tip on DNS Propagation: If your domain was only recently connected to the web hosting account, give DNS a chance to propagate (this can take anywhere from a few minutes up to 24–48 hours) before troubleshooting connection issues. Trying to fix a setup that is simply waiting on DNS is a common source of wasted time.
IMAP vs. POP3: Which Should You Choose?
Before diving into the setup steps, it is worth understanding the protocol choice you will be asked to make, because it directly affects how your mail behaves across multiple devices:
| Feature | IMAP (Recommended) | POP3 (Legacy) |
| Server Storage | Keeps messages stored on the server | Downloads messages locally and deletes from server |
| Multi-Device Sync | Syncs read status, folders, and sent mail across all devices | Mail is restricted to the single device that downloaded it |
| Best Used For | MacBooks, iPhones, iPads, and Webmail users | Single desktop computers with limited server storage |
- IMAP (Internet Message Access Protocol): Keeps your messages stored on the mail server and mirrors them to Apple Mail. Read a message, move it to a folder, or delete it on your MacBook, and the same change appears on your iPhone, iPad, or in webmail almost immediately, because every device is looking at the same server-side mailbox.
- POP3 (Post Office Protocol): Downloads messages to a single device and, depending on its settings, removes them from the server afterward. That made sense in the era of one computer and a dial-up connection, but today it means a second device may never see messages already pulled down by the first, and deleting mail is not straightforward to reverse.
For a custom domain email used on a MacBook alongside a phone or tablet, IMAP is almost always the right choice, and it is the option used throughout this guide.
Method 1: Manual IMAP Setup in Apple Mail (Recommended)
This is the most reliable method to set up custom domain email in Apple Mail on a MacBook because you enter every server setting yourself, rather than depending on an automated installer to guess correctly. It works with almost every cPanel hosting provider, including Hostinger, Namecheap, KailashCloud, and many others.
Step 1 — Log in to cPanel
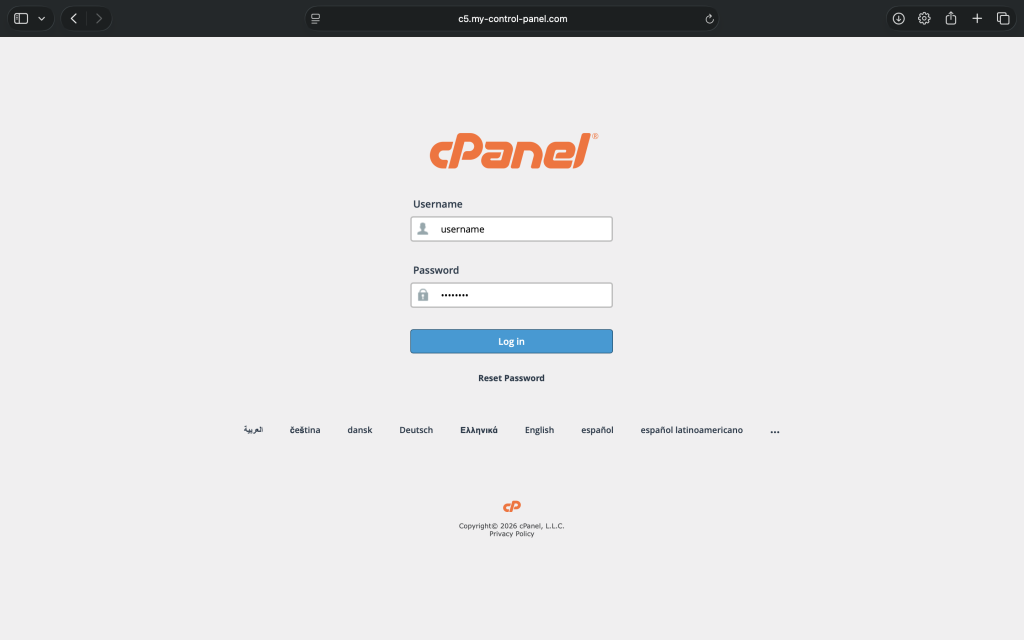
Open your web browser and go to your cPanel login page typically https://yourdomain.com:2083, or https://yourdomain.com/cpanel if your host has set up a shortcut redirect. Sign in with your cPanel username and password..
Step 2 — Open “Email Accounts”
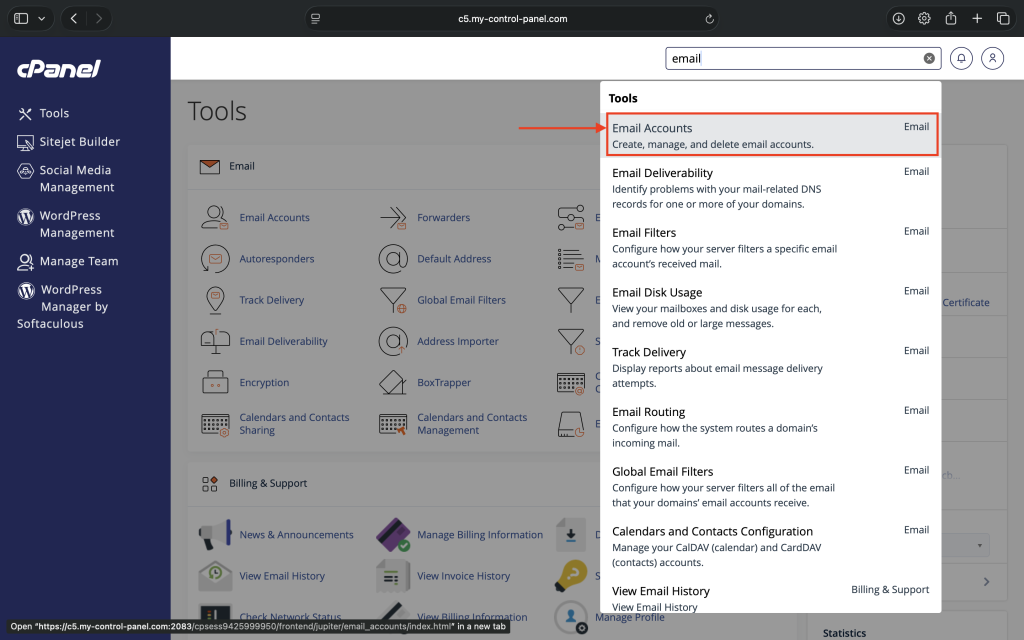
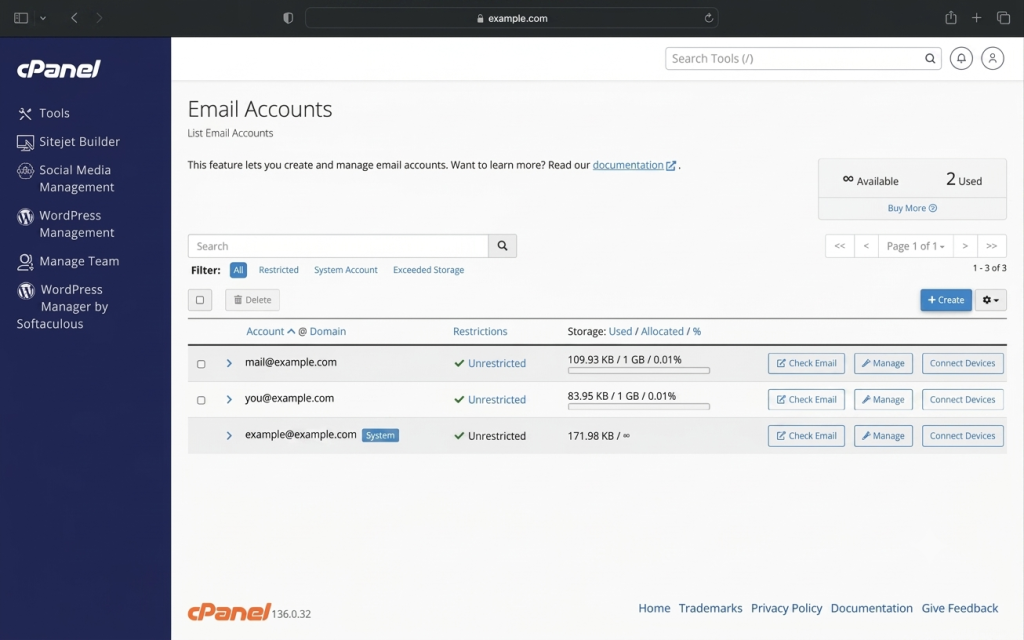
Inside the cPanel dashboard, find the Email section and click Email Accounts.
Step 3 — Create a New Account
Click Create, then fill in:
- Username: e.g. hello (this becomes [email protected]).
- Password: use a strong, unique password (a password manager helps here).
- Storage Space: set a quota, or leave unlimited if your plan allows.
Click Create to finish.
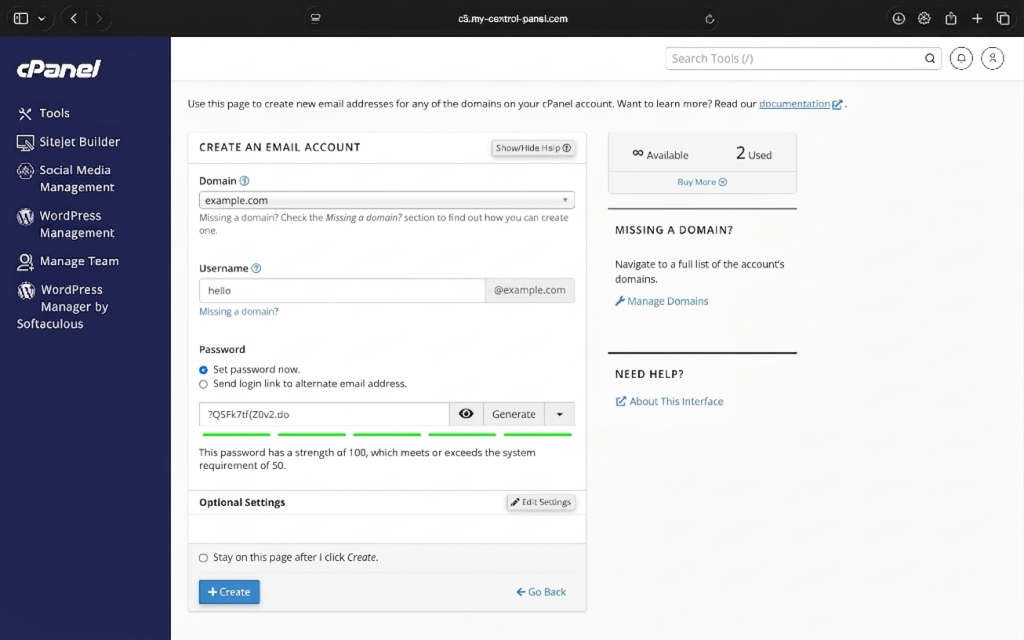
Your mailbox now exists. Next, we need its connection settings. Your new address will be: [email protected].
Step 4 — Find Your Mail Server Settings
Back on the Email Accounts page, find your new address and click Connect Devices (some cPanel themes call this “Set Up Mail Client”). You will see the Manual Settings section.
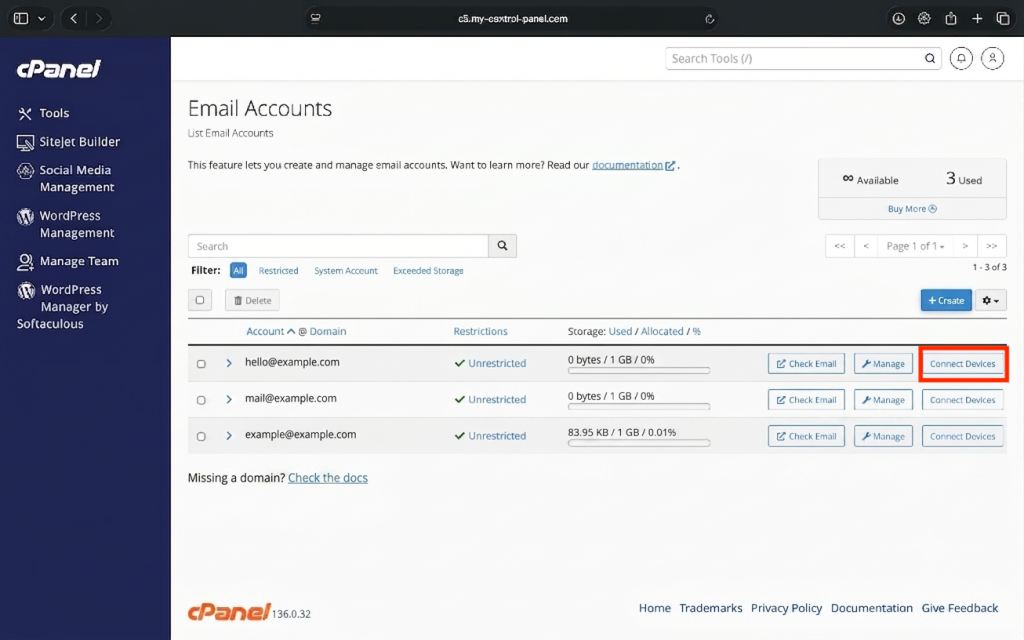
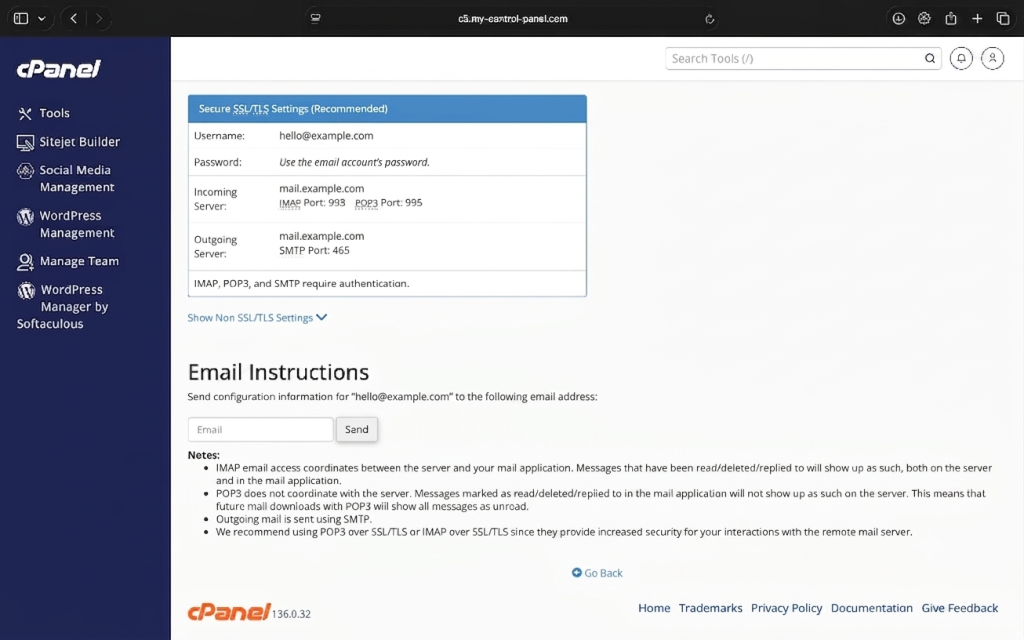
This page shows your Manual Settings note these down, you’ll need them shortly to setup custom domain email in apple mail on a MacBook:
| Setting | Incoming (IMAP) | Outgoing (SMTP) |
| Server | mail.yourdomain.com | mail.yourdomain.com |
| Port ( SSL) | 993 | 465 |
| Port (non‑SSL, not recommended) | 143 | 587 |
| Username | Full Email Address | Full Email Address |
| Password | Email Password | Email Password |
| Encryption | SSL/TLS | SSL/TLS |
IMAP vs POP3: Always choose IMAP. It syncs your mail across devices and keeps a copy on the server. POP3 downloads mail locally and can cause you to lose messages if you ever set up another device.
Step 5 — Open Mail Settings
Open the Apple Mail app on your MacBook. From the menu bar, go to Mail → Settings (or Mail → Preferences on older macOS versions), then click Accounts.
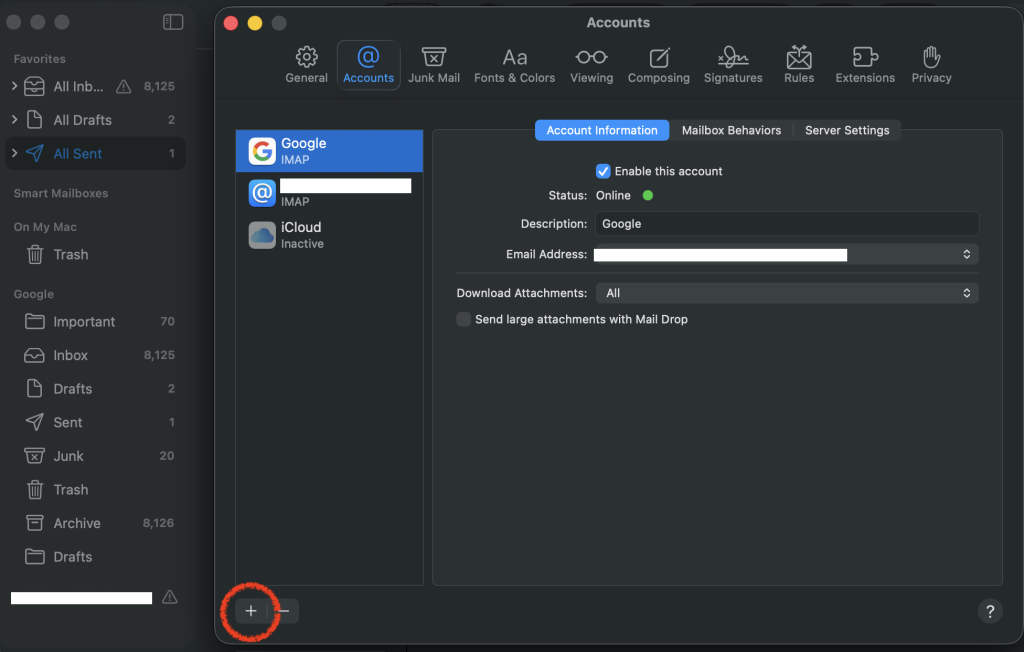
Step 6 — Add a New Account
Click the + (Plus) button at the bottom of the account list, then choose Other Mail Account… and click Continue.
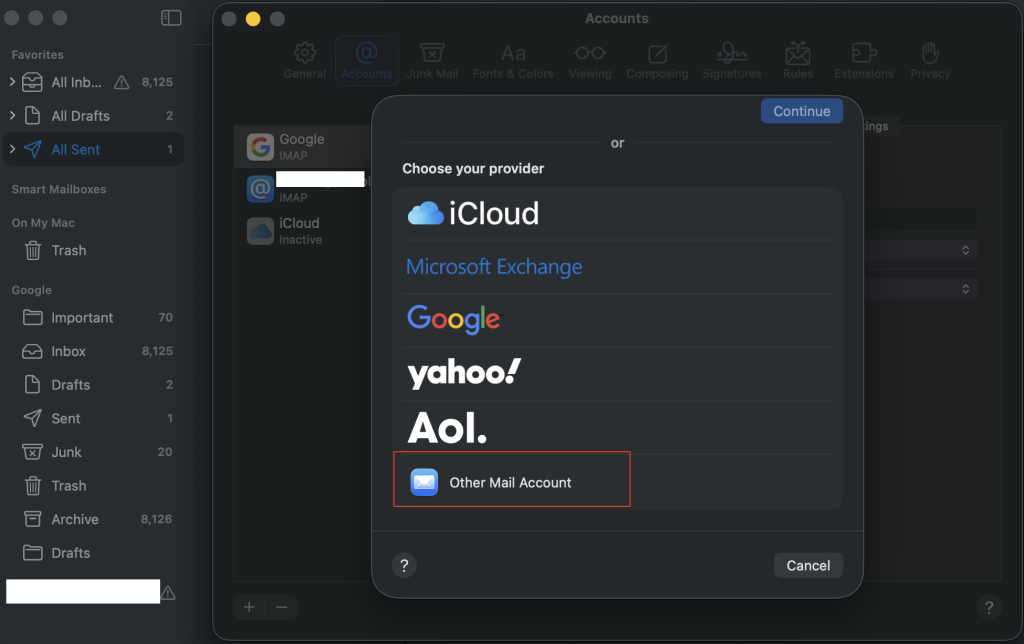
Step 7 — Enter Your Basic Details
- Name: How you want your name to appear to apple mail email recipients.
- Email Address: [email protected]
- Password: the mailbox password you set in cPanel.
Click Sign in.
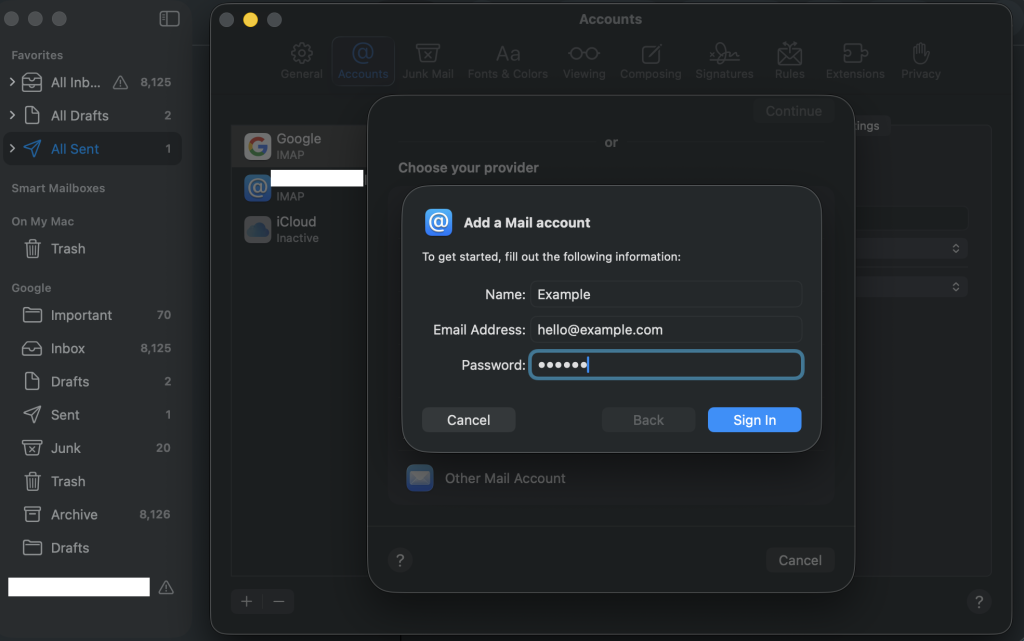
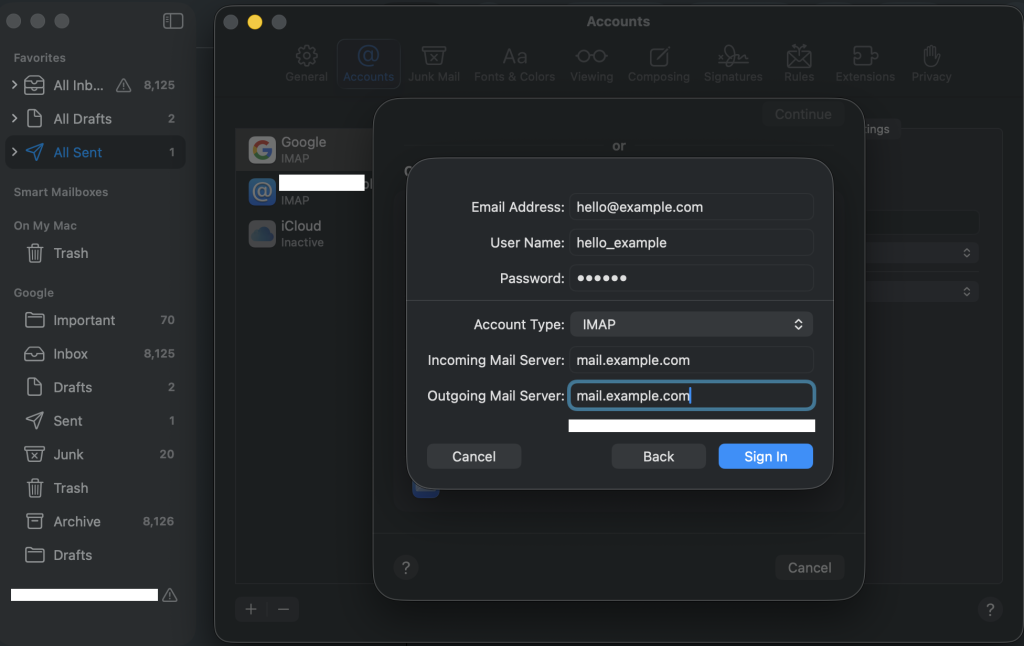
Apple Mail will attempt auto-discovery and will most likely fail — that is expected for cPanel custom domains without active autodiscover DNS records — and it will then present manual server fields.
Step 8 — Enter Manual Server Settings
Fill out both the Incoming and Outgoing server forms to setup custom domain email in apple mail MacBook:
Incoming Mail Server:
- Account Type: IMAP
- Server: mail.yourdomain.com
- Username: [email protected]
- Password: your email password
Outgoing Mail Server:
- SMTP Server: mail.yourdomain.com
- Username: [email protected]
- Password: your email password
Click Sign In to complete the connection process.
Step 9 — Verify Port and SSL Settings
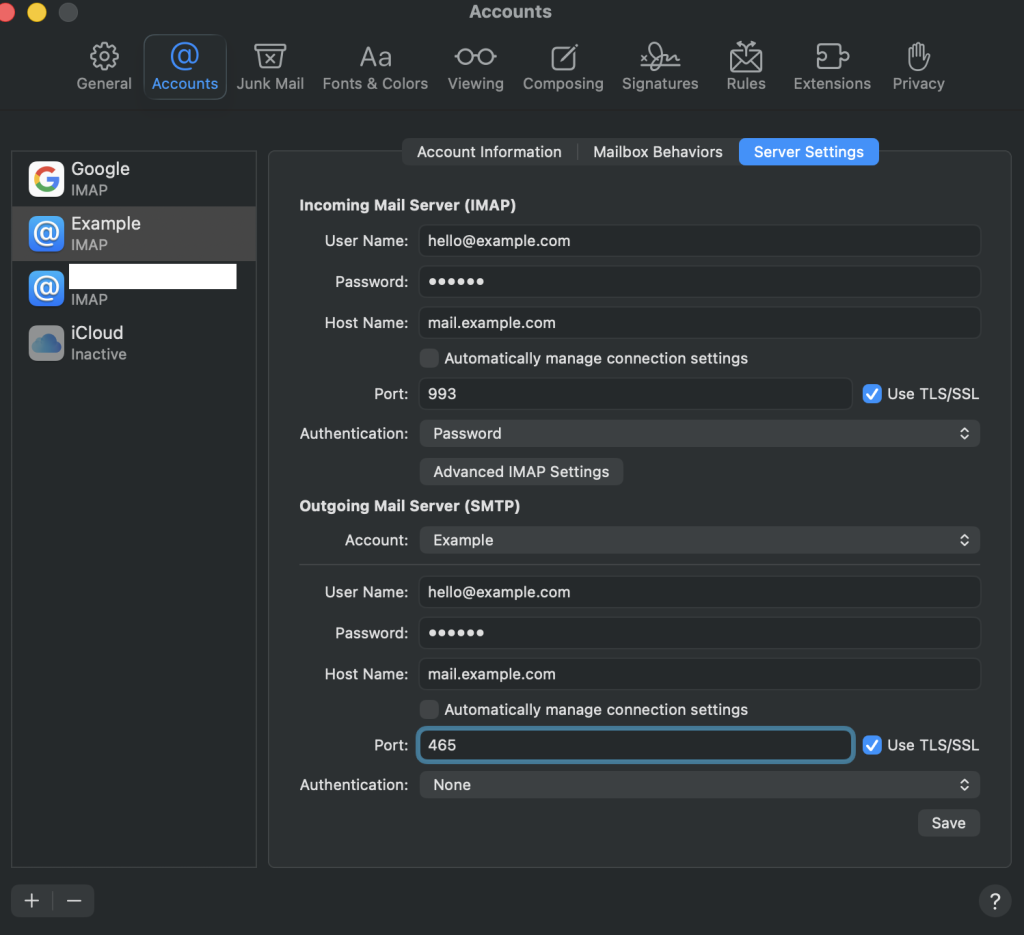
Sometimes Apple Mail doesn’t expose port fields during initial setup. If your mail doesn’t sync afterward,
- Go back to Mail → Settings → Accounts.
- Select your new account and click the Server Settings tab.
- Uncheck “Automatically manage connection settings” for both incoming and outgoing servers
- Account Information tab → confirm the incoming server is correct
- Server Settings (bottom of Account Information) → make sure:
- Confirm the incoming port is 993 with Use SSL checked.
- Confirm the outgoing port is 465 (or 587 with STARTTLS) with Use SSL checked.
Method 2: Automatic Setup Using the cPanel Configuration File (Easiest)
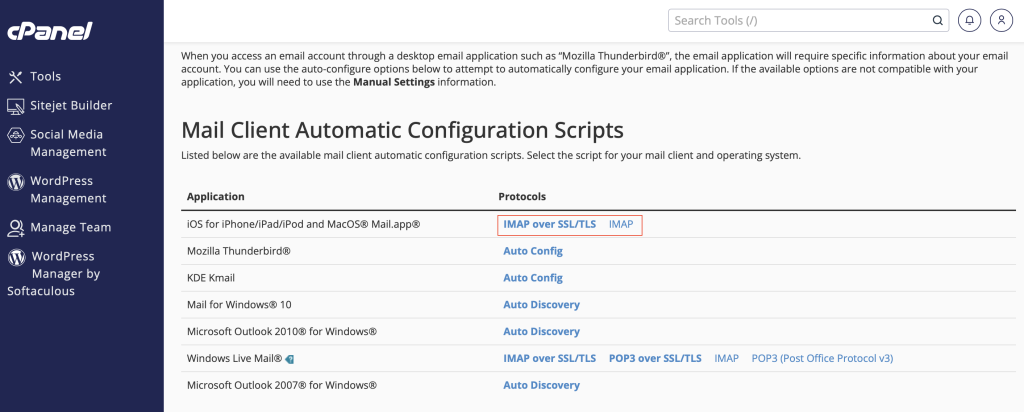
Many hosting providers offer a pre-configured Apple Mail profile that automatically fills in all IMAP, SMTP, SSL, and authentication settings for you on macOS.
Step 1 — Open Connect Devices
In cPanel, go to Email Accounts → Connect Devices. Look for options such as Apple Mail, Mail Client Automatic Configuration, or macOS Mail Profile.
Step 2 — Download the Configuration File
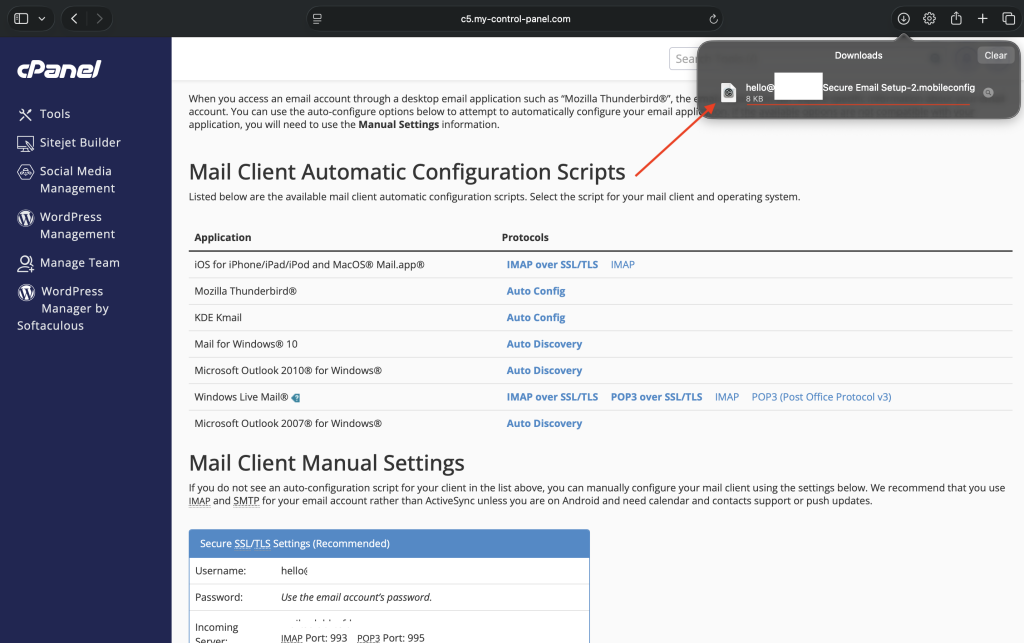
Click the Apple Mail option. The downloaded file is usually mailconfig.mobileconfig.
Step 3 — Install the Profile on macOS
- Double-click the downloaded file. macOS will open System Settings and display a Profile Installation window.
- Click Continue, then Install.
- Enter your Mac password if prompted and confirm.
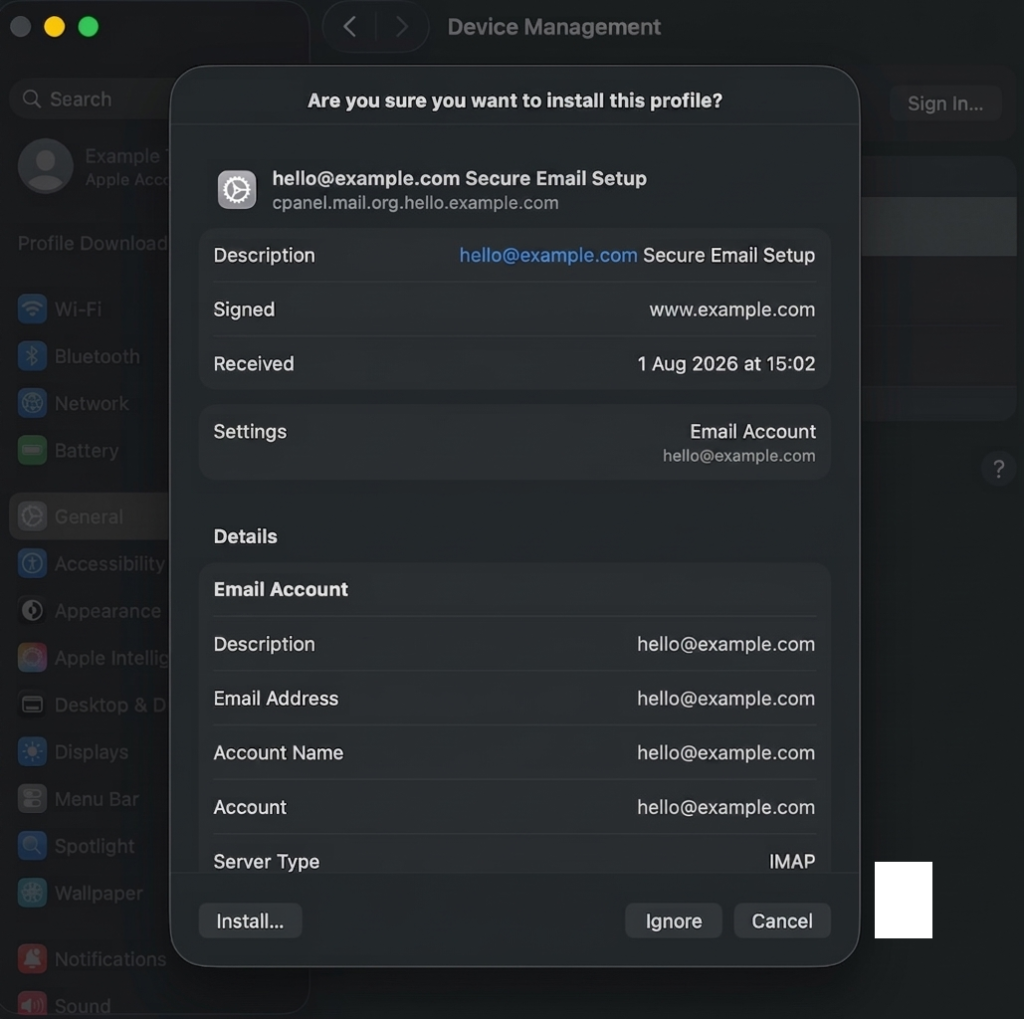
After installation, Apple Mail automatically adds the custom account, and it will appear ready for use the next time you open the app.
Method 3: Apple Mail Auto-Discovery Setup
Some hosting providers configure autodiscover records for your domain, allowing Apple Mail to detect the settings automatically.
- Open Apple Mail on your MacBook.
- Go to Mail → Add Account → Other Mail Account.
- Enter your name, email address, and password, then click Sign In.
Apple Mail will search for autodiscover.yourdomain.com and mail.yourdomain.com. If those DNS records exist and resolve correctly, the account configures itself instantly without requiring manual server parameters. If this method fails silently, fall back to Method 1.
Syncing the Same Account to Apple Mail in iPhone and iPad
Because this setup uses IMAP, extending your custom domain email to an iPhone or iPad uses the exact same core information you used on your MacBook:
- On your iPhone or iPad, open Settings → Mail → Accounts → Add Account → Other → Add Mail Account.
- Enter your name, full email address, password, and a helpful account description.
- Select IMAP at the top tab.
- Enter the incoming mail server settings (
mail.yourdomain.com, Host Name, full email username, password). - Enter the outgoing mail server settings (
mail.yourdomain.com, Host Name, full email username, password). - Tap Save.
Mail, along with Contacts and Calendars if your host supports CalDAV/CardDAV protocols, will begin syncing automatically. Because IMAP mirrors the exact same server mailbox, anything you read, flag, or file into folders on your MacBook will reflect on your phone or tablet within seconds.
Troubleshooting Common Apple Mail Errors
If you encounter issues while setting up your domain email on MacBook, use these targeted solutions to fix the most common errors:
- Cannot connect using SSL” error: Your host’s mail server might use a shared SSL certificate that doesn’t exactly match mail.yourdomain.com. Try unchecking SSL temporarily to test the connection, or ask your host if they support AutoSSL has issued an active certificate for your email subdomain.
- Emails send but never receive (or vice versa): Double-check that your incoming and outgoing server or port fields were not accidentally swapped — this is the single most common human error when entering manual settings.
- “Password incorrect” even though it’s right: Ensure the Username field contains your full email address (
[email protected]), not just the prefix before the@. cPanel mail servers strictly require the complete email address for authentication.
- Mail app hangs on “Verifying…”: Confirm your domain’s DNS has propagated and that mail.yourdomain.com actually resolves — you can check this in Terminal with:
nslookup mail.yourdomain.com
If that command returns no IP address, the issue is DNS propagation, not Apple Mail.
- Outgoing mail stuck in Outbox: Many ISPs and public Wi-Fi networks block outbound traffic on default port
25, and some restrict port587. Switch your outgoing port setting to 465 with SSL enabled.
- Duplicate Messages Appearing: This can happen if the account was accidentally added twice under settings, or if a server-side rule is being executed locally. Check Mail → Settings → Accounts for duplicate entries.
- Sent Messages Not Appearing on Other Devices: This means the account’s Sent mailbox has not been mapped to the server folder. In Mail → Settings → Accounts → Mailbox Behaviors, ensure Sent Mailbox points to the server’s remote Sent folder rather than an “On My Mac” local folder.
Recommended cPanel Domain Email Settings for Apple Mail
Use this convenient reference table when filling in your account details inside Apple Mail settings:
| Setting | Recommended Value |
| Account Type | IMAP |
| Incoming Server | mail.yourdomain.com |
| Incoming Port | 993 |
| Outgoing Server | mail.yourdomain.com |
| Outgoing Port | 465 |
| Encryption | SSL/TLS |
| Authentication | Password |
| Username | Full email address |
Understanding Email Routing and Deliverability: MX, SPF, DKIM, and DMARC
While setting up Apple Mail handles sending and receiving messages locally, your domain’s DNS authentication and routing records determine whether emails reach your domain and whether your outgoing messages land in a client’s inbox or get redirected to their spam folder:
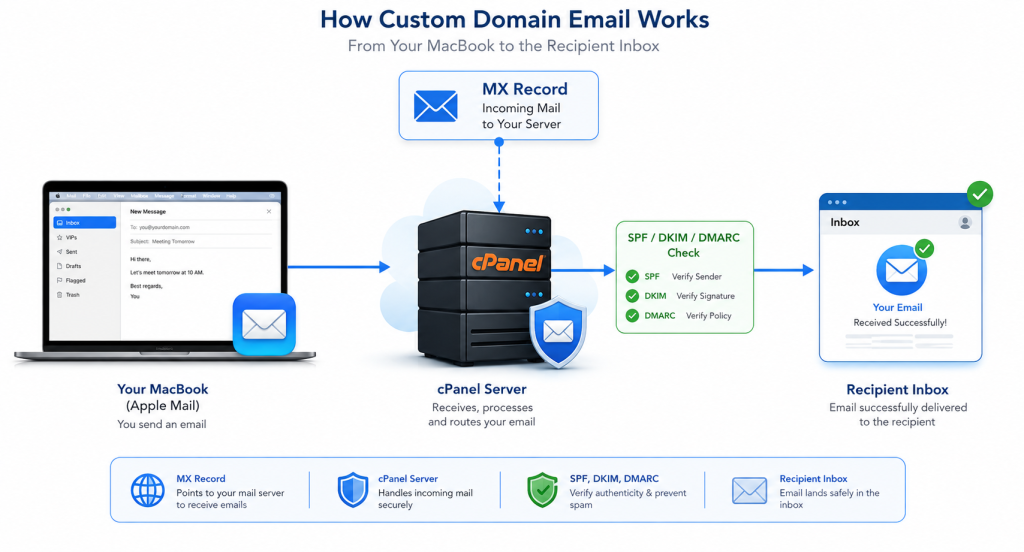
- MX (Mail Exchanger) Records: A fundamental DNS record that specifies which mail server is responsible for accepting incoming email on behalf of your domain name. Without a correctly pointed MX record (typically pointing to
mail.yourdomain.com), other mail servers will not know where to deliver messages sent to your address. - SPF (Sender Policy Framework): A DNS TXT record that explicitly lists which mail servers are permitted to send email on behalf of your domain name, preventing unauthorized servers from impersonating you.
- DKIM (DomainKeys Identified Mail): Attaches a cryptographic signature to outgoing messages, allowing the recipient’s mail server to verify that the email was not altered during transit and genuinely originated from your domain.
- DMARC (Domain-based Message Authentication, Reporting & Conformance): A policy record that instructs receiving servers on how to handle emails that fail SPF or DKIM checks (e.g., quarantine, reject, or pass through) while sending performance reports back to you.
Most cPanel web hosts automatically configure default MX, SPF, and DKIM records upon mailbox creation. You can verify and manage these settings inside cPanel under Email Deliverability and the Zone Editor to guarantee seamless mail routing and maximum inbox deliverability.
Best Practices for Custom Domain Email in Apple Mail on a MacBook
To keep your custom business email working smoothly on macOS, follow these operational best practices:
- Use Strong Mailbox Passwords: Avoid simple passwords like
admin123. Use a dedicated password manager to generate complex 16+ character strings. - Keep IMAP Protocol Enabled: Avoid switching to POP3 so that your Mac, iPhone, iPad, and webmail remain perfectly synchronized.
- Configure Authentication Records: Verify that SPF, DKIM, and DMARC records are valid to maintain high domain reputation and deliverability.
- Use Exact Hostnames: Always use the precise hostname shown in cPanel (
mail.yourdomain.com). Guessing hostnames likemail2.yourdomain.comcan lead to SSL certificate mismatch errors. - Perform Two-Way Delivery Testing: Send a test email to an external account (like Gmail) and send a reply back to confirm both inbound and outbound routing work correctly.
- Maintain Access to Webmail: Keep your cPanel webmail login details saved as a reliable backup in case you ever need to access mail from a foreign computer.
Frequently Asked Questions (FAQ)
- Do I still need cPanel webmail after setting up Apple Mail?
No, you do not need to use webmail for daily sending and receiving. However, it is good practice to keep your webmail login credentials saved as a fallback option if you ever need to check emails from a web browser on another computer. - Can I set up multiple custom domain email accounts in Apple Mail?
Yes. You can add as many custom domain accounts as you need. Repeat Method 1 or Method 2 for each address. Apple Mail organizes them neatly in a unified inbox or separate sidebars. - Is custom domain email setup on a MacBook as secure as Gmail or Outlook?
Yes. Security relies primarily on your hosting provider’s server infrastructure and whether SSL/TLS encryption, SPF, DKIM, and DMARC are configured. A well-configured cPanel mailbox running over SSL is just as secure. - Why does Apple Mail repeatedly ask for my password?
This usually occurs for three reasons: the password was mistyped, the username field does not contain the full email address, or the SSL certificate formail.yourdomain.comhas expired or doesn’t match the server hostname. - Can I forward my domain email to Gmail instead of configuring Apple Mail?
Yes, cPanel supports email forwarders. However, setting up email natively via IMAP in Apple Mail gives you full two-way synchronization across your MacBook and iOS devices without exposing your personal Gmail address.
Wrapping Up
Learning how to set up custom domain email in Apple Mail on a MacBook gives you full control over your business communications while allowing you to enjoy the speed and native integration of macOS. Once configured, your domain email works effortlessly across all your devices with full IMAP synchronization.
Got stuck or seeing a specific connection error on your MacBook? Drop your error message in the comments below, and I’ll help you troubleshoot it!