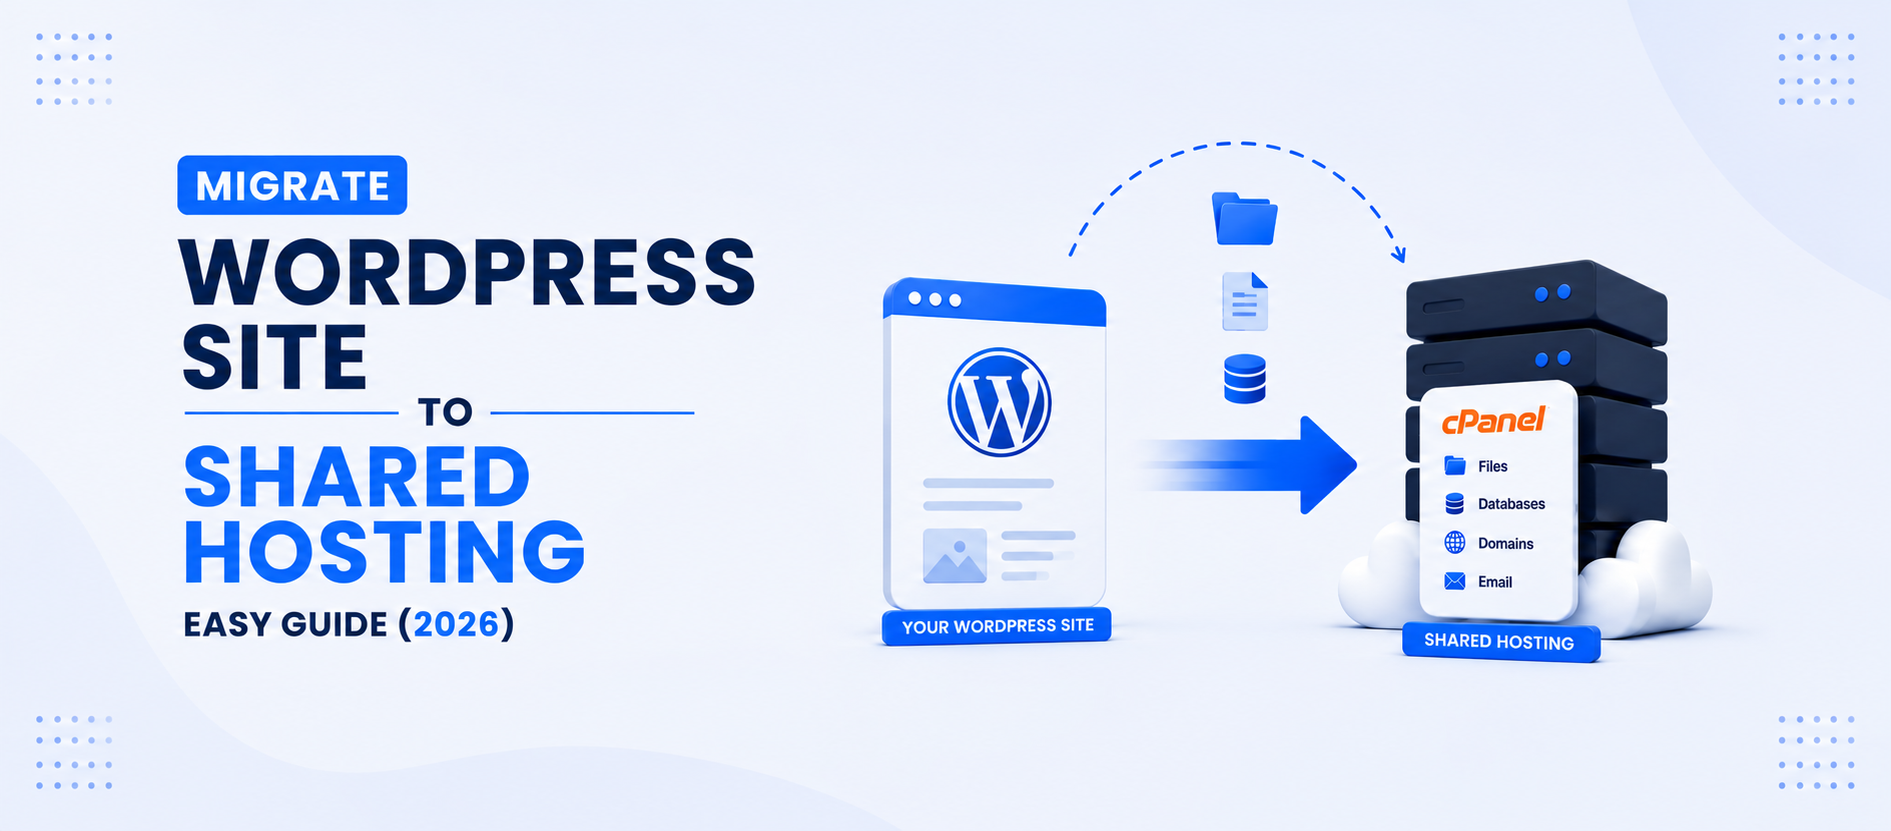

If you’re trying to migrate WordPress site to shared hosting without losing any data, you’ve probably already run into a plugin that promised a one-click fix. Every WordPress migration plugin makes that promise, and I admit they’re genuinely handy for small sites: install, export, import, done. But that promise usually breaks the moment your site reaches a few hundred megabytes.
But we are here for a solution that just works every time. This guide covers both methods of WordPress site migration: the Plugin method and the manual method.
With the help of this guide, it doesn’t matter who you are: a newbie or a pro, you will be able to migrate WordPress site with ease.
Quick Answer: How to Migrate WordPress Site to Shared Hosting
To migrate WordPress site to shared hosting, back up your files and
database on the old host, set up a new hosting account, upload the
files, import the database, update wp-config.php with your new
credentials, fix the site URLs if your domain changed, and point
your DNS to the new server. You can do this manually through cPanel,
or automate most of it with a plugin like All-in-One WP Migration.
What is WordPress?
Before jumping straight into migration, let’s know what WordPress is and what it is made of. It is a free, open-source content management system (CMS) that lets you build and manage your website through an admin dashboard instead of writing actual code. It is powered by PHP and supports MySQL or MariaDB natively for the database.
The core ideas that make it so much more powerful and popular than coded sites are: the theme that controls how your website looks and the plugins that extend the functionality of WordPress (forms, SEO, caching, e-commerce, etc), which is why it is so approachable among non-coders.
What is Migration and why do we need it?
Migration is the process of moving your entire WordPress site, including every file, the database, your themes, plugins, and settings, from one host to another, without losing any of it.
While we specifically talk about shared hosting, it comes down to these major reasons for migrating a WordPress site. They are as follows:
- Pages load slower than they used to, or the site crashes during high traffic because the site has grown, and the current host can’t keep up.
- Support tickets take days to get a reply when something breaks.
- Renewal price hiked well past what was originally quoted.
This is where the need for a trustworthy hosting provider hits the most. There are several hosting providers in Nepal like Kailash Cloud, Nest Nepal, Prabhuhost, etc. Make sure that you have chosen the best WordPress hosting for your website
Plugin Migration
A plugin method does the same work as the manual method, just automated. It is designed for people with less technical knowledge.
We will be taking the most popular migration plugin, All-In-One WP Migration, with more than 5 million downloads, as a reference for our guide for plugin method migration. It bundles your entire website: all your files, plugins, themes, settings, and database into a single .wpress file. You export that one file from your old site and import it into a fresh WordPress install on your new host. That completes the migration, followed by a DNS update (if required).
Here is a step-by-step guide:
Install the plugin.
Search and install the All-in-One WP Migration plugin on your current (source) site from the Plugin section in your admin dashboard, then activate it.
Admin Dashboard > Plugins> Add Plugin> search > install > activate
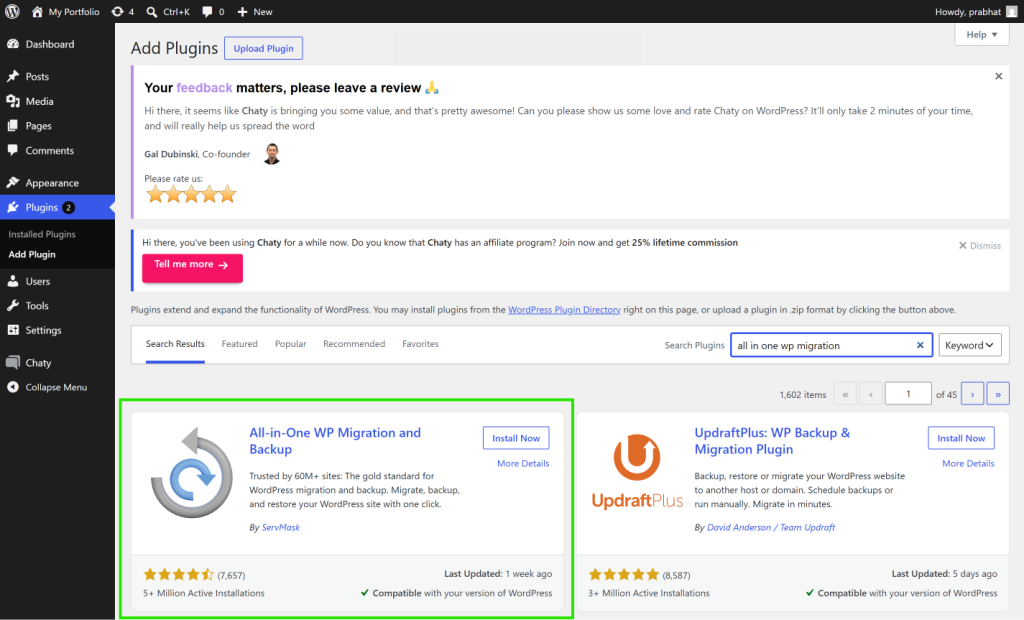
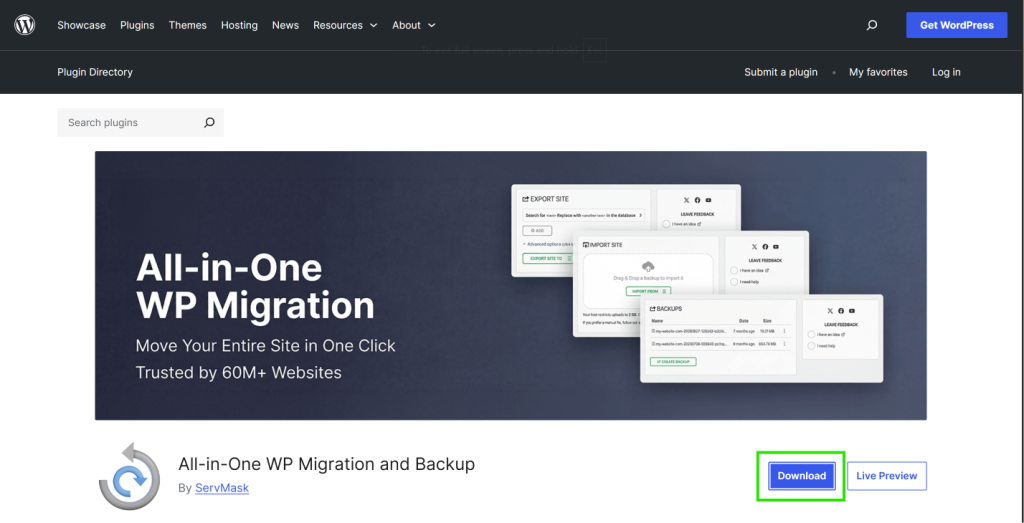
If you can’t find the plugin there, then you can directly download the plugin from the official WordPress.org website and upload it to your plugin section.
All-In-One WP Migration > Download> Admin Dashboard > Plugins> Add Plugin> Upload Plugin> upload plugin zip file > install > activate
Export and download the data.
Once the plugin is activated, then on your source site, run the export. All-in-One WP Migration bundles your files, database, themes, and settings into a single .wpress file, then lets you download it once it’s ready.
Admin Dashboard > All-in-One WP Migration > Export to > File > wait for the export to finish > Download
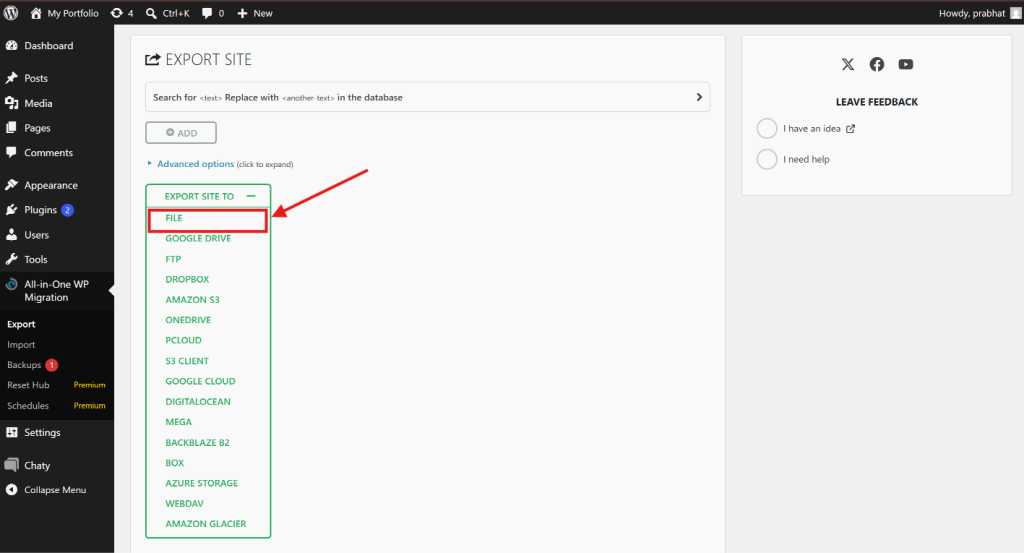
The export can take a few minutes on larger sites, so don’t close the tab while it’s building the file.
Install a fresh WordPress site.
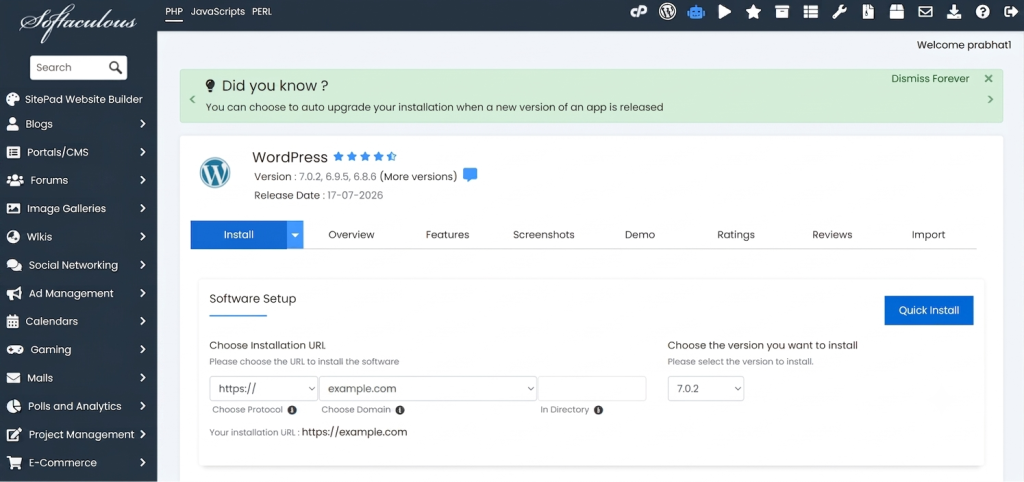
Before you can import anything, your new hosting account needs a fresh, empty WordPress installation.
cPanel (new host) > Softaculous > install WordPress.
Install the plugin and import the exported file
The installation and activation steps of the plugin are the same as mentioned above. Now you need to import the exported file. To do so, you need to upload the .wpress file you downloaded earlier from the source site. The plugin unpacks it, rewrites your site URLs, imports the database, and installs and configures plugins and themes automatically.
Admin Dashboard (new site) > All-in-One WP Migration > Import > select the .wpress file > wait for the import to complete > click> proceed> finish
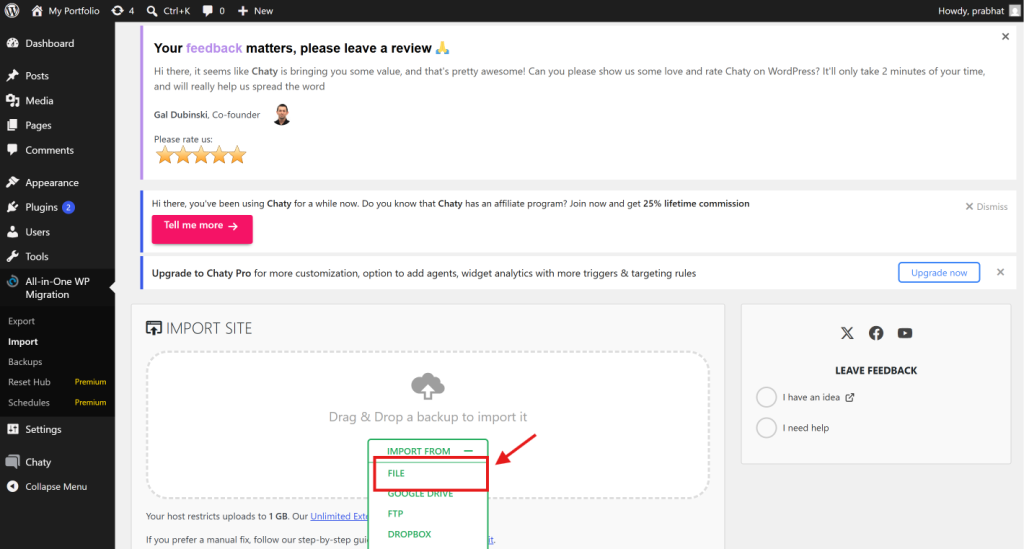
Note: You can increase your upload limit from cPanel’s multiPHP ini editor through these two values upload_max_filesize and post_max_size.
Once the import is completed, everything should be migrated correctly. Now, as the final step, update your domain’s DNS as described below so visitors start landing on the migrated site.
Manual Migration
The manual method does the same job as the plugin Migration, which is moving files, database, and settings to a new host. Except you handle each piece yourself through cPanel and phpMyAdmin instead of relying on a plugin. It’s more steps, but there’s no PHP upload ceiling to fight, and no plugin dependencies like upload and import limits.
Here is a step-by-step guide:
Backup your website files.
On your current (source) site, compress your entire WordPress folder into a single archive (.zip file), so you have one file to move instead of thousands.
cPanel (old host) > File Manager > public_html > select all > Compress > Zip Archive > download
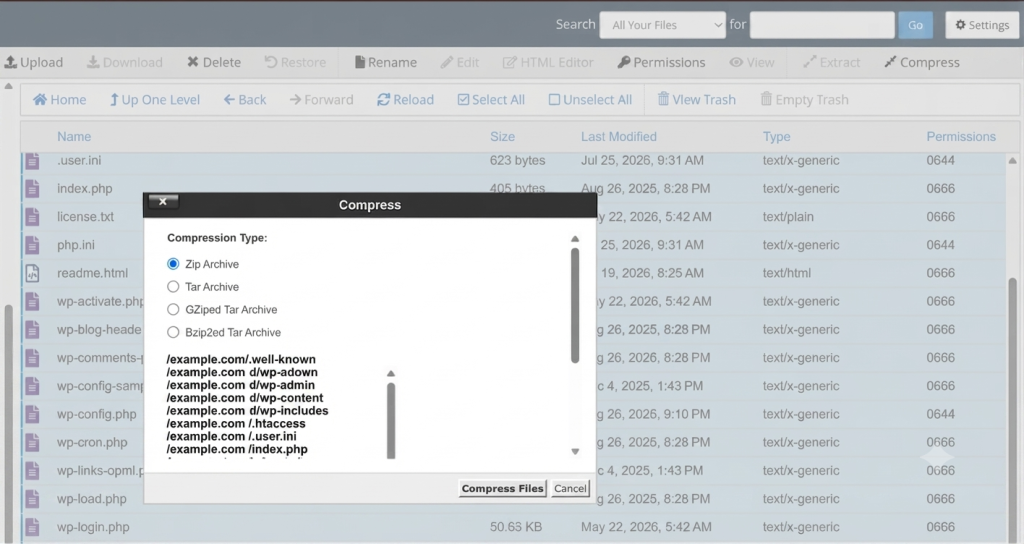
For a large site, download this zip or files over FTP with a client like FileZilla because some low-spec free hostings aren’t even able to make a zip archive.
Back up your database.
Your files are only half the site; everything else (posts, pages, settings, users) sits in the database, and that needs its own export.
cPanel (old host) > phpMyAdmin > select your WordPress database > Export tab > Export method: Quick > Format: SQL > Go
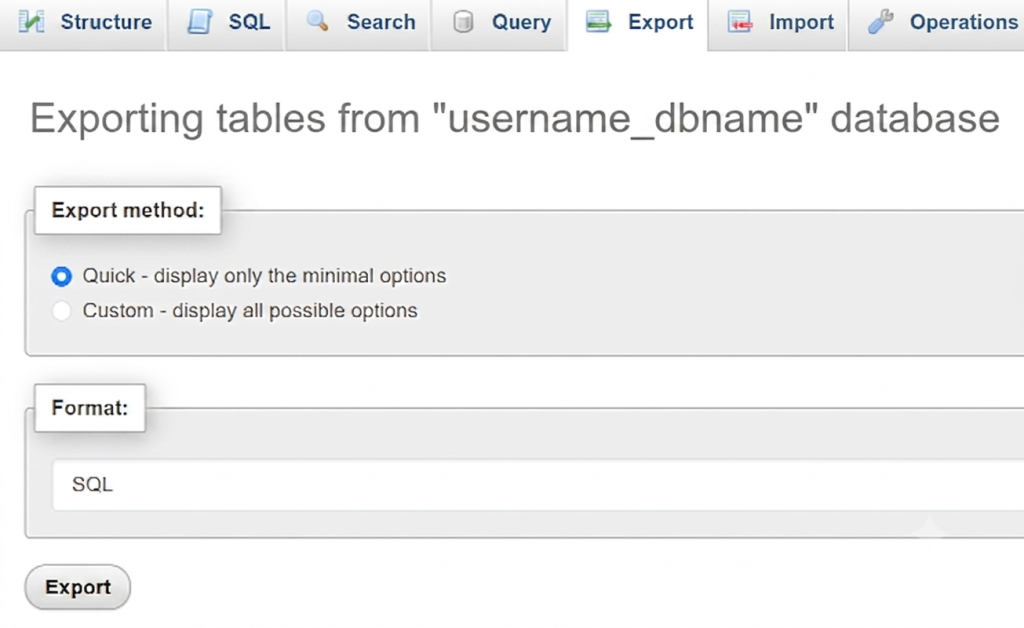
Create a new database and database user.
In your new host cPanel, you need to create a new database and a user. Unlike the plugin method, nothing is auto-created here. You build an empty database on the new host and connect it to a user before anything can be imported into it. Also, make sure to grant all privileges to that associated user to the database.
cPanel (new host) > Database Wizard > create database > create user > grant All Privileges > make changes/next step.
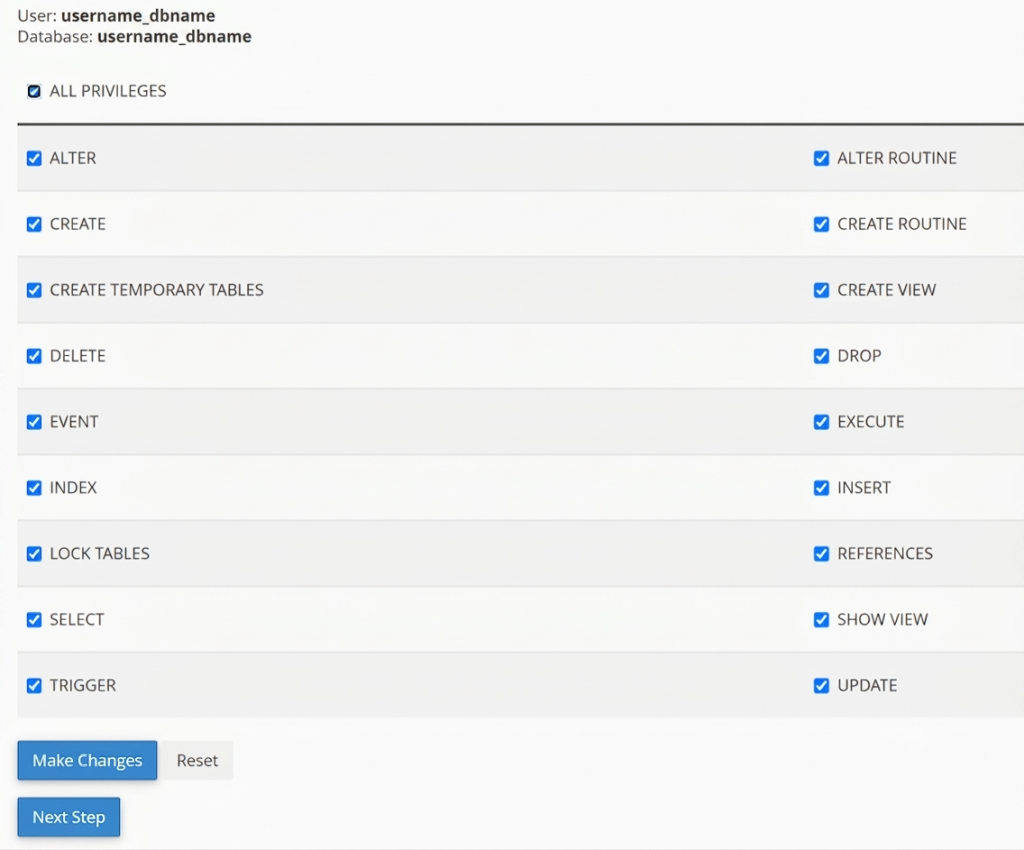
Note down the database name, username, and password exactly as shown, and shared hosting usually prefixes the database and user name with your cPanel username (e.g. username_wpdb).
Import the database.
With the empty database from Step 4 ready, import the .sql file you exported in Step 2.
cPanel (new host) > phpMyAdmin > select the empty database > Import tab > choose the .sql file > import
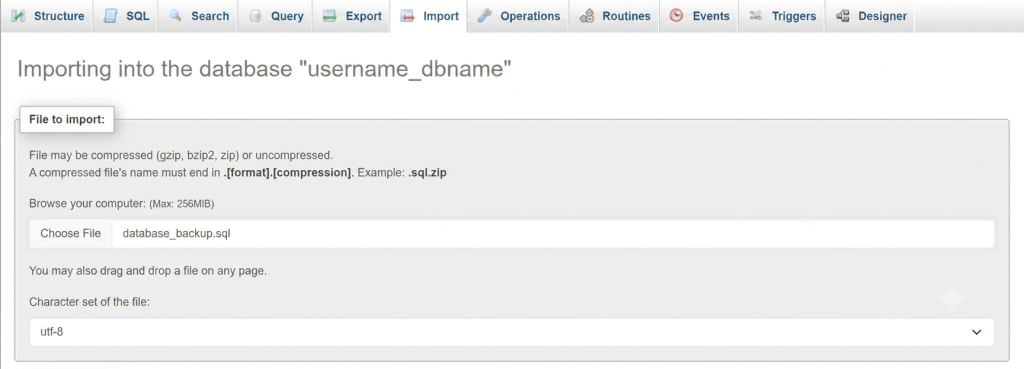
Fix the site URLs stored in the database.
This step is only for sites that also change their domain along with the host. Your old domain is stored in the database table named wp_options in the siteurl and home tuples; you have to update the stored URL to your new domain URL.
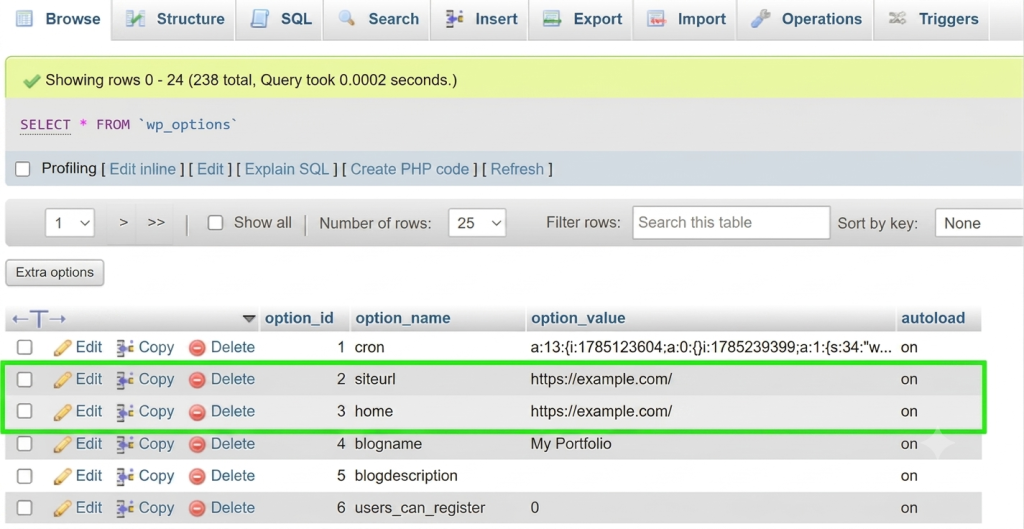
Upload your website files.
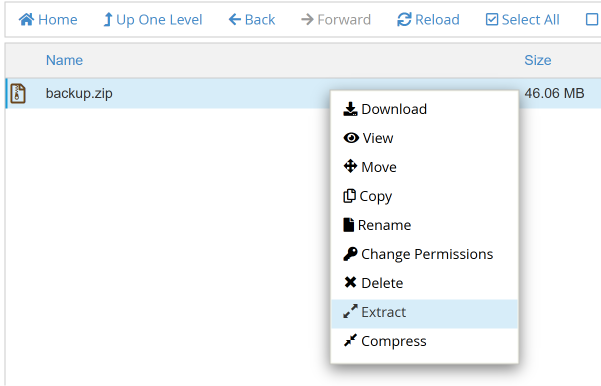
Now you need to upload the.zip, which you created and downloaded from the old host file in your new public_html folder, then extract it.
cPanel (new host) > File Manager > public_html > Upload > select your zip file > wait for upload > right-click > Extract
Update wp-config.php with your new database details.
Right now, both WordPress files and database exist on the new server, but they don’t know about each other yet. This step connects them.
cPanel (new host) > File Manager > public_html > wp-config.php > right click > Edit
define( 'DB_NAME', 'your_new_database_name' );
define( 'DB_USER', 'your_new_database_user' );
define( 'DB_PASSWORD', 'your_new_database_password' );
Point your domain’s DNS to the new host.
As a final step, you need to update your DNS records. Either change the A record to the new server’s IP address, or change the nameservers if you’re also moving DNS management to the new host.
This step remains common for both methods of migration, whether it is manual or plugin-based migration.
If you have trouble with DNS migration, then you can get help from our DNS guide.
Common Migration Errors and How to Fix Them.
Plugin Method (All-in-One WP Migration)
Import or export gets stuck or times out.
This is consistently the most-reported problem with this plugin, and the causes stack up in roughly this order of likelihood: PHP limits still too low (upload_max_filesize, post_max_size, max_execution_time, memory_limit), your hosting account running low on disk space, a site that’s large for your hosting tier, a slow connection, or a conflict with another active plugin. Start with the PHP limits, since that’s the most common cause, then check disk usage in cPanel and clear out old backups or unused plugins and themes if space is tight.
If you’ve genuinely fixed all of that and it’s still failing, real users have hit this exact wall: the upload completes fine, but the import throws an error right at 100%, even after correctly raising both PHP and web server limits. At that point, the bottleneck has moved somewhere those settings don’t reach, so skip the plugin upload entirely. Connect via FTP or from cPanel file manager, drop the .wpress file directly into wp-content/ai1wm-backups/ on the new site, then refresh the Import screen; the plugin will pick it up from there.
Manual Method
Raw folders listing, right after uploading your files.
You extracted the zip into a subfolder instead of directly inside public_html. Open File Manager and confirm wp-content and .htaccess are sitting directly inside public_html, not nested one level down.
Error establishing a database connection
WordPress can’t reach the database, which almost always traces back to wp-config.php. Either the database name, username, or password doesn’t match what you actually created, or the database user was never granted privileges on that database.
Too many redirects when you try to load the site.
This usually means your Site URL and Home URL don’t agree with each other, or SSL isn’t fully active yet on the new host. Recheck the “Fix the site URLs” step
A 500 Internal Server Error.
Almost always either a PHP version mismatch between your old and new host, or a corrupted .htaccess file from the transfer. Match the new host’s PHP version to what your old host was running, or regenerate .htaccess from Settings → Permalinks inside wp-admin.
A white screen after the site was already loading fine elsewhere.
This one’s usually a PHP memory limit that’s too low for what your site actually needs. Try raising WP_MEMORY_LIMIT that should fix the issue.
Either Method
A white screen with nothing on it
Almost always a PHP fatal error WordPress isn’t displaying. Enable WP_DEBUG in wp-config.php to see the actual error, and check that your PHP version is compatible with your theme and plugins.
404 errors on every page.
Your new server hasn’t generated the rewrite rules your permalinks depend on yet. Go to Settings → Permalinks in wp-admin and click Save, even without changing anything; that regenerates them.
Broken or missing images
This usually comes down to the wp-content/uploads folder not transferring completely, or landing with the wrong file permissions. Confirm the folder made it across in full, and that directories are set to 755 and files to 644.
Frequently Asked Questions
Can I migrate a WordPress site without a plugin?
Yes. The manual method covered in this guide, backing up files and the database through cPanel and phpMyAdmin, uploading them to the new host, and reconnecting everything through wp-config.php, doesn’t touch a plugin at all. It’s more steps but no limits.
Will migrating my site cause downtime?
Not if you follow the order in this guide. Since you set up and fully test the new site before touching DNS, your live site keeps running normally on the old host right up until the cutover.
Is All-in-One WP Migration’s free version actually enough for my site?
For most small to mid-sized sites, yes. As covered earlier in this guide, the free version doesn’t have a hardcoded size limit built into the plugin itself; what actually gates you is your hosting’s PHP upload settings.
Do I need to change nameservers to migrate hosting?
Not always. If you’re only changing where your site is hosted and keeping your existing DNS provider, updating your domain’s A record to the new server’s IP is enough. You only need to change nameservers if you’re also moving DNS management itself to your new host.
What’s the safest way to migrate WordPress site to shared hosting?
For small to medium sites, the plugin method is the safer choice; fewer steps means fewer chances to make a mistake. For large sites, the manual method is more robust: it breaks the transfer into smaller, individually recoverable steps instead of one all-or-nothing export/import that can fail after a long wait.
Conclusion
Both methods get you to the same place: your site running on a new host; the difference is where the friction shows up. The plugin method trades manual steps for a dependency, and it’s the faster path. The manual method skips that dependency entirely, but only pays off if you get each step right.
Pick manual if you want full control and don’t mind the extra steps. Pick the plugin if your site fits comfortably under the limits.
If you’d rather not do either yourself, a WordPress hosting provider like Kailash Cloud migrates your site for free on every hosting plan, handled directly by a team of professionals.