
Imagine opening your website one morning only to discover that it won’t load. A plugin update may have triggered a fatal error, an important folder could have been deleted by mistake, your database might be corrupted, or your website may even have been hacked overnight. Whatever the cause, seeing your website offline is stressful, especially if it brings in leads, sales, or supports your business every day.
know the reason behind why website get hacked.
The good news is that if your hosting provider takes regular backups, recovering your website is usually much easier than you think.
In this guide, you’ll learn how to restore a website from backup using JetBackup in cPanel. We’ll walk you through every restore option, including recovering your entire website, restoring only website files, bringing back a database, or recovering deleted email accounts.
More importantly, you’ll learn when to use each restore option. Choosing the wrong restore method can overwrite recent files, database changes, or emails that you actually wanted to keep. By the end of this guide, you’ll know exactly which backup to restore and how to do it safely.
Whether you run a WordPress blog, a business website, or an online store, this step by step guide will help you recover your website with confidence.
Quick Answer: How to Restore Website data from Backup
To restore website data from backup, Follow these steps:
- Log in to cPanel
- Open JetBackup 5
- Choose Full Backups, Home Directory, Database, or Email Accounts as per your requirement
- Select a backup created before the issue occurred
- Click Restore.
Why Website Backups Matter
Most website owners don’t think about backups until something goes wrong. It’s only after a website crashes, files disappear, or a database becomes corrupted that they realize how valuable a recent backup can be.
Here are some of the most common situations where backups become your lifeline.
Accidental File Deletion
You (or your developer) deleted files, a folder, or an entire database by mistake. It happens more often than you’d think, especially when multiple people manage one hosting account.
Instead of rebuilding everything manually, you can restore the missing files from a recent backup and get your website running again within minutes.
Website Hacked or Infected with Malware
Your WordPress site suddenly redirects visitors to spam pages, display unwanted advertisements, or even be flagged by Google as unsafe.
If you have a clean backup created before the attack, restoring it is often the fastest way to recover your website. Once the restore is complete, remember to update WordPress, themes, plugins, and change all passwords to prevent the same vulnerability from being exploited again.
Failed WordPress Updates
A theme, plugin, or PHP version update goes wrong and now you’re staring at the dreaded WordPress white screen of death. A quick restore from backup fixes in minutes what could take hours to debug.
Database Corruption
If the database becomes corrupted because of a failed migration, a bad SQL query, or a faulty plugin, restoring only the database is often the safest solution.
Deleted Email Accounts
If an email account or mailbox is deleted accidentally, backups can help you recover those messages without affecting your website.
Understanding the Four Types of Website Backup Restores
Before restoring your website, it’s important to understand what you’re restoring.
Many website owners assume they should restore the entire website whenever something goes wrong. In reality, that’s often unnecessary and can even cause you to lose recent changes.
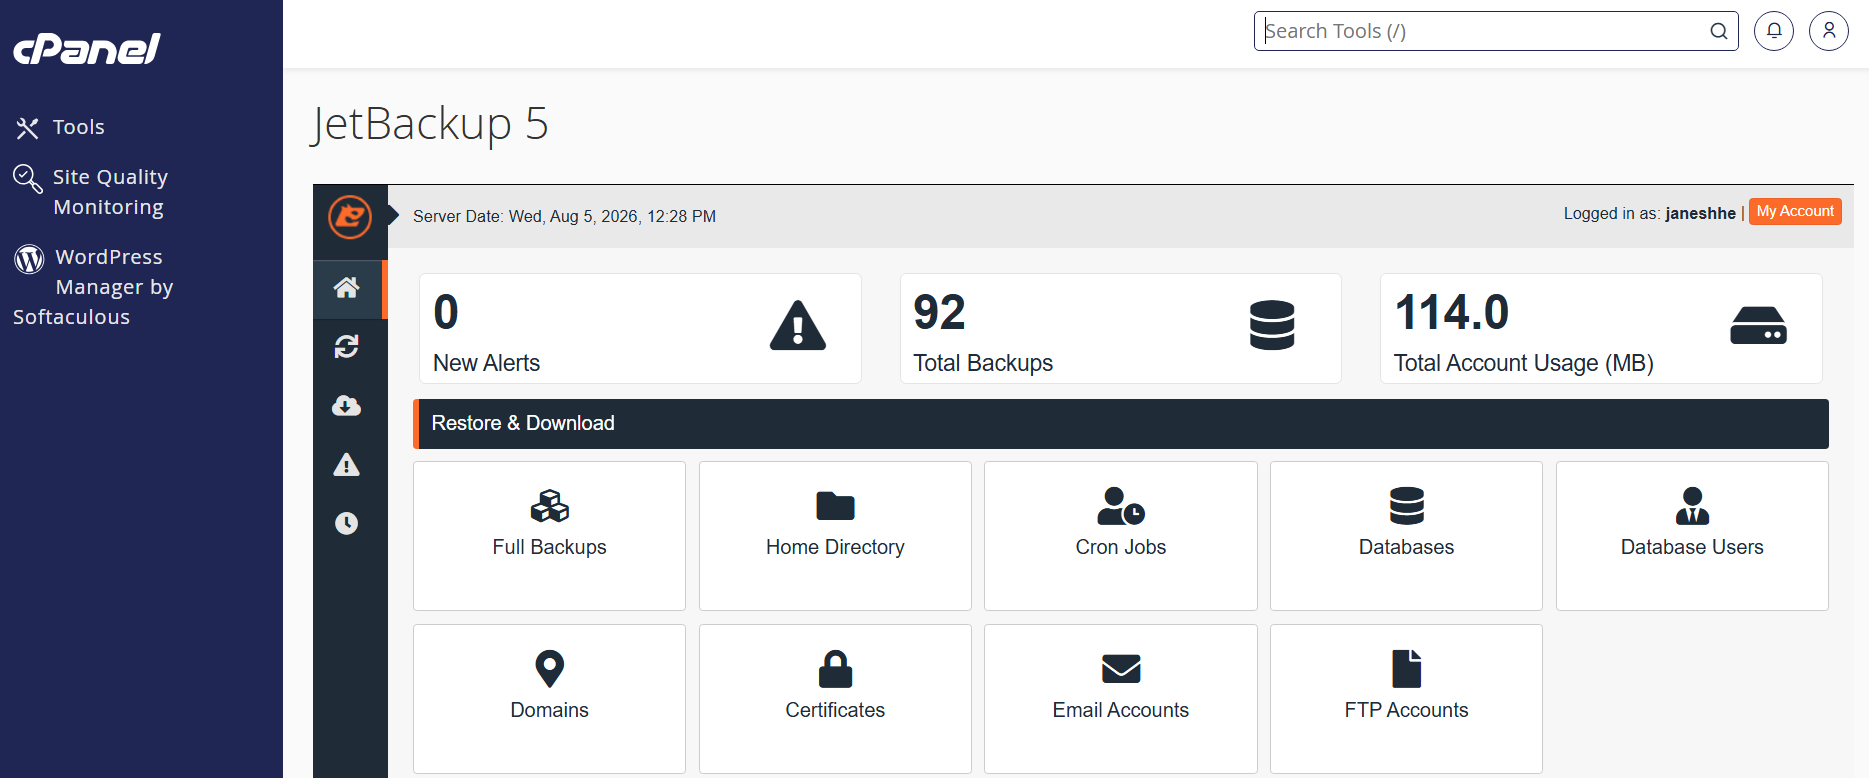
JetBackup lets you restore different parts of your hosting account individually. Choosing the right restore type helps you recover faster while protecting the rest of your data.
The table below explains what each restore option does and when you should use it.
| Restore Type | What it Recovers | When to Use it |
| Full Account Restore | Website files, databases, email accounts, DNS settings, cron jobs | Total site failure, major hack, server-wide corruption |
| Files / Home Directory Restore | Website files only (themes, plugins, uploads, code) | Deleted files, corrupted theme/plugin, defaced pages |
| Database Restore | MySQL database only (posts, pages, users, orders, settings) | Deleted posts/products, corrupted tables, bad SQL query |
| Email Restore | Email accounts and messages only | Deleted email account or lost messages |
Restore Only What You Need
One of the most common mistakes is restoring the entire hosting account when only a single component is affected.
For example, imagine you’ve uploaded dozens of new product images today, but someone accidentally deleted several blog posts yesterday. If you perform a full account restore, those newly uploaded images could also be replaced with older versions from the backup.
A database restore would recover the missing blog posts while keeping your latest images intact.
Similarly:
- If only your images or website files are missing, restore the Home Directory.
- If your website content has disappeared but the design still loads correctly, restore the Database.
- If an email account was deleted, restore only the Email backup.
- If your entire website is inaccessible because of malware, accidental deletion, or severe corruption, choose a Full Account Restore.
The golden rule of restoring: Restore the smallest component that fixes the problem.
This approach minimizes downtime and reduces the risk of overwriting recent data that doesn’t need to be restored.
Before You Restore Your Website: 3 Quick Checks
Taking a minute to prepare before restoring your backup can save hours of troubleshooting later.
Here are three things you should always check first.
Identify what’s actually broken
Start by determining which part of your website is affected.
Ask yourself questions like:
- Is the entire website offline?
- Are only some images missing?
- Did blog posts or products disappear?
- Has an email account been deleted?
- Did the issue begin after updating a plugin or theme?
Understanding the problem helps you choose the correct restore option.
Choose the Right Restore Point
Every backup represents your website at a specific date and time.
Always choose a backup created before the issue occurred.
For example, if your website was hacked on Friday morning, restoring Friday night’s backup may simply restore the hacked version again. Instead, choose a backup from Thursday or earlier.
The closer the restore point is to the incident, the less recent data you’ll lose.
Know what you’ll lose
When you restore a backup, JetBackup replaces the selected component with the version stored in that backup.
Depending on what you restore, this may remove:
- Recently published blog posts
- New WooCommerce orders
- Newly uploaded images
- Recent emails
- Updated website settings
If your website receives regular visitors or customer orders, it’s a good idea to export or document any important changes made after the backup date before starting the restore process.
Method 1: How to Restore a Website from Backup (Full Account Restore)
A Full Account Restore is the quickest way to recover your entire website when multiple components are affected.
This restore option replaces your current hosting account with a previous backup, including website files, databases, email accounts, DNS settings, cron jobs, and other account configurations.
When Should You Use a Full Account Restore?
Choose a Full Account Restore if:
- Your website has been completely deleted.
- Your website was hacked and multiple files were infected.
- A failed migration damaged your entire website.
- Multiple databases or website files are missing.
- Your website no longer loads after major changes.
Step-by-Step: Full Account Restore with JetBackup
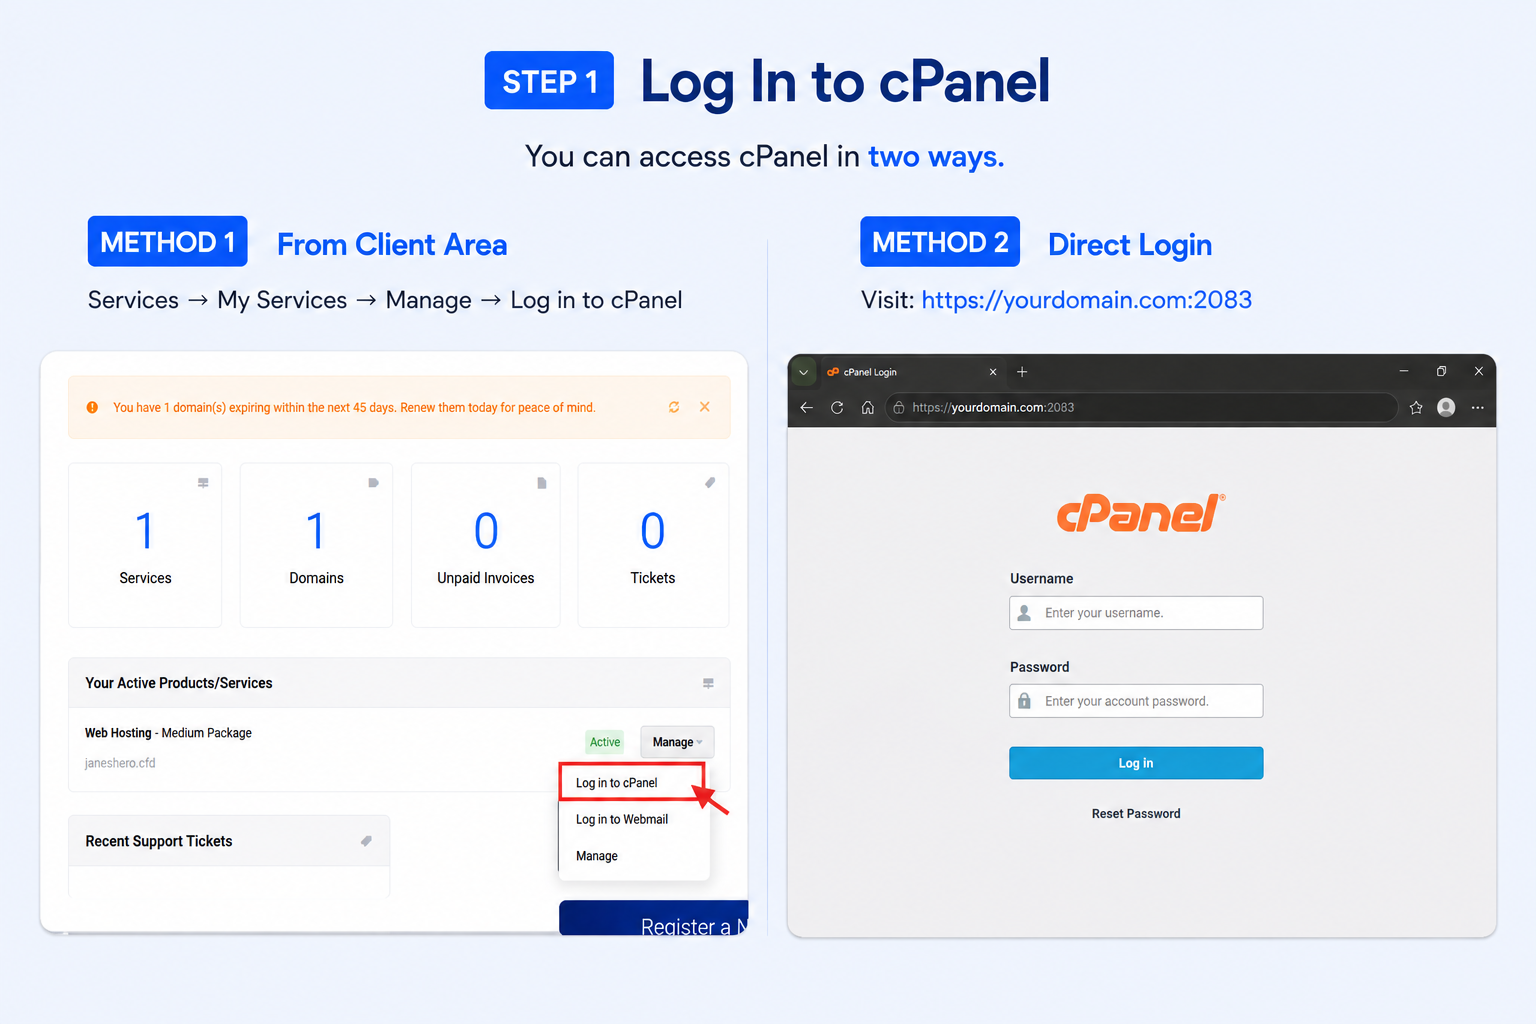
Step 1: Log in to cPanel
Access your cPanel by visiting yourdomain.com/cpanel or yourdomain.com:2083 or logging in through your hosting provider’s Client Area and navigating to Services → Manage → Log in to cPanel.
Step 2: Open JetBackup
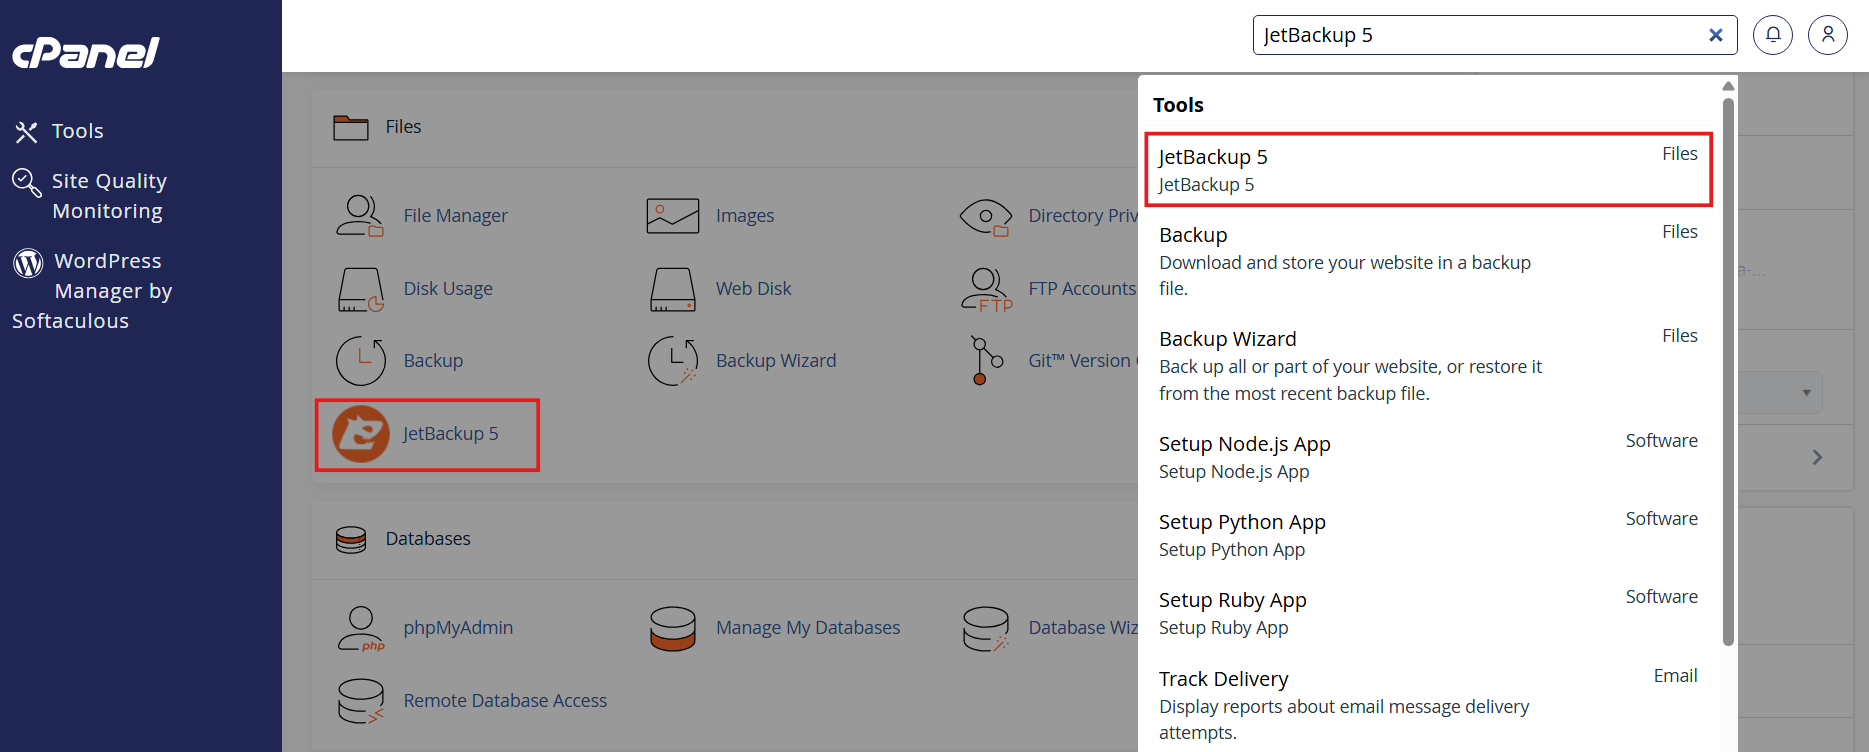
Scroll to the Files section (or use the search bar) and click “JetBackup 5“.
Step 3: Open Full Account Backups
After opening JetBackup, you’ll see several backup options.
Click “Full Backups“.
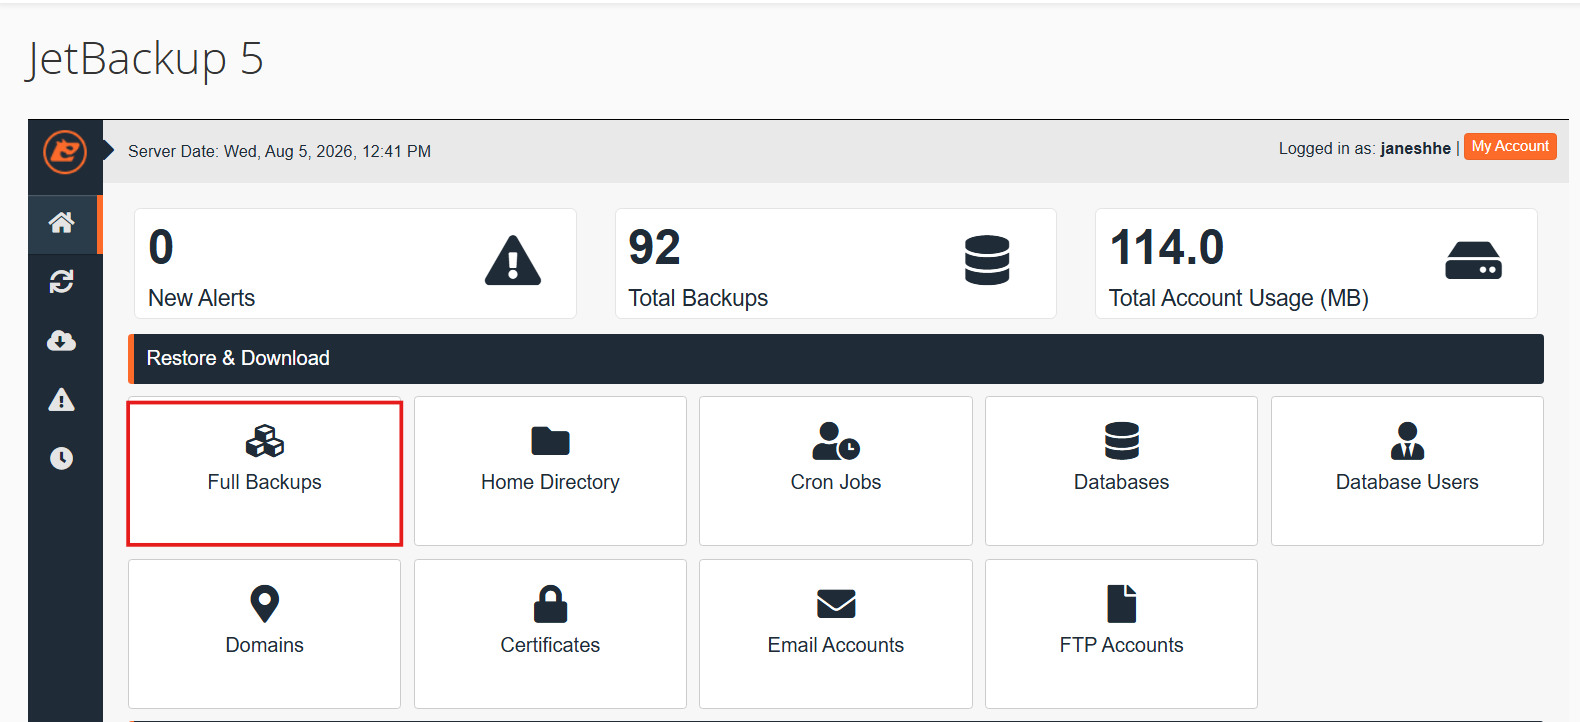
This section displays every available backup for your hosting account, along with the date and time each backup was created.
If your hosting provider performs automatic backups, you’ll usually see multiple restore points to choose from.
Step 4: Choose the Correct Backup
Take a moment to select the right restore point.
Always choose a backup created before the issue occurred.
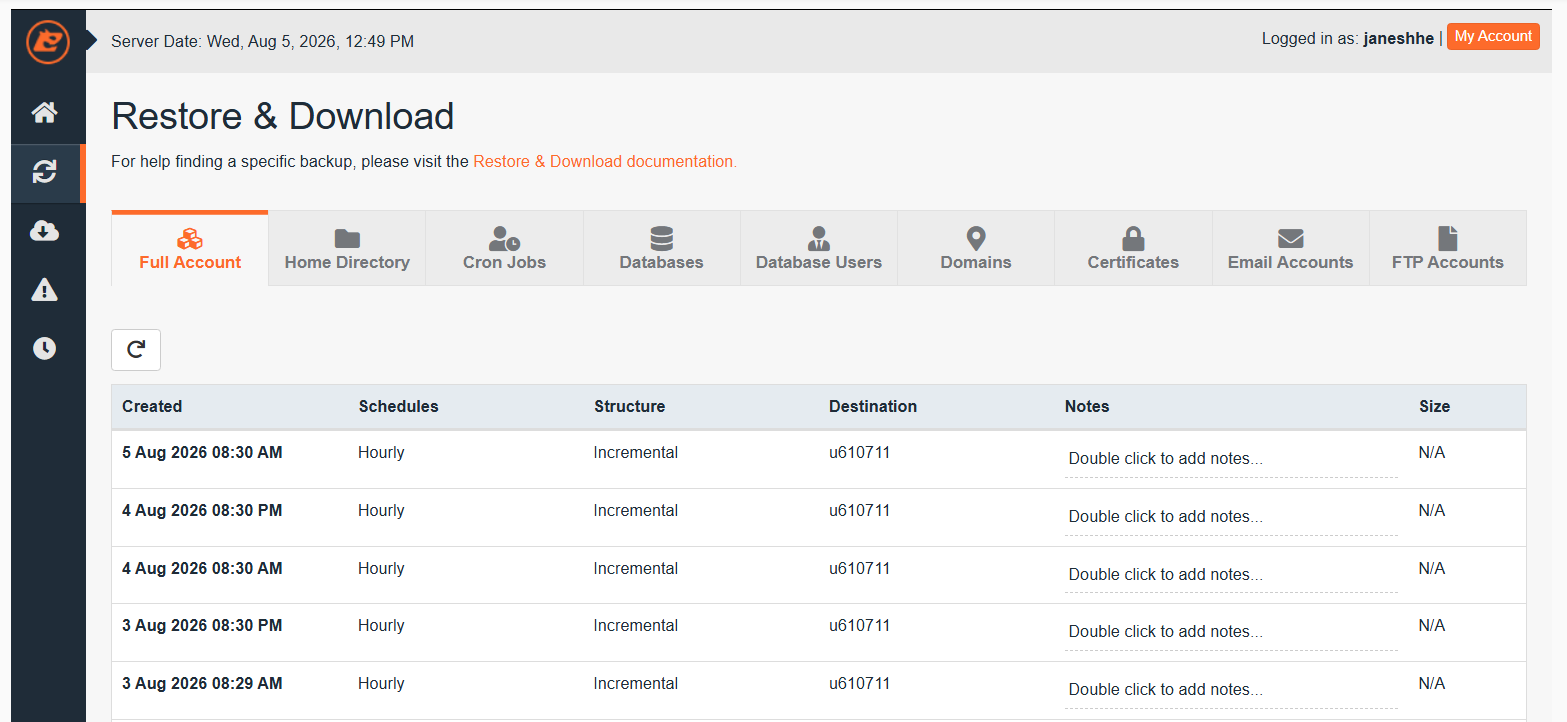
Step 5: Review the Restore Summary
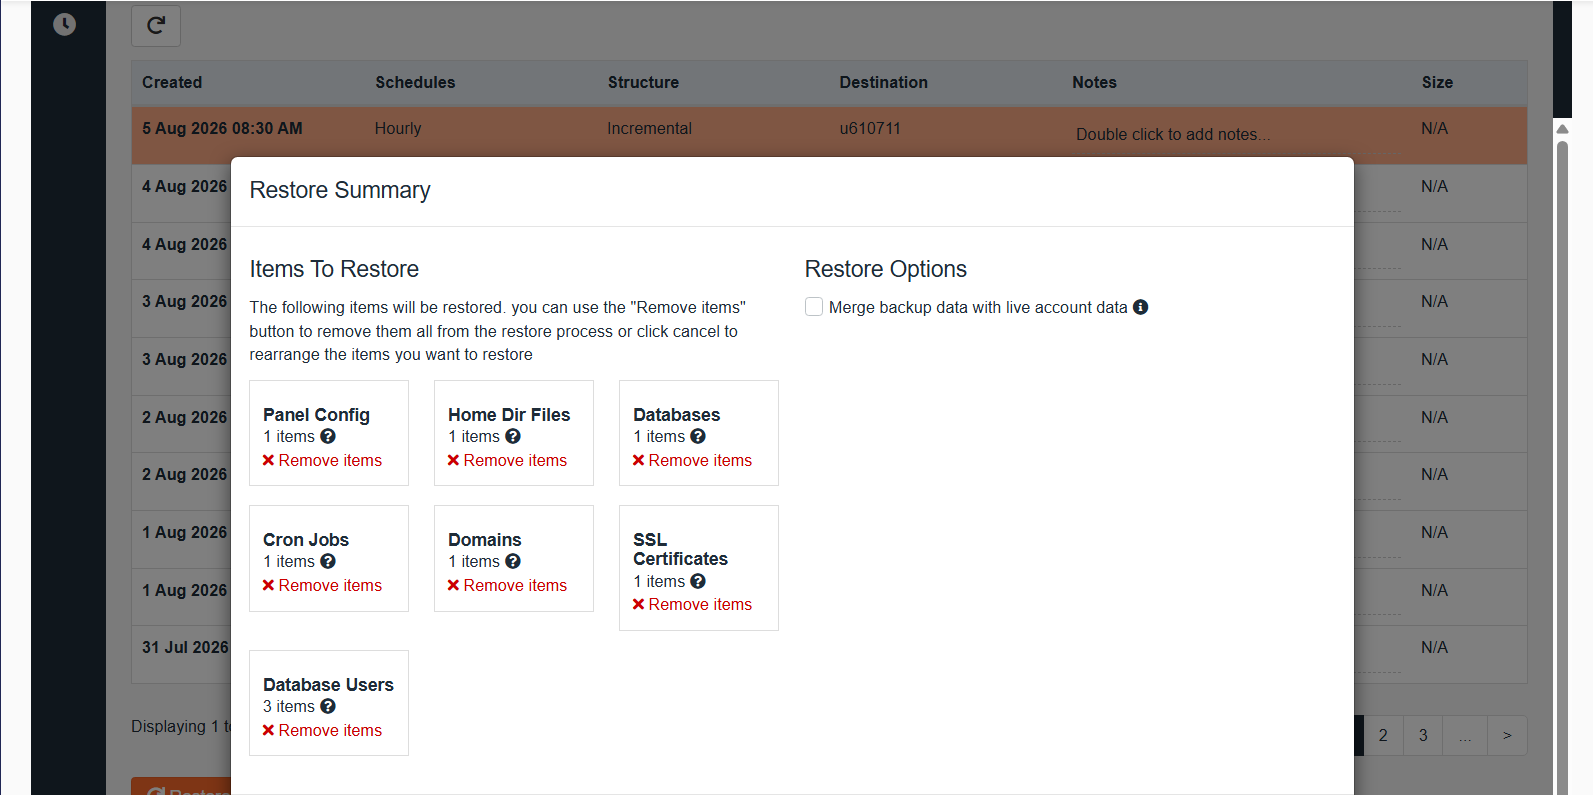
Scroll to the bottom and click “Restore“.
JetBackup displays a “Restore Summary“, showing everything that will be replaced.
Review this information carefully before continuing.
Once the restore starts, your current account data will be replaced with the selected backup.
If you’re managing a live business website, double-check that you’ve selected the correct backup.
Step 6: Start the Restore Process
Scroll to the bottom and Click “Restore Selected Items” to begin.
JetBackup adds the restore task to its processing queue.
The time required depends on your website size.
Small sites finish in 2–5 minutes; large sites with many images may take longer.
Avoid making changes to your website while the restore is running.
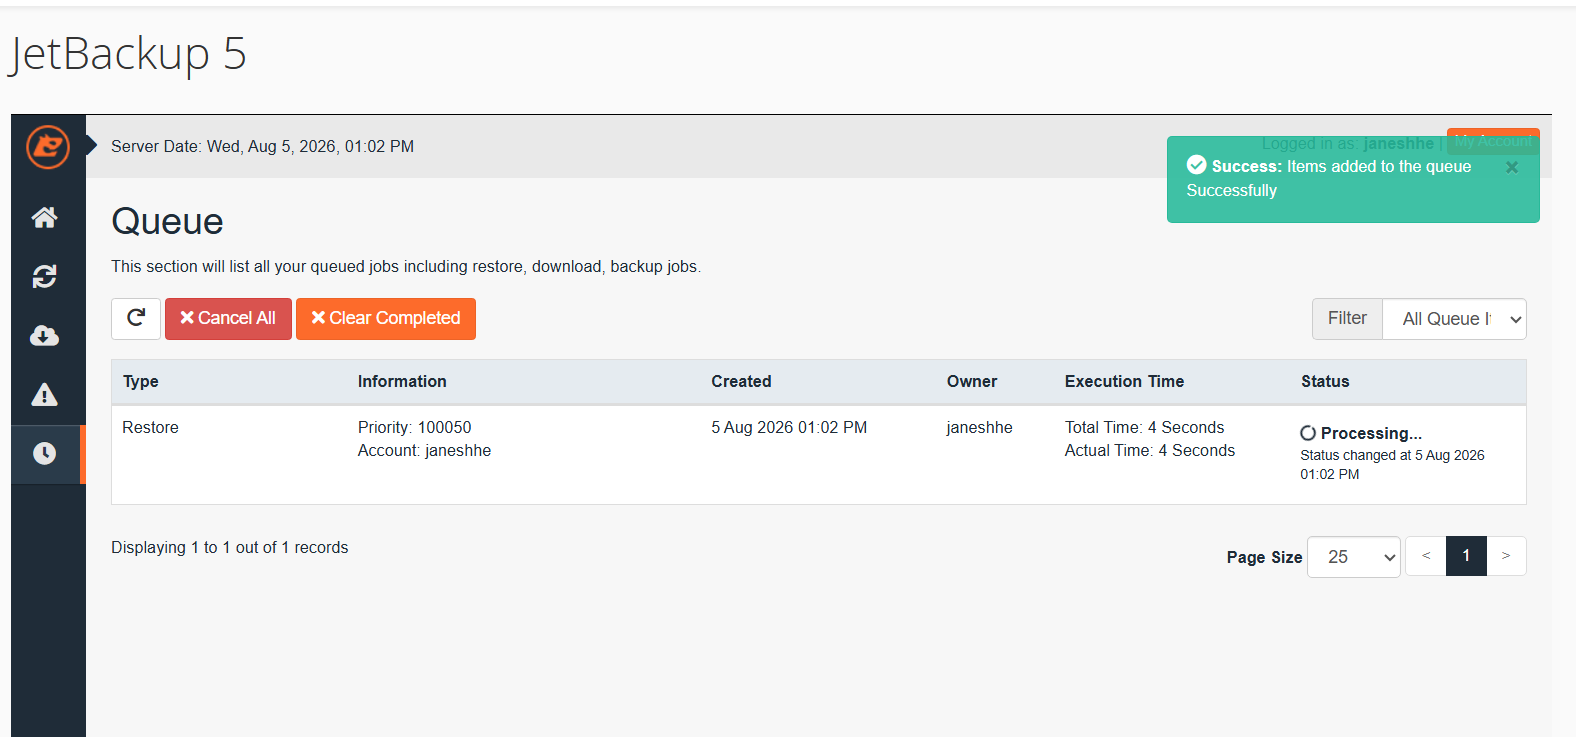
Step 7: Monitor the Restore Progress
Open the “Queue” section inside JetBackup.
You’ll be able to monitor the progress in real time.
Wait until the status changes to Completed before opening your website.
Step 8: Verify That Everything Is Working
Once the restore finishes, test your website carefully.
Check the following:
- Homepage loads correctly.
- Navigation menu works.
- Images appear properly.
- Contact forms are working.
- Blog posts are accessible.
- WooCommerce checkout works, if applicable.
- WordPress admin login is successful.
It’s also a good idea to open your website in an Incognito or Private Browsing window to avoid seeing a cached version. If your website uses a CDN like Cloudflare, clear the cache before testing.
If the padlock/HTTPS breaks after restore then reactivate your SSL certificate.
⚠️ Important: A full account restore first removes the current account data and replaces it with the backup. This cannot be undone, so double-check your restore point before confirming.
Method 2: How to Restore Deleted Website Files in cPanel (Home Directory Restore)
Sometimes, your website doesn’t need a complete restore.
Maybe you accidentally deleted an important folder, updated a plugin that broke your website, or replaced a configuration file with the wrong version. In these situations, restoring only your website files is usually the safest and fastest solution.
A Home Directory Restore recovers your website files without affecting your database, email accounts, or other hosting settings. That means your latest blog posts, WooCommerce orders, and emails remain untouched.
When Should You Restore Website Files?
A Home Directory Restore is the right choice when:
- You accidentally deleted website files or folders.
- Images or media files disappeared from your website.
- A WordPress theme or plugin became corrupted after an update.
- You edited files like
.htaccessorwp-config.phpand your website stopped working. - Your website layout is broken, but your posts, pages, and products are still available.
💡 Tip: If you’re only missing a few files, you don’t need to restore the entire Home Directory. JetBackup allows you to recover individual files or folders, helping you avoid unnecessary changes to your website.
Option A: Restore the Entire Home Directory
If multiple website files are damaged or missing, restoring the complete Home Directory is the quickest solution.
Step 1: Open JetBackup
Log in to cPanel and open JetBackup 5.
Click “Full Backups” (or “Restore & Download“), then select the “Home Directory” tab.
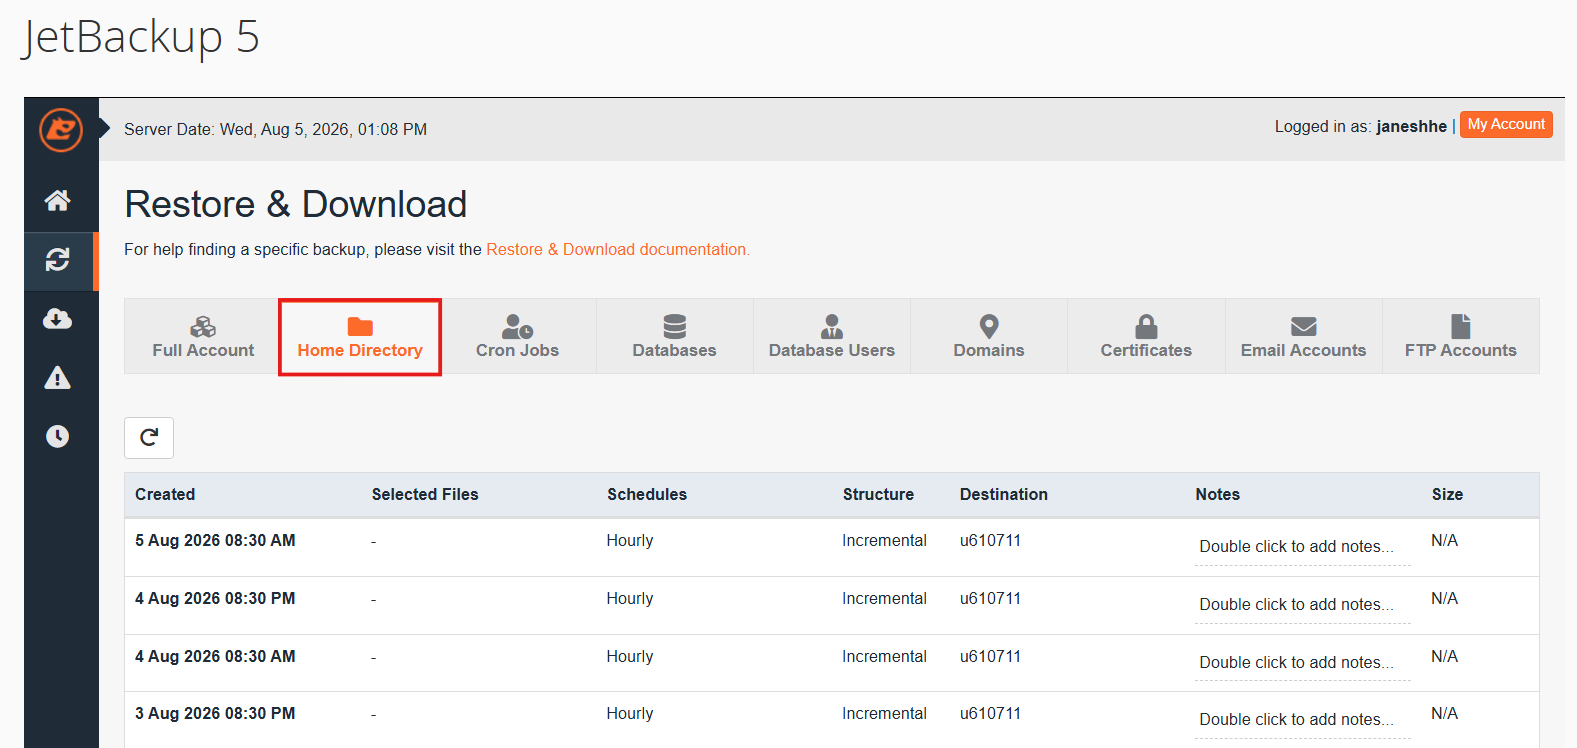
Step 2: Choose a Backup
Select a backup created before the issue occurred.
If you’re unsure which backup to choose, compare the backup date with the time the problem started.
For example:
- Deleted files yesterday? Restore the backup from the previous day.
- Website broke after updating a plugin? Choose a backup created before the update.
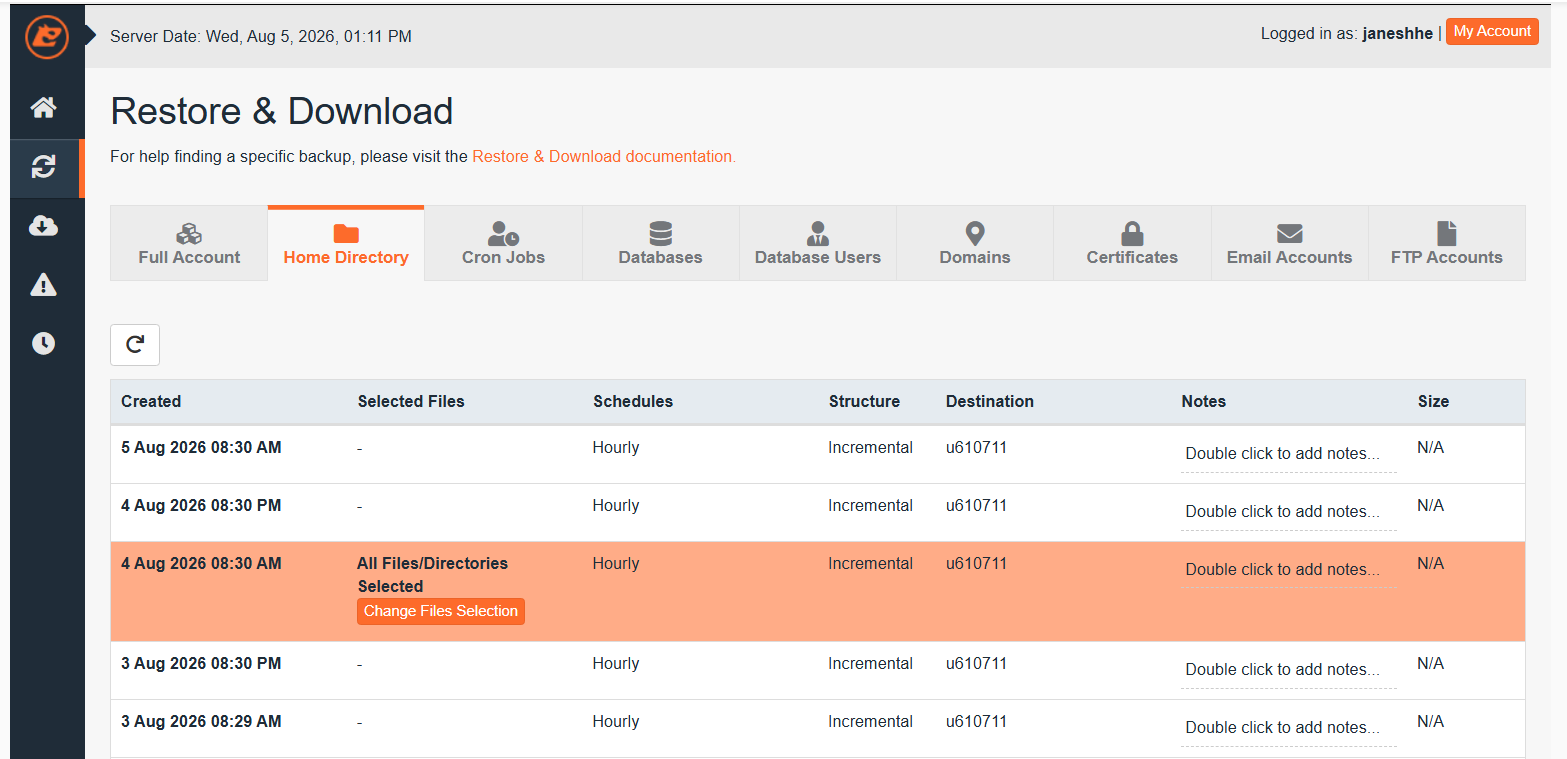
Step 3: Start the Restore
Scroll to the bottom and Click “Restore“.
Review the “Restore summary” to confirm you’re restoring the correct backup.
Once everything looks correct, click “Restore Selected Items“.
JetBackup will begin restoring your website files.
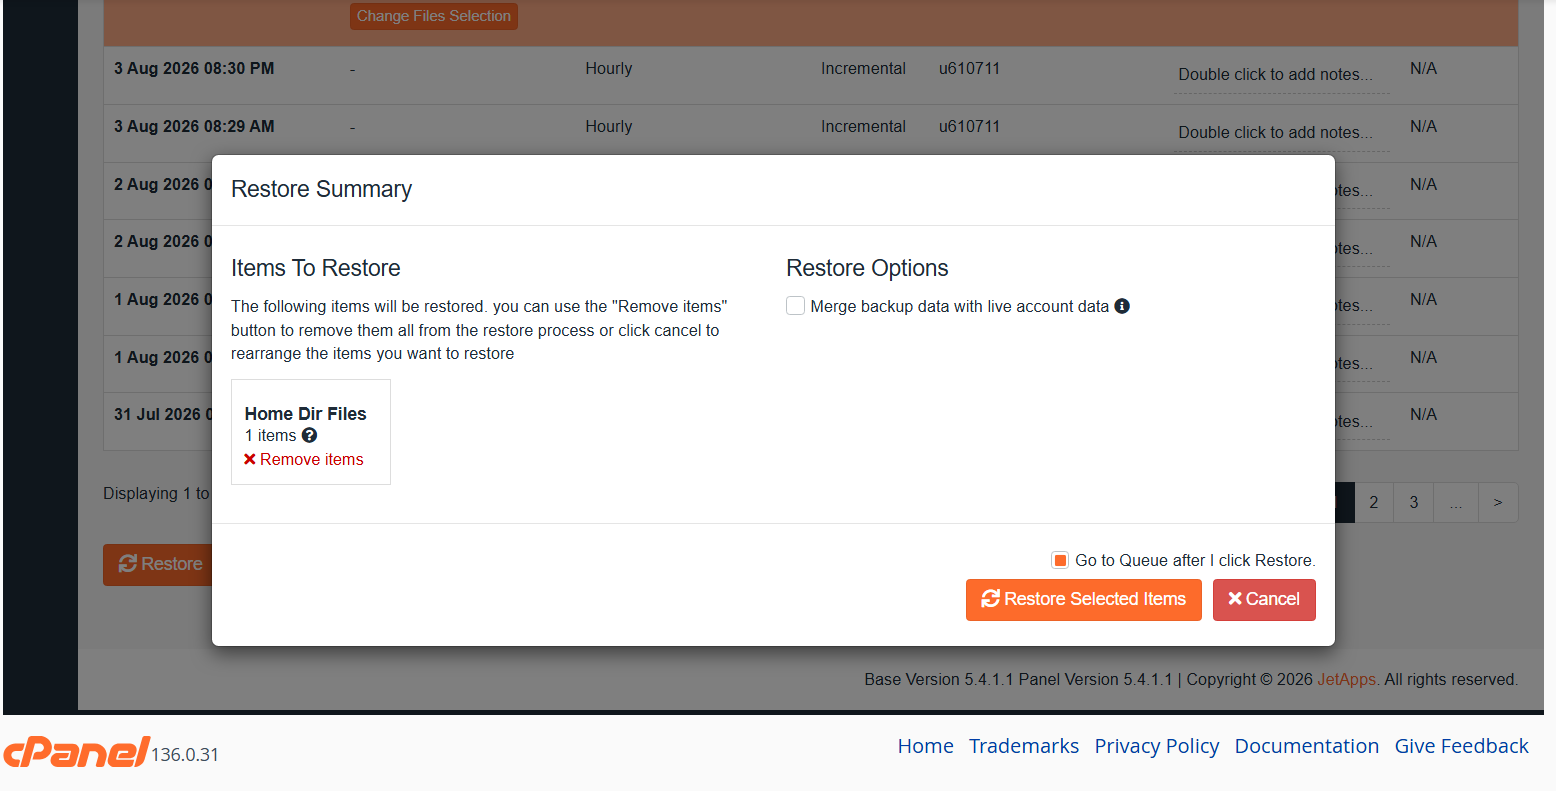
Step 4: Verify Your Website
After the restore finishes:
- Refresh your website.
- Check that missing images have returned.
- Confirm your theme loads correctly.
- Test important pages.
- Clear your browser cache if necessary.
If everything looks normal, your website files have been successfully restored.
Option B: Restore Specific Files or Folders (The Smart Way)
One of JetBackup’s most useful features is the ability to restore only the files you actually need.
Instead of restoring your entire website, you can recover a single image, plugin, theme, or folder.
This minimizes downtime and reduces the risk of replacing recent changes.
Step 1: Open File Backups
In “JetBackup“, go to “Restore & Download” and select “Home Directory“.
Choose your preferred backup date.
Click the “Change Files Selection” button near the selected backup.
JetBackup will display your backup using a file manager interface similar to cPanel’s File Manager.
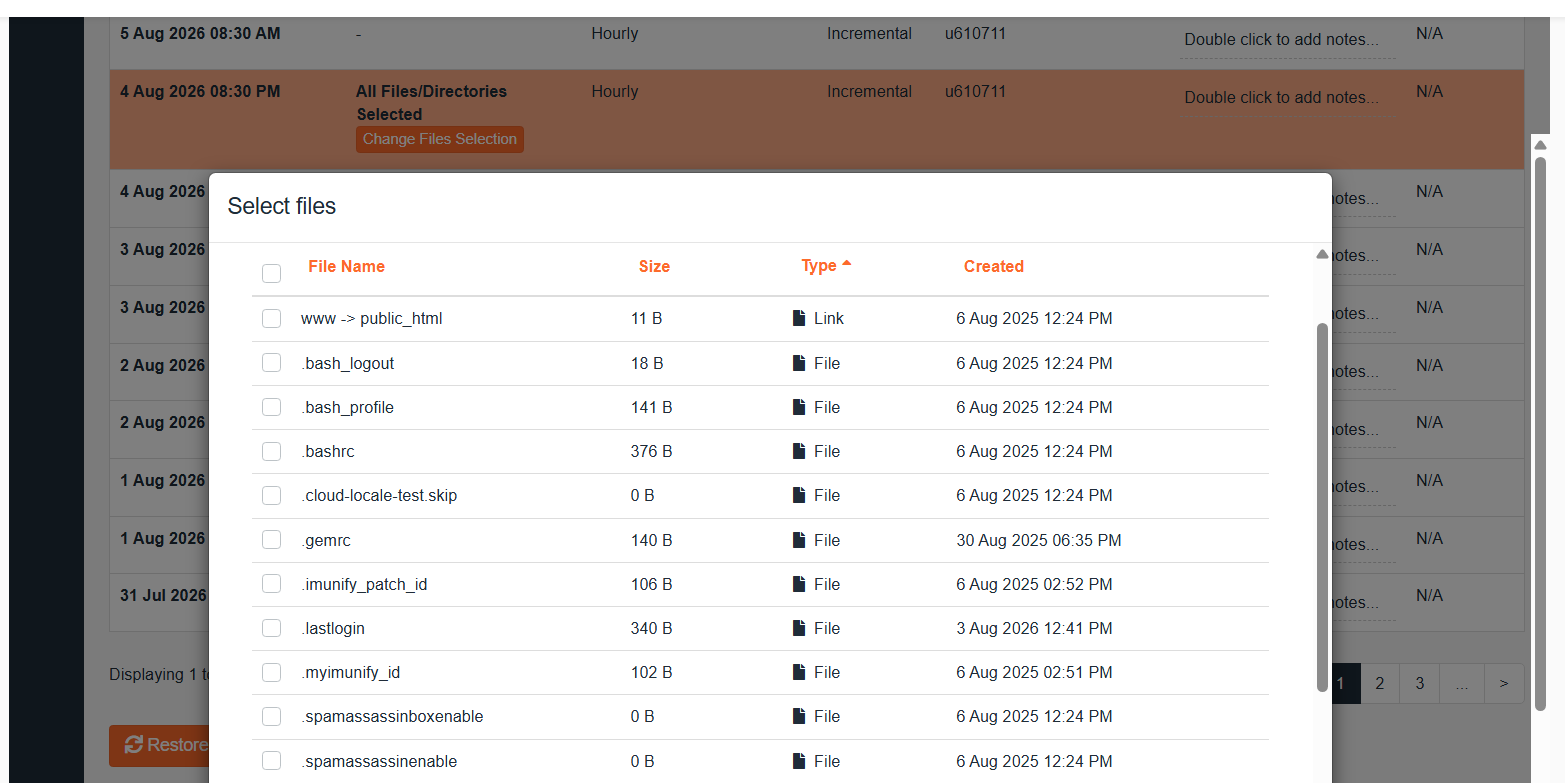
Step 2: Browse to the Missing File
Navigate through the backup just as you would inside File Manager.
Locate the file or folder you want to restore.
Tick the checkbox next to the file(s) or folder(s), then click “Select Files“.
Step 3: Restore Selected Files
Click “Restore” and confirm.
Once everything looks correct, click “Restore Selected Items“.
JetBackup will begin restoring your website files.
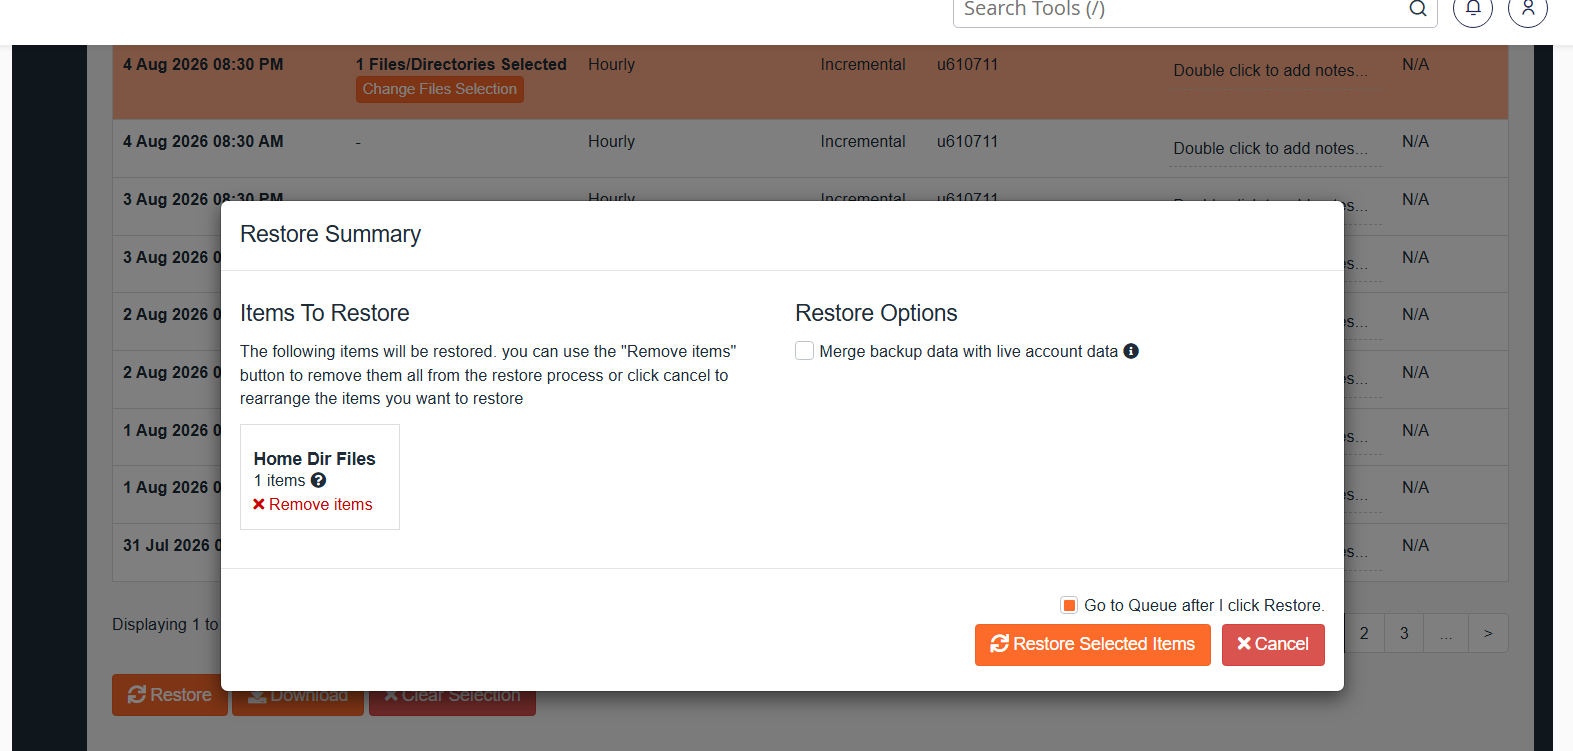
Real example
Suppose you accidentally deleted your June product images while cleaning your uploads folder.
Instead of restoring your entire website, you can simply restore:
public_html/wp-content/uploads/2026/06/Only the deleted images will be recovered.
Everything else, including new products, blog posts, and website changes, will remain exactly as they are.
This targeted approach is faster, safer, and recommended whenever possible.
💡 Tip: You can also click Download instead of Restore to save a copy of the backup files to your computer first. Downloading a backup first provides an additional layer of safety, especially when working on production websites.
Method 3: How to Recover Deleted Database (Database-Only Restore)
A website is made up of two main components: files and a database.
Your website files include themes, plugins, images, CSS, JavaScript, and configuration files. The database, on the other hand, stores your website’s content and settings.
If your website loads but your blog posts, pages, products, or user accounts are missing, the problem is usually with the database, not the website files.
In this situation, restoring only the database is the safest option because it leaves your website files untouched.
When to Restore Only the Database (Not a Full Backup)
Restore just the database when:
- You need to recover a deleted database or database table (e.g., someone dropped a table in phpMyAdmin)
- Posts, pages, products, or orders disappeared but the site itself loads fine
- You ran a bad SQL query or a bulk edit/plugin corrupted your content
- You see “Error establishing a database connection” caused by corrupted tables (not wrong credentials)
- A migration or search-replace operation scrambled your URLs or settings
- Site settings/users were changed maliciously, but files are clean
Why not just do a full restore?
Because a full restore would also roll back your files and emails. Imagine you spent yesterday uploading 50 product images and today someone corrupted the database. A full restore fixes the database but deletes those 50 images. A database-only restore fixes the content and keeps your images. Restore only what’s broken.
Conversely, Restore the FULL backup (not just the database)
When your site was hacked. Malware lives in files (injected PHP, backdoors in plugins), and hackers often modify both files and database. Restoring only the database would leave the infected files in place, and you’d be re-hacked within days.
Step-by-Step: Database Restore with JetBackup
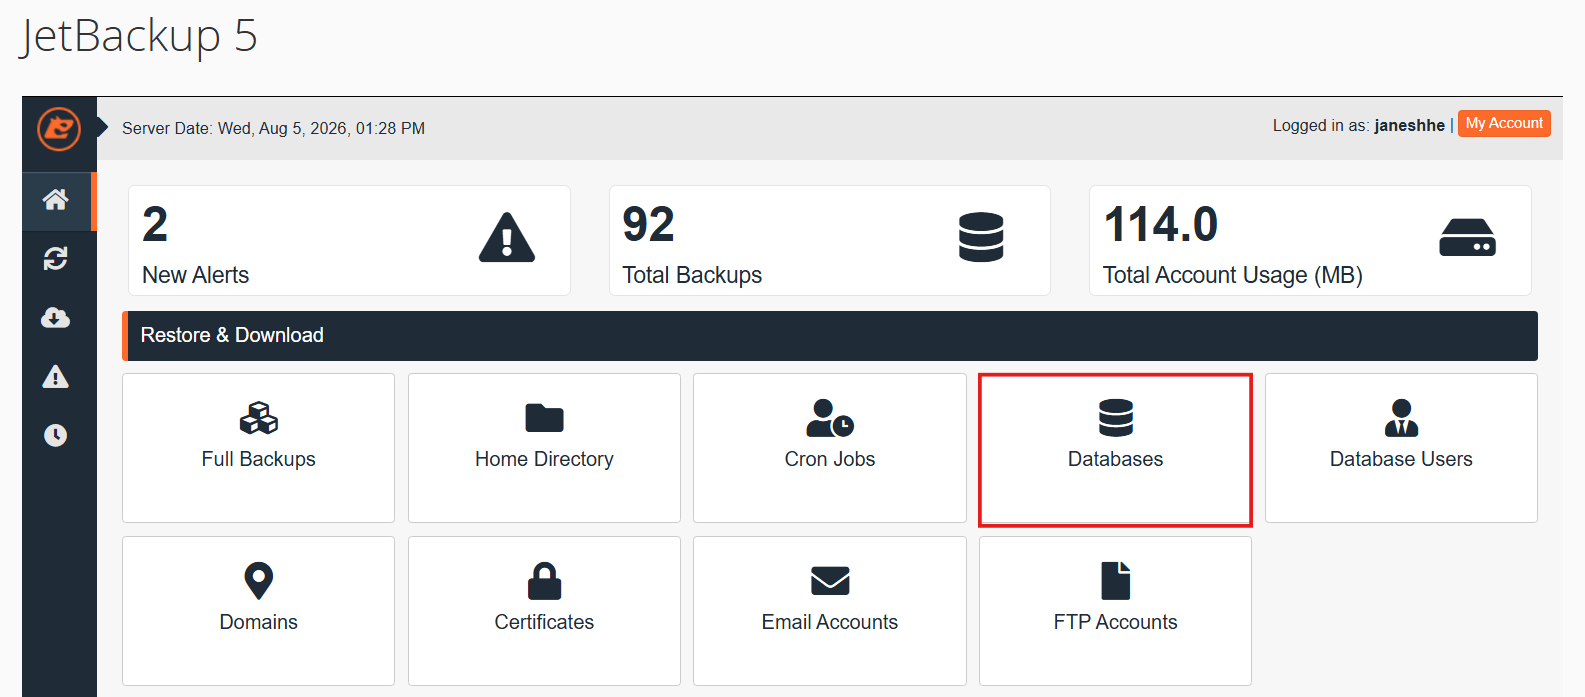
Step 1: Open Database Backups
Log in to cPanel and open “JetBackup 5“.
Click “Database Backups” (or “Restore & Download“ → “Databases“).
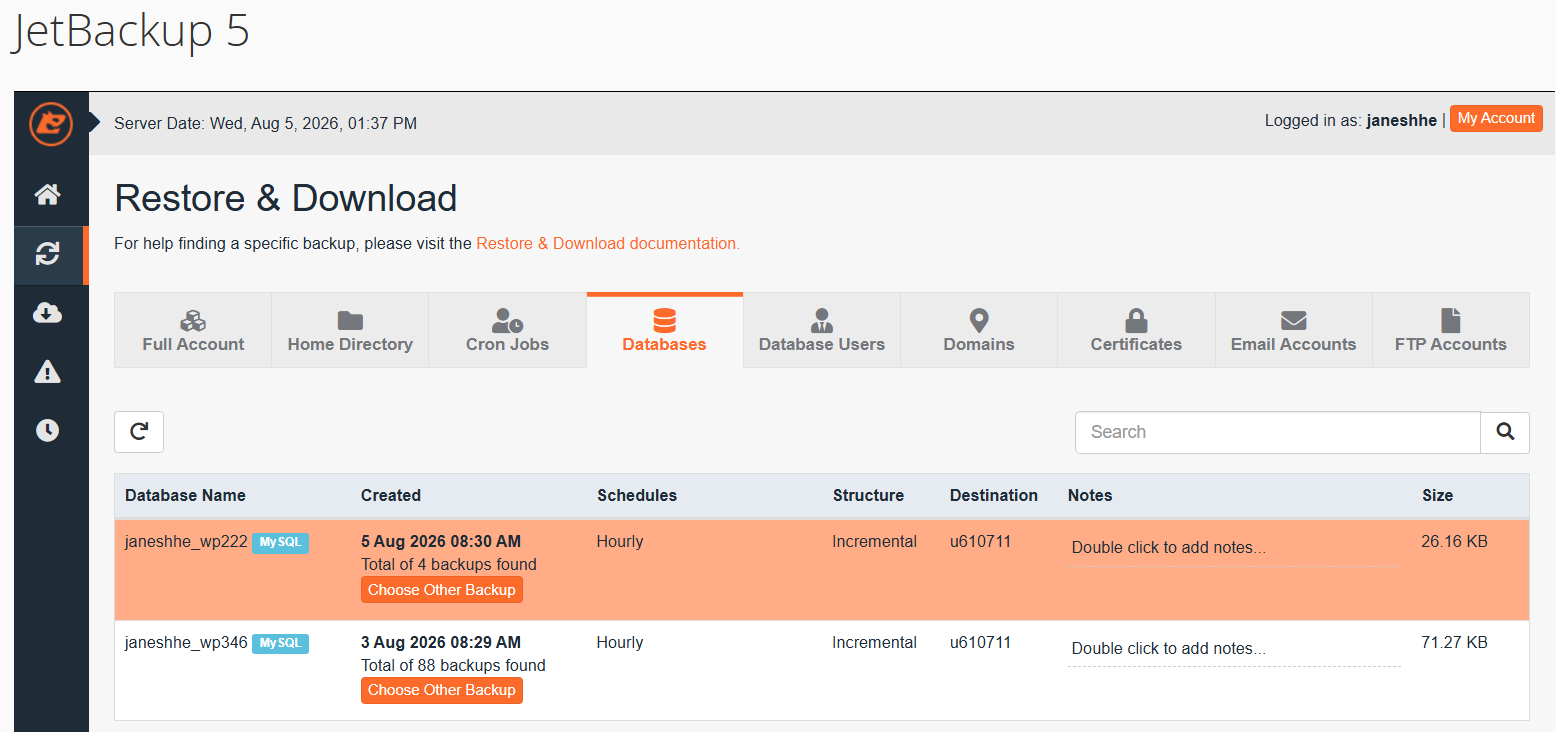
You’ll see a list of all databases associated with your hosting account.
If you host multiple websites under the same account, you’ll see multiple database names.
Step 2: Select the Correct Database
Choose the database you want to restore.
If you’re unsure which database belongs to your WordPress website, you can find its name inside the wp-config.php file.
Look for this line:
define('DB_NAME', 'your_database_name');The value shown after DB_NAME is the database connected to your website.
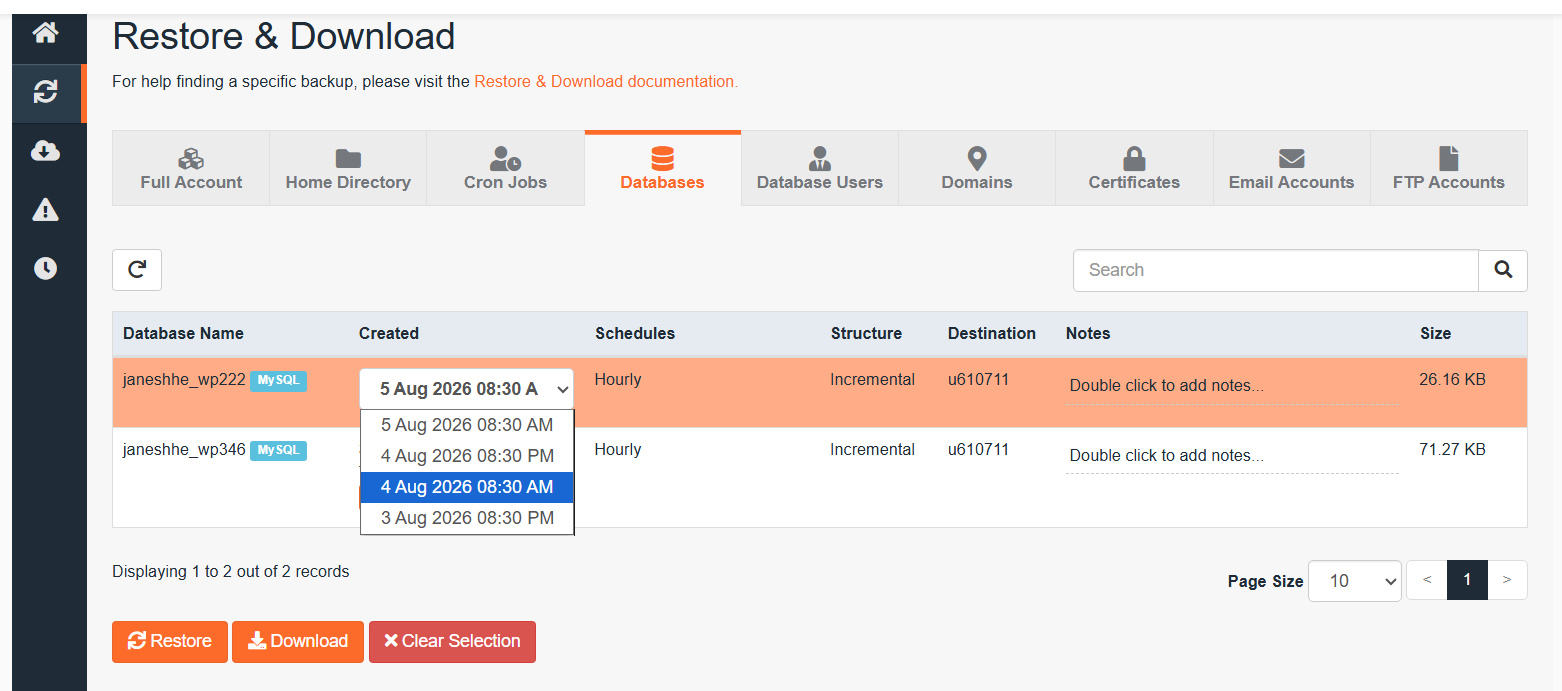
Step 3: Choose a Restore Point
Click “Choose Other Backup” if you want to restore a database from an earlier backup.
Select a backup created before the issue occurred.
For example:
- Products disappeared today? Choose yesterday’s backup.
- Database became corrupted after importing data? Select a backup created before the import.
Choosing the correct restore point helps prevent restoring the same issue again.
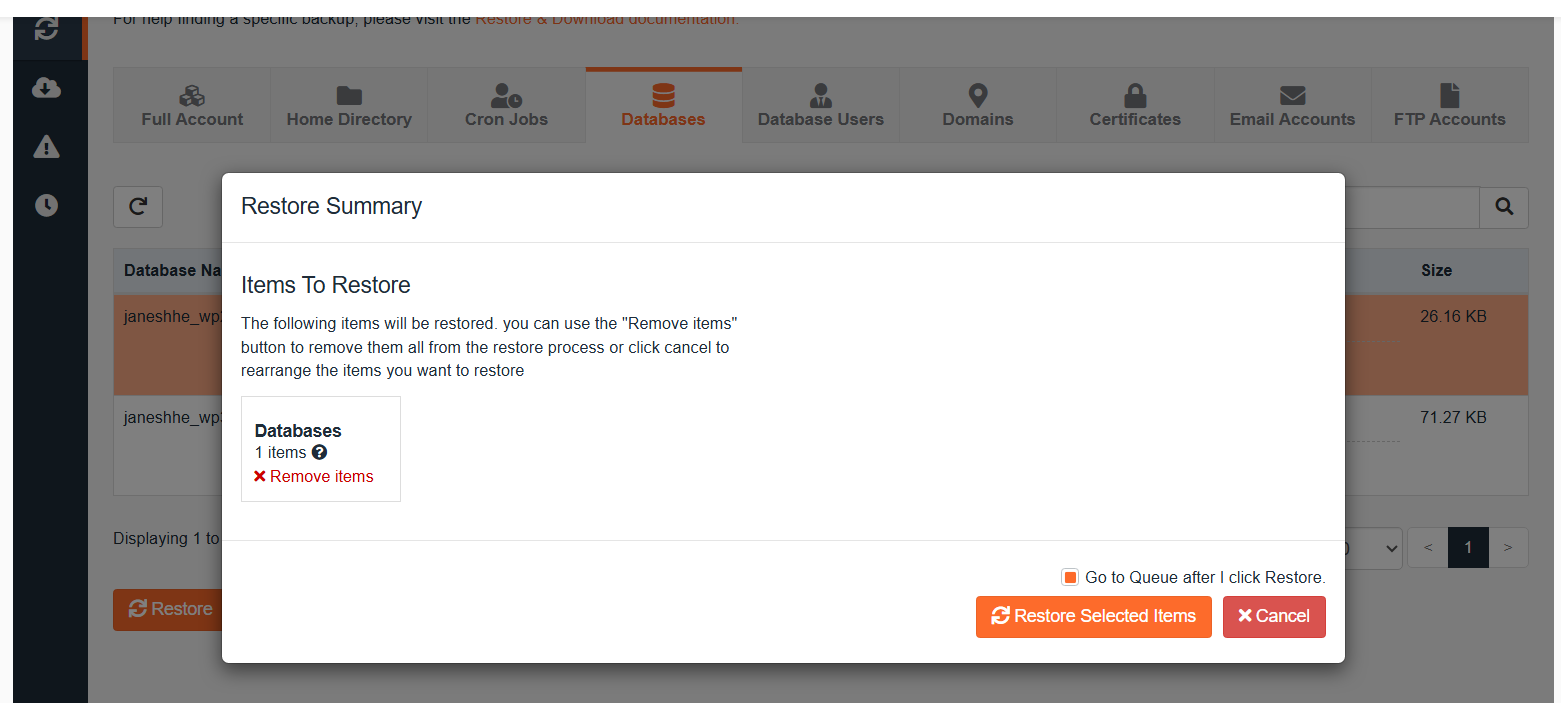
Step 4: Start the Database Restore
Click “Restore“.
Review the restore summary carefully.
If everything looks correct, click “Restore Selected Items“.
JetBackup will add the restore request to its processing queue.
Most database restores complete within a minute, although larger databases may take slightly longer.
Step 5: Verify Your Website
After the restore is complete, refresh your website and check that your content has returned.
Verify:
- Blog posts
- Pages
- WooCommerce products
- Customer orders
- Website settings
- User accounts
If you’re using a caching plugin or Cloudflare, clear the cache before checking the website.
Real Example
Suppose you accidentally deleted several WooCommerce products while updating your online store.
Your product images are still available, and the website design looks normal. Only the products are missing.
Instead of restoring the entire website, restore only the database.
This brings back your products, categories, and settings while preserving recently uploaded images and other website files.
Method 4: How to Restore Email Accounts from Backup (Email-Only Restore)
Losing access to an important business email account can be just as disruptive as losing your website.
Whether an email account was deleted accidentally or important messages disappeared from your inbox, JetBackup allows you to restore email accounts without affecting your website files or database.
This restore option is useful for businesses that rely on email communication with customers, suppliers, or team members.
When Should You Restore Email Accounts?
An Email Restore is the right choice if:
- An email account was accidentally deleted from cPanel.
- Important emails or folders were removed from Webmail.
- An email account stopped working after accidental changes.
- You need to recover mailbox data from a previous backup.
If your website is also experiencing issues, determine whether you need to restore only the email account or perform a Full Account Restore.
Step-by-Step: Email Restore with JetBackup
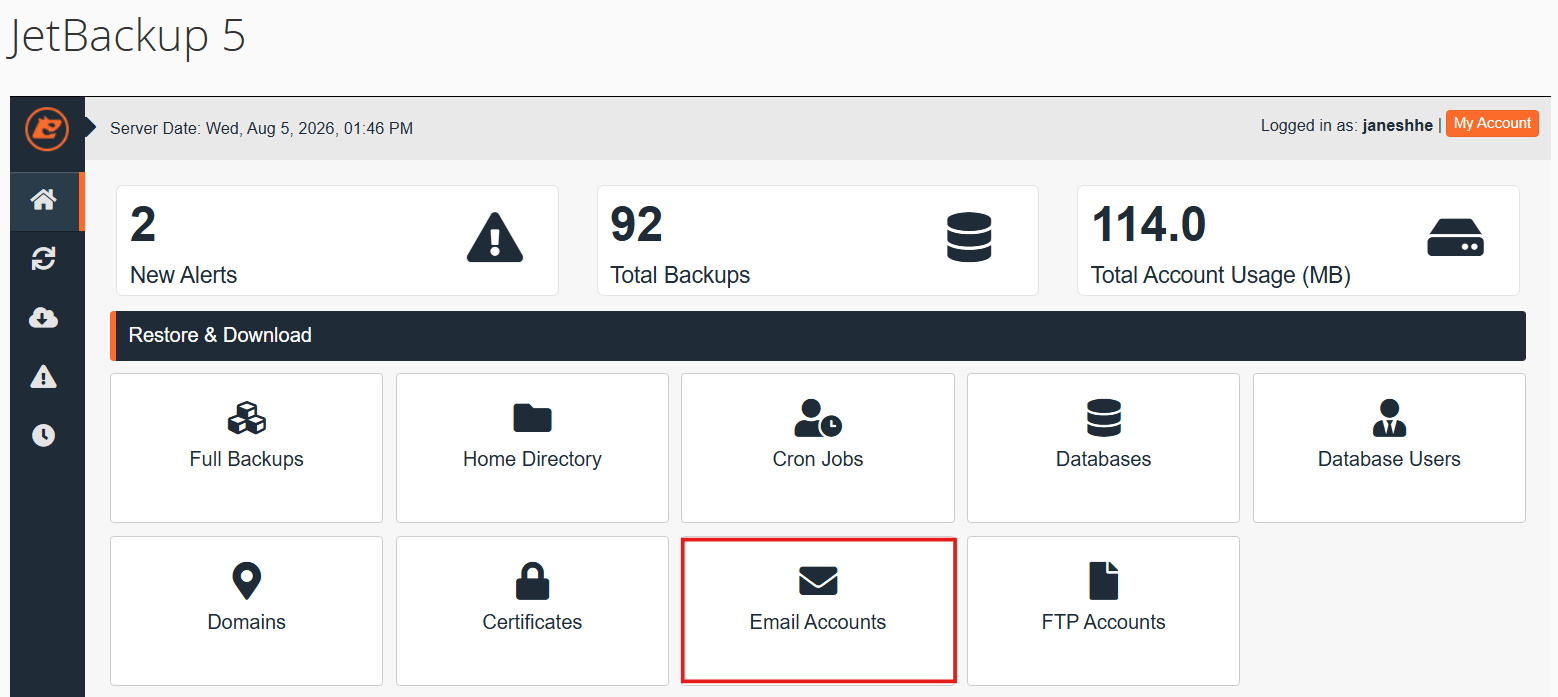
Step 1: Open Email Backups
Log in to your cPanel account.
Open “JetBackup 5“, then click “Email Accounts” (or “Restore & Download“ → “Email Accounts“).
You’ll see a list of all email accounts associated with your hosting account.
Step 2: Select the Email Account
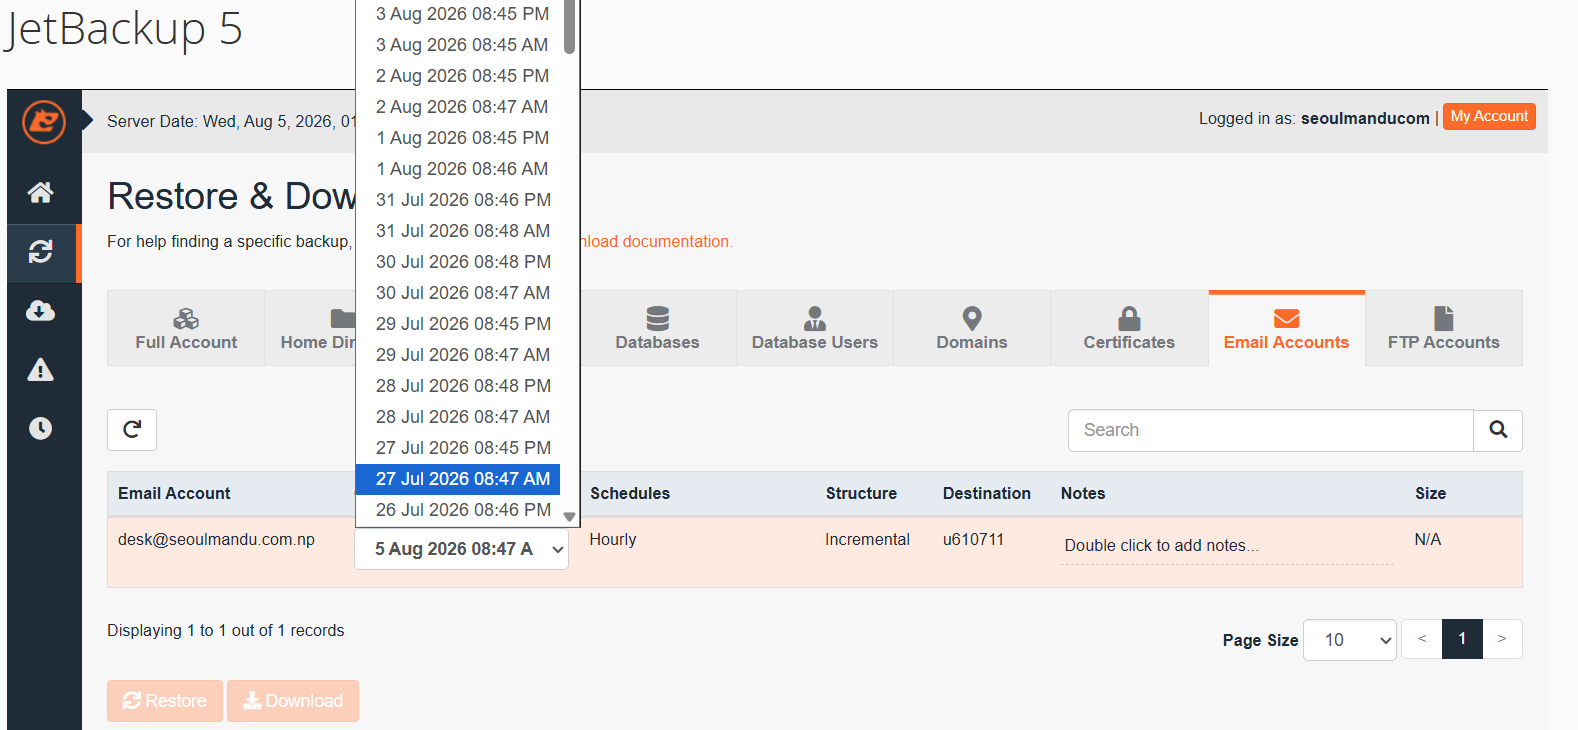
Choose the email account you want to restore.
For example:
If the account was deleted several days ago, click “Choose Other Backup” and select an older backup created before the deletion.
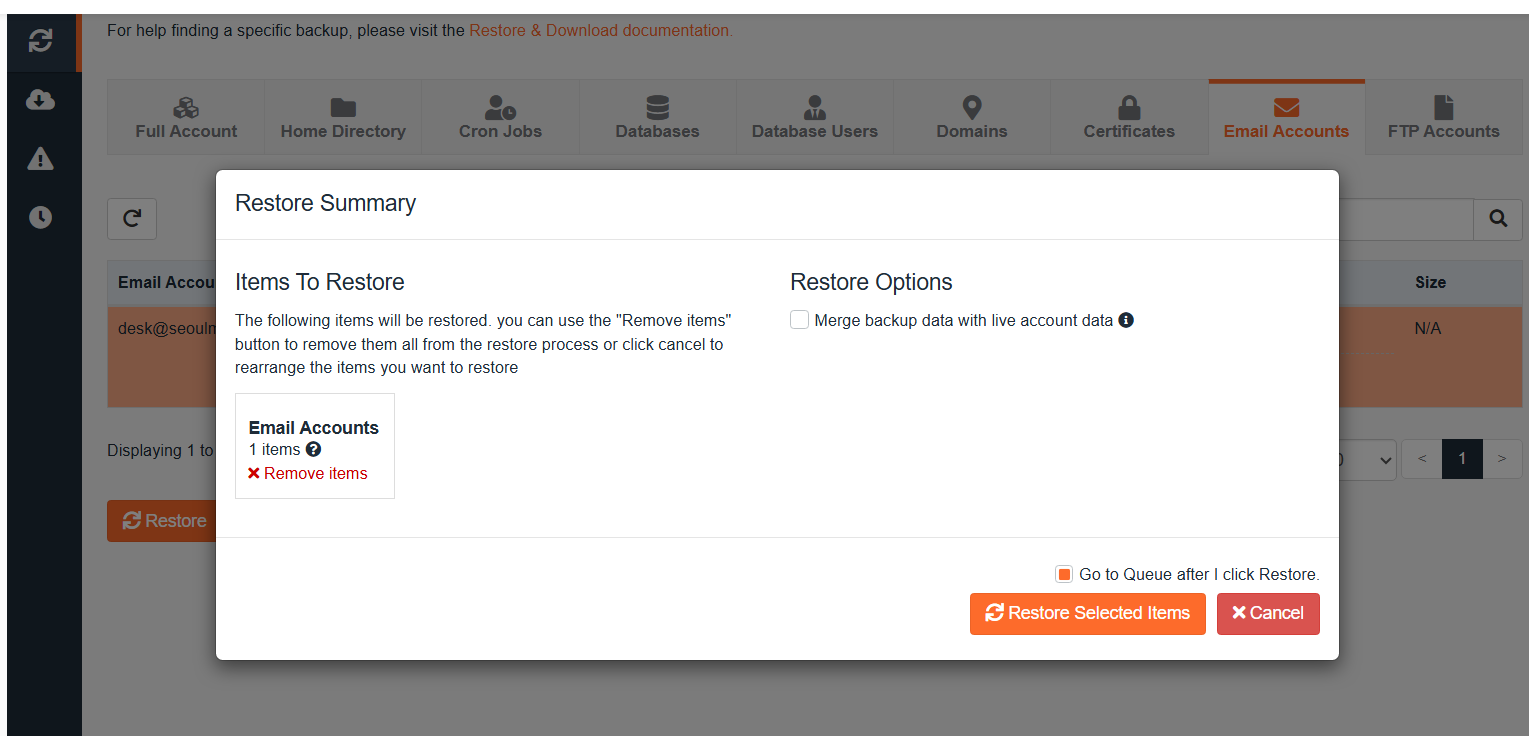
Step 3: Start the Restore
Click “Restore“.
Review the restore summary to make sure you’ve selected the correct email account and backup date.
When you’re ready, click “Restore Selected Items“.
JetBackup will begin restoring the mailbox.
Most email restores are completed within a few minutes.
Step 4: Verify the Restored Email Account
Once the restore is complete, log in to Webmail or your preferred email client to verify everything is working correctly.
Check the following:
- The email account is accessible.
- Inbox messages are available.
- Sent emails are present.
- Important folders have been restored.
- You can send and receive emails successfully.
If you use Outlook, Thunderbird, Apple Mail, or another email client with IMAP, your restored emails should automatically synchronize with your device after a short time.
💡 Tip: If you use IMAP on your phone/Outlook, restored messages will re-sync automatically. If you use POP3 (which downloads and deletes from the server), messages already downloaded to a device were never on the server, check that device’s local folders instead.
Real Example
Suppose a team member accidentally deletes the [email protected] mailbox from cPanel.
Your website continues working normally, but years of customer conversations appear to be gone.
Instead of restoring the entire hosting account, simply restore the deleted email account from JetBackup.
Within a few minutes, the mailbox and its messages are available again without affecting your website or database.
Real-World Scenarios: Which Restore Do I Need?
Still unsure? Match your situation:
Scenario 1: My WordPress Website Shows a White Screen
A White Screen of Death usually appears after:
- Updating a plugin
- Updating a theme
- Editing PHP files
- Installing incompatible software
Recommended solution
Before restoring a backup, try disabling the recently updated plugin through File Manager in cPanel.
If the issue continues, restore the Home Directory from a backup created before the update.
Scenario 2: My Website Was Hacked
If your website redirects visitors to spam pages, displays unwanted advertisements, or has been flagged by Google, your website may be infected with malware.
Recommended solution
Perform a Full Account Restore using a backup created before the infection occurred.
After restoring your website:
- Change your cPanel password.
- Change your WordPress administrator password.
- Update WordPress core.
- Update all themes and plugins.
- Remove unused plugins and themes.
- Enable two-factor authentication if available.
Restoring the backup removes the infected files, but fixing the security weakness that allowed the attack is equally important.
Scenario 3: I Accidentally Deleted Images or Files
Deleting files from File Manager or cPanel doesn’t always mean they’re gone forever.
If only a few files or folders are missing, restore those specific files using JetBackup’s File Manager.
This method restores only the deleted items without affecting the rest of your website.
Scenario 4: My Blog Posts or WooCommerce Products Disappeared
If your website design still loads correctly but posts, products, or customer orders are missing, the problem is usually in the database.
Recommended solution
Restore only the Database.
This restores your content while preserving recently uploaded images and website files.
Scenario 5: I Deleted an Email Account
If an email account such as [email protected] or [email protected] was deleted accidentally, restore only the email account through JetBackup.
There’s no need to restore your website or database.
Scenario 6: I’m Moving My Website to Kailash Cloud
If you’re moving to Kailash Cloud, don’t restore anything yourself. Our team migrates your full website files, databases, and emails at no extra cost and with minimal or no downtime. Just open a ticket with your hosting account.
What If Your Current Hosting Provider Doesn’t Offer Backups?
Many website owners assume their hosting provider automatically creates backups.
Unfortunately, that’s not always the case.
Some providers:
- Create backups only once a week.
- Store only a single backup.
- Charge extra for restores.
- Don’t include backups in basic hosting plans.
If a backup isn’t available when disaster strikes, recovering your website becomes much more difficult.
Your options may be limited to:
- Restoring a manual backup from your computer.
- Recovering data from a backup plugin.
- Rebuilding the website manually.
- Using archived versions from the Internet Archive or Google’s cache, if available.
This is why automatic backups should be one of the first things you check when choosing a hosting provider.
At Kailash Cloud, eligible Web hosting plans include:
- Twice-daily automated backups: Your data is backed up every 12 hours for better protection.
- Off-site backup storage: Backups are stored on separate infrastructure for added reliability.
- Self-service JetBackup restores: Restore files, databases, or emails anytime in just a few clicks.
- Multiple restore points: Choose from several backup versions instead of relying on a single copy.
Best Practices: Never Fear Data Loss Again
Restoring is the cure; these habits are the prevention:
- Download a manual backup before major changes. Updating WordPress core, switching themes, or editing the database? Spend 2 minutes generating and downloading a backup first (JetBackup → Select Backup → Download).
- Keep an occasional local copy. Once a month, download a full backup to your computer or Google Drive. Off-site, off-server, and local storage together provide the strongest protection.
- Test your backups. A backup you have never tested is a hope, not a plan. Occasionally restore a single file to verify that the backup system works properly.
- Act quickly after accidents. Backups have retention limits. If you delete something today, restore it this week instead of waiting a month for older restore points to expire.
- Limit who has cPanel access. Most “mystery deletions” happen because a teammate or freelancer accidentally clicks the wrong option.
Frequently Asked Questions
How do I restore my WordPress website from backup without a plugin?
If your host provides JetBackup in cPanel (all Kailash Cloud plans do), you don’t need any plugin. Open JetBackup, choose Full Account, Home Directory, or Database restore, pick a restore point, and click Restore. Plugins like UpdraftPlus are only necessary when your host doesn’t provide server-side backups.
How long does a website restore take?
The time depends on the size of your website.
- Database Restore: Usually less than one minute
- Home Directory Restore: Around 2 to 10 minutes
- Full Account Restore: Approximately 5 to 15 minutes for most websites
Larger websites with extensive media libraries may take longer. You can watch live progress in the JetBackup Queue.
Will restoring a backup delete my recent data?
Yes, for the component you restore. Restoring yesterday’s database removes today’s new posts/orders. That’s why you should restore the smallest component that fixes your problem, and choose the most recent clean restore point.
Can I recover a deleted database if I don’t know its name?
Yes. For WordPress, open cPanel and navigate to:
File Manager → public_html/wp-config.php and look for the line define('DB_NAME', 'xxxx'); that’s your database name. Then restore it via JetBackup → Database Backups.
My website was deleted by mistake, How do I recover it completely?
Do a Full Account restore. It brings back files, databases, email accounts, and settings in one operation. If the account itself was terminated, contact your hosting providers with off-site backups (like Kailash Cloud) can restore terminated accounts from the backup server.
My WordPress site was hacked is restoring a backup enough to fix it?
Restoring removes the malware, but not the vulnerability that let hackers in. After restoring: update WordPress core, all themes and plugins; delete unused plugins/themes; change every password (WordPress, cPanel, database, FTP); and enable 2FA. Otherwise the same hole gets exploited again.
How often should my website be backed up?
Daily at minimum for any active site; twice daily or more for e-commerce and news sites where hours of lost orders/content hurt. Weekly backups mean you can lose up to 7 days of data — unacceptable for a business site in 2026.
Does Kailash Cloud charge for restores?
No. Backups run automatically 2x daily on every plan, and you can perform unlimited self-service restores through JetBackup free. Our support team will also handle restores for you 24/7 at no cost.
Conclusion: Restores Are Easy, When Backups Exist
Losing website data feels catastrophic in the moment.
Knowing how to restore a website from backup allows you to recover quickly from accidental deletions, failed updates, malware infections, database issues, and email loss.
The most important takeaway is to restore only the affected component whenever possible. Whether it’s your website files, database, email account, or the entire hosting account, choosing the correct restore option helps minimize downtime and protects your most recent data.
Just as important is having reliable backups available before you need them.
If your hosting provider offers automatic backups and an easy restore tool like JetBackup, you can recover your website in minutes instead of spending hours rebuilding it.