


Django works well on a local computer, but moving a project to cPanel requires a few settings that do not exist in a normal local development setup. The most important pieces are the Python application environment, WSGI entry point, project settings, static files, database, and domain configuration.
The good news is that you do not need to manage Apache configuration manually on a typical cPanel Python hosting account. cPanel can run Python applications through Phusion Passenger, while CloudLinux servers may expose the same workflow through Setup Python App. The exact interface depends on how your hosting provider has configured the server.
This guide shows how to host a Django website on cPanel from an existing Django project, including the files to upload, the WSGI configuration, dependencies, migrations, static files, environment variables, and the common errors that appear after deployment.
Quick Answer
To host a Django website on cPanel:
- Confirm that your cPanel hosting supports Python applications and Passenger.
- Prepare your Django project with a
requirements.txtfile and production settings. - Create a Python application in cPanel using Setup Python App or Application Manager.
- Upload your Django project into the application root.
- Create and configure the
passenger_wsgi.pyWSGI entry point. - Install dependencies, run migrations, and collect static files.
- Configure the domain, test the website, and check logs if it does not load.
The exact menu names and available Python versions depend on your hosting environment. cPanel documents Python applications through its Application Manager and WSGI deployment workflow, while CloudLinux provides Python Selector for supported cPanel servers.
What You Need Before You Start
Before uploading anything, make sure you have:
- A cPanel hosting account with Python application support enabled.
- A working Django project that runs correctly on your local computer.
- Access to cPanel File Manager.
- cPanel Terminal or SSH access if your hosting plan provides it.
- A domain or subdomain connected to the hosting account.
- A
requirements.txtfile containing your Python dependencies. - Production database credentials if your project uses MySQL, PostgreSQL, or another external database.
- Your Django project’s settings module and WSGI module name.
If your cPanel account does not contain Setup Python App, Application Manager, or another Python application feature, ask your hosting provider whether Python and Passenger are enabled.
If you are using Kailash Cloud, its Python hosting plans are specifically presented for Django, Flask, and FastAPI applications and include cPanel and terminal access.
Step 1: Prepare Your Django Project Locally
Do the first part of the deployment on your own computer. The goal is to make the project portable so the server only has to recreate the Python environment and connect the production settings.
A typical Django project might look like this:
myproject/
├── manage.py
├── requirements.txt
├── passenger_wsgi.py
├── myproject/
│   ├── __init__.py
│   ├── settings.py
│   ├── urls.py
│   ├── wsgi.py
│   └── asgi.py
├── app1/
│   ├── migrations/
│   ├── admin.py
│   ├── models.py
│   ├── views.py
│   └── urls.py
├── templates/
└── static/
Your structure may be different. The important part is knowing the name of the Django package that contains settings.py and wsgi.py.
Create requirements.txt
If your local virtual environment contains all the packages required by the project, you can generate the dependency list with:
pip freeze > requirements.txt
Review the file before uploading it. It should contain the packages your production application actually needs.
Do not upload your local venv or .venv directory. cPanel or CloudLinux creates a server-side Python environment for the application.
Prepare Django for production
Do not leave the development configuration enabled on a public website. Django recommends reviewing settings such as DEBUG, ALLOWED_HOSTS, HTTPS, static files, and environment-specific configuration before going live.
For example:
DEBUG = False

ALLOWED_HOSTS = [
    "yourdomain.com",
    "www.yourdomain.com",
]
Replace the values with the domains that actually serve your application.
Keep your SECRET_KEY, database password, API keys, and other secrets outside the source code where possible.
Step 2: Create the Python Application in cPanel
There are two common cPanel configurations. Your hosting provider may expose one or both.
Before creating the Python application, first add the domain or subdomain that you want to use for the application in cPanel. You will then use this domain or subdomain as the Application URL when configuring the Python app.
If you need help adding a domain or subdomain in cPanel, see our guide:
How to Add a Subdomain and Addon Domain in cPanel
Once the domain or subdomain is created and pointing to your hosting account, continue with one of the Python application setup methods below.
Option A: Setup Python App on CloudLinux
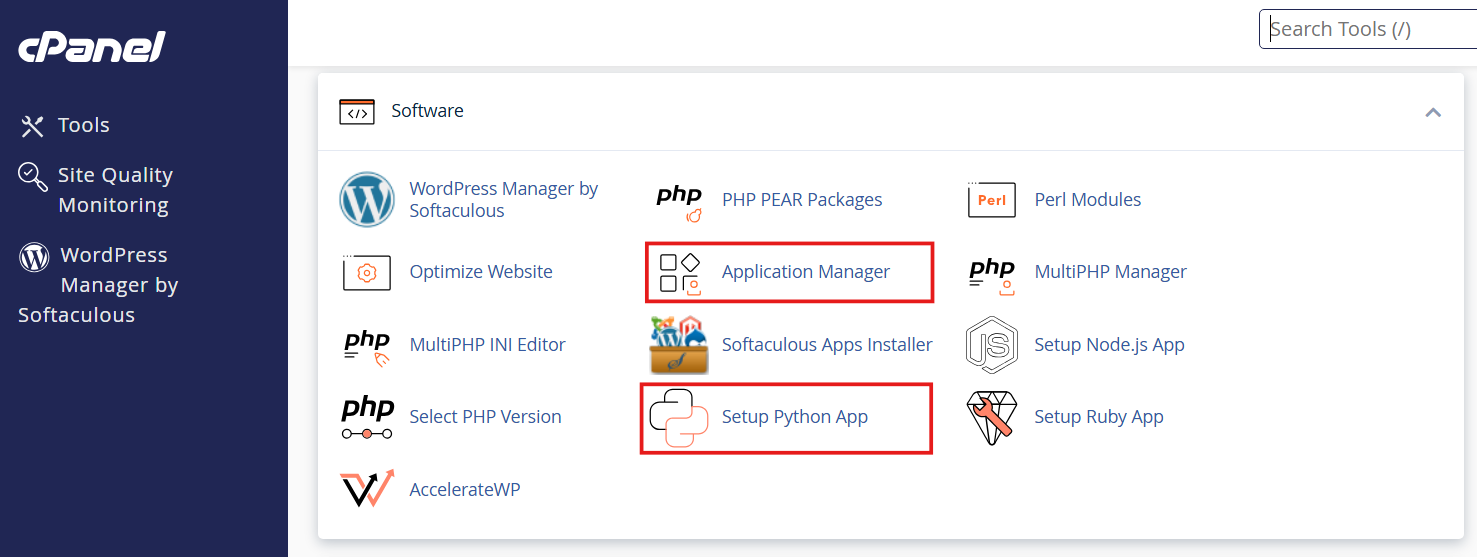
On CloudLinux servers, look under the Software section for Setup Python App. This is provided by CloudLinux’s Python Selector and uses Passenger to host Python applications.
Click Create Application and choose the Python version that is compatible with your project.
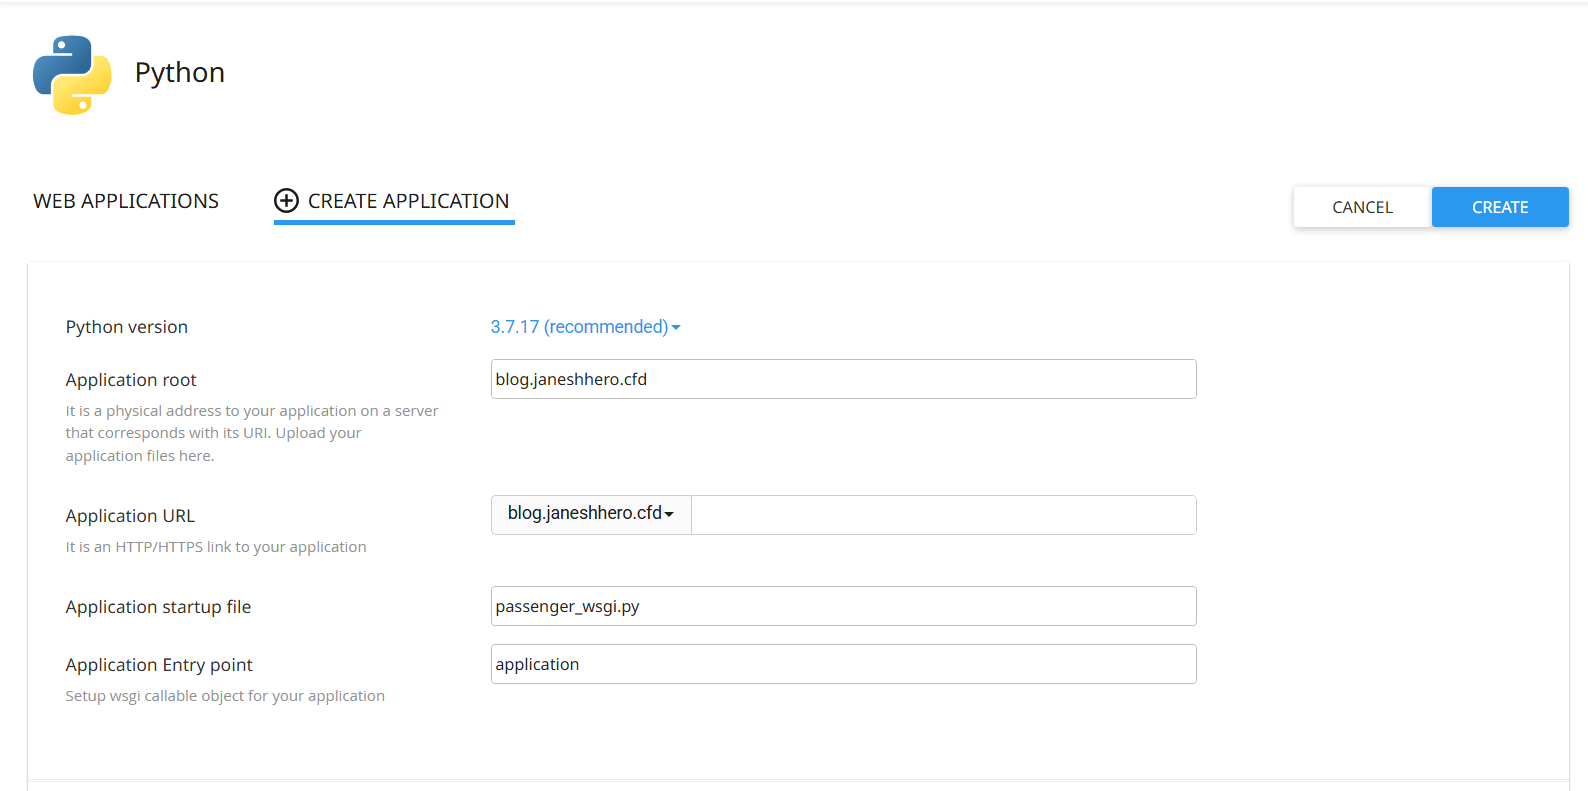
Typical fields include:
| Field | What to enter |
|---|---|
| Python version | A version supported by your project and offered by the server |
| Application root | Your project directory relative to the cPanel home directory |
| Application URL | The domain or subdomain that should serve the application |
| Application startup file | passenger_wsgi.py |
| Application Entry point | application |
Keep the application code outside public_html when your hosting interface allows it.
Option B: Application Manager
Some cPanel servers use Application Manager instead.
cPanel’s Application Manager supports Python applications and uses the server’s configured Passenger Python runtime. The exact fields available depend on the server configuration.
If your host gives you Application Manager instead of Setup Python App, follow the fields and environment created by that interface.
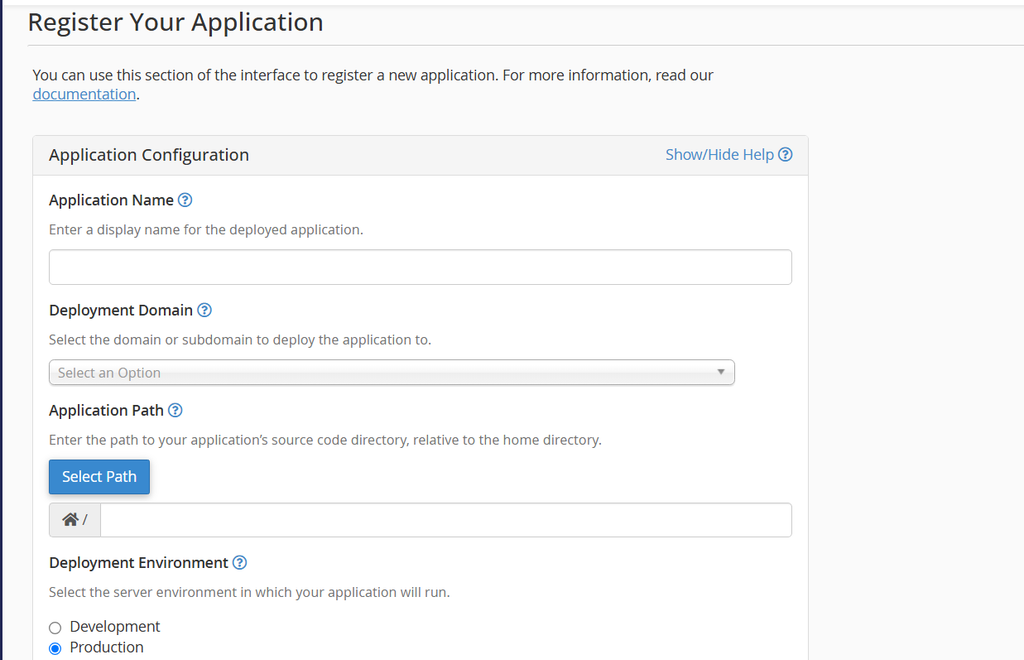
If neither interface is available, this is usually a server-side limitation rather than a Django problem. Contact your hosting provider before trying to build a custom Apache configuration on shared hosting.
Step 3: Upload Your Django Project
Once the Python application exists, upload the Django project into the application root you selected.
The simplest method for a small project is cPanel File Manager:
- Compress your Django project into a ZIP file on your computer.
- Leave out
.venv,venv,__pycache__, and other local development files. - Open File Manager in cPanel.
- Open the application root directory.
- Upload the ZIP file.
- Extract it in the application root.
- Confirm that
manage.py,requirements.txt, and your Django project package are in the expected locations.
Be careful about an extra directory level.
A clean structure might look like:
/home/yourusername/djangoapp/
├── manage.py
├── requirements.txt
├── passenger_wsgi.py
└── myproject/
    ├── settings.py
    ├── urls.py
    └── wsgi.py
Step 4: Configure passenger_wsgi.py
Passenger needs a WSGI application object that it can load. Django already provides a WSGI application through the project’s wsgi.py, so the cPanel entry point can import it.
Create passenger_wsgi.py in the application root:
import os
import sys

sys.path.insert(0, "/home/yourusername/djangoapp")
os.environ.setdefault("DJANGO_SETTINGS_MODULE", "myproject.settings")

from django.core.wsgi import get_wsgi_application

application = get_wsgi_application()
Replace:
/home/yourusername/djangoappwith the actual absolute path to your application root.myproject.settingswith the Python path to your Django settings module.
For a standard project, myproject.settings refers to myproject/settings.py.
The key detail is:
application = get_wsgi_application()
That application object is what Passenger loads.
If your project has a non-standard layout, do not copy the example blindly. The Python path must match the location of manage.py and the package containing settings.py.
Step 5: Install Dependencies and Run Django Commands
Open the Terminal in cPanel or connect through SSH if your hosting account provides it.
If you are using CloudLinux’s Setup Python App, the application page normally provides the command needed to enter the application’s virtual environment. Copy the command shown by your cPanel interface rather than guessing the virtual environment path.
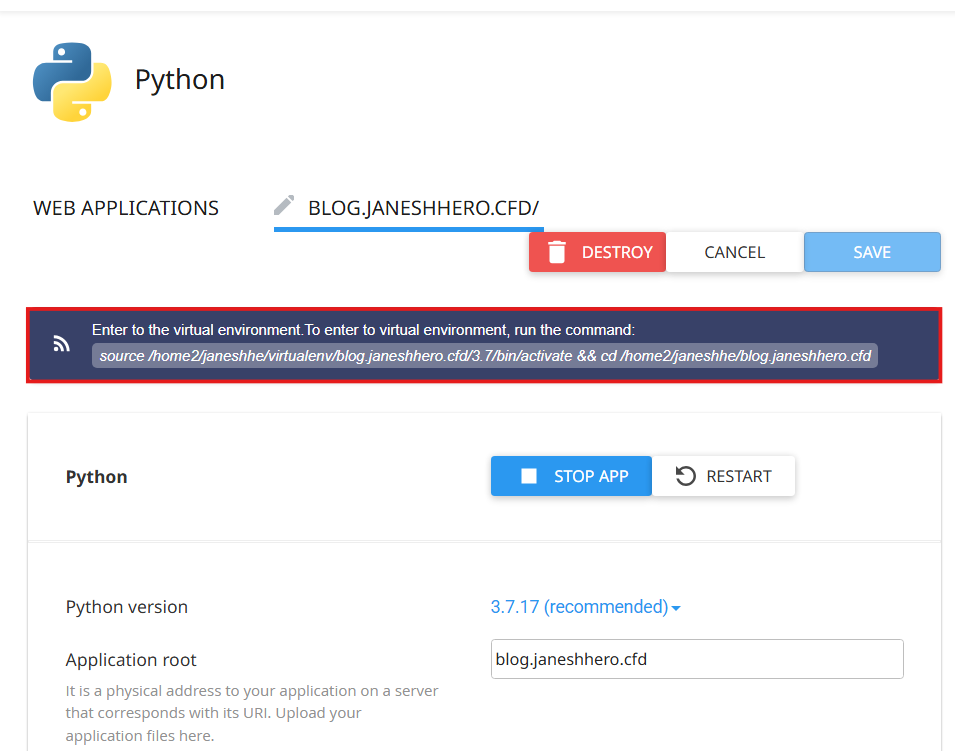
Once the environment is active, move to your application directory:
cd /home/yourusername/djangoapp
Then install the packages:
pip install -r requirements.txt
You can confirm that Django is available with:
python -m django --version
Run database migrations
If your application uses Django’s database models, run:
python manage.py migrate
Before running migrations, make sure your production database, database user, and permissions are configured correctly. If you haven’t created them yet, follow cPanel’s official guide for creating a database, database user, and assigning user privileges.
If you use MySQL or MariaDB, cPanel’s Database Wizard walks you through the complete setup.
Do not assume that localhost is always the correct database host. Use the value supplied by your hosting environment or database provider.
Create a superuser if needed
If the project uses Django Admin and you need an administrator account, run:
python manage.py createsuperuser
Follow the prompts to create the account. Once the application is running, you can sign in to Django Admin at /admin/.
Step 6: Configure Static Files
A Django development server can serve static files during development, but production deployment needs a defined static-file strategy.
A common production setting is:
STATIC_URL = "/static/"
STATIC_ROOT = BASE_DIR / "staticfiles"
Then run:
python manage.py collectstatic
Django collects the static assets into STATIC_ROOT.
Your production setup must then make that directory available at the /static/ URL. How you serve it depends on the cPanel server configuration and the way your application is deployed.
For uploaded media, configure MEDIA_ROOT and MEDIA_URL separately. User-uploaded files should be stored separately from your application code and should not be treated as executable code.
Step 7: Connect the Domain and Test the Website
If you selected the correct domain or subdomain when creating the Python application, cPanel and Passenger should route requests to your Django application.
Open the application URL and test more than the homepage.
Check:
- The homepage loads.
- A real application route works.
- Django Admin opens if your project uses it.
- CSS and JavaScript load correctly.
- Images and uploaded media work as expected.
- Database-backed pages can read and write data.
- Forms and authentication work.
- HTTPS works correctly.
Django recommends HTTPS for sites that handle logins, sessions, password resets, or other sensitive information.
Run Django’s deployment checks:
python manage.py check --deploy
Review every warning it reports. A successful page load does not necessarily mean the application is ready for production.
Common Django cPanel Problems and How to Fix Them
1. 503 Service Unavailable
A 503 response usually means Passenger could not start or serve the application correctly.
Check these first:
- The Python version selected in cPanel matches your application’s requirements.
- Django and all dependencies are installed in the application’s virtual environment.
passenger_wsgi.pyexists in the expected application root.DJANGO_SETTINGS_MODULEpoints to the correct settings module.- The Python path in
sys.path.insert()points to the directory containingmanage.py. - The application has been restarted after configuration changes.
- The application logs do not show a Python import error or missing dependency.
2. ModuleNotFoundError
If the log contains something such as:
ModuleNotFoundError: No module named 'django'
the package is probably missing from the application’s Python environment.
Activate the environment created for that application and run:
pip install -r requirements.txt
Do not install Django into a different global Python environment and assume Passenger will use it.
3. DisallowedHost error
If Django reports an invalid HTTP host, check ALLOWED_HOSTS in your production settings.
ALLOWED_HOSTS = [
    "yourdomain.com",
    "www.yourdomain.com",
]
Use the actual hostnames visitors use.
4. CSS and JavaScript are missing
If the page loads but looks unstyled, static files are usually the first thing to inspect.
Run:
python manage.py collectstatic
Then confirm that STATIC_ROOT is configured and that your cPanel deployment actually serves /static/ from the collected directory.
Also check the browser’s developer tools for 404 responses on CSS and JavaScript files.
5. Database connection errors
A database error after deployment usually means the production settings do not match the database created on the server.
Check:
- Database name
- Database username
- Database password
- Database host
- Database port
- Database driver installed in
requirements.txt - Database user privileges
6. Changes are not appearing
Passenger applications may continue running an existing application process after you edit files. Restart the application through the cPanel interface after deployment changes.
7. The application works locally but not on cPanel
This is usually an environment difference rather than a Django problem.
Compare:
- Python version
- Django version
- Installed dependencies
- Environment variables
- Database configuration
- File paths
ALLOWED_HOSTS- Static and media configuration
- Operating-system packages required by third-party libraries
If a package requires native system libraries that are unavailable on shared hosting, the application may need a different dependency or a VPS where you control the server environment.
Where cPanel Fits for Django Hosting
cPanel can be a convenient deployment environment for Django when your hosting provider has configured Python support, Passenger, and the required application-management tools.
It is particularly useful when you want a control panel for domains, databases, SSL, email, files, and Python applications instead of managing every server component yourself.
There are limits, however. Shared hosting normally restricts CPU, memory, background processes, system packages, and server-level configuration.
A larger Django application may eventually need a VPS when it requires custom services, more predictable resources, WebSockets, scheduled background jobs, or deeper server configuration.
Django cPanel Deployment Checklist
Before you call the deployment complete, check each item:
- Python application support is enabled.
- The selected Python version is compatible with the project.
- Project files are in the correct application root.
requirements.txtis present.- Dependencies are installed inside the application’s environment.
passenger_wsgi.pyimports the correct Django application.DJANGO_SETTINGS_MODULEpoints to the correct settings module.DEBUG = Falsein production.ALLOWED_HOSTScontains the real domain names.- Production secrets are not hard-coded into the repository.
- Database credentials are correct.
python manage.py migratecompletes successfully.python manage.py collectstaticcompletes successfully.- Static files are actually being served.
python manage.py check --deployhas been reviewed.- HTTPS works.
- The homepage and important application routes work.
- Application logs are clean after testing.
- A backup exists before major future changes.
Conclusion
To host a Django website on cPanel, you need to connect five key pieces correctly: the Python environment, your Django project, the Passenger WSGI entry point, the production database, and static files.
Start by confirming that your hosting account supports Python applications. Then create the application, upload the project, install the dependencies, configure passenger_wsgi.py, run migrations and collectstatic, and test the live domain.
When something fails, do not start changing random settings. Check the application logs first, then verify the Python environment, WSGI import path, dependencies, Django settings, database, and static-file configuration.
If your Django application needs more control or better performance than shared cPanel hosting provides, a VPS is the natural next step. With a VPS, you have greater control over the server environment and can choose the web server, Python environment, process manager, database setup, background workers, and other server components. You also get dedicated server resources, which can provide a significant performance boost and more consistent performance as your application grows.
If you’re considering a Nepal-based VPS hosting environment, consider factors such as server location, available resources, latency, root access, and the level of server management you need.
Frequently Asked Questions
Can I host Django on cPanel shared hosting?
Yes, if the hosting provider has enabled Python application support and the server includes a supported way to run Python through Passenger. CloudLinux servers commonly expose this through Setup Python App, while other cPanel configurations may use Application Manager.
Do I need SSH access to host Django on cPanel?
Yes, SSH access is strongly recommended. Although some cPanel setups allow application management through the control panel, SSH makes it easier to install dependencies, run Django commands such as migrate and collectstatic, manage the virtual environment, and troubleshoot deployment issues.
Can I use Django with MySQL on cPanel?
Yes, when the hosting environment provides MySQL and the required Python database driver. Create the database and user through the hosting control panel, configure the production Django database settings, install the appropriate driver, and run migrations.
Can I use PostgreSQL with cPanel?
That depends on the hosting provider and server configuration. Do not assume PostgreSQL is available on every cPanel shared hosting plan.
Why does my Django site show a 503 error?
A 503 usually means the application did not start correctly or Passenger could not serve it. Check the application logs, Python version, installed dependencies, WSGI file, settings module, application path, and recent configuration changes.
Do I need Gunicorn to run Django on cPanel?
Not necessarily. A cPanel environment that uses Passenger can serve a Django WSGI application without requiring you to run a separate Gunicorn process. The correct deployment method depends on how the hosting provider has configured Python application support.
Should I upload my virtual environment?
No. Do not upload your local venv or .venv directory. Recreate the environment on the server and install the packages from requirements.txt.
Can I host a Django API on cPanel?
Yes, a Django project that exposes API endpoints can be deployed in the same way as another Django WSGI application. The practical limits depend on your hosting resources and the API’s workload.