
Your Node.js app runs perfectly with npm start on your laptop. You upload it to cPanel, open your domain, and get a 503 error. Sometimes, you may only see a directory listing.
That difference catches almost everyone the first time. cPanel was built primarily for PHP, so it does not run your Node.js application the same way your local machine does. Instead, an application server called Phusion Passenger starts your app, manages the port it listens on, and passes incoming requests to it through Apache.
Once you understand this difference, the rest becomes much easier. Most of the process involves filling out a few fields and clicking a button.
This guide explains how to host a Node.js application on cPanel from start to finish. You will learn how to check whether your hosting supports Node.js, prepare your application files, create the application in cPanel, install dependencies, and connect it to your domain.
The final sections cover the errors that commonly appear in support tickets. By the end, you should be able to identify and fix most of these problems yourself.
Quick Answer
To host a Node.js application on cPanel:
- Confirm your hosting plan includes Setup Node.js App or Application Manager.
- Prepare your app locally with a valid
package.jsonand a startup file namedapp.js. - Open Setup Node.js App and click CREATE APPLICATION.
- Set the Node.js version, application root, application URL, and startup file.
- Upload your project files to the application root, leaving out
node_modules. - Click Run NPM Install, then add your environment variables.
- Click Start Application and open your application URL.
Each step is explained below, along with the settings that cause the most trouble.
What You Need Before You Start
Check these first. A missing item here is the reason most first deployments fail:
- A cPanel hosting account with Node.js support enabled
- A working Node.js application with a valid
package.json - A domain or subdomain already pointing to your hosting account
- An active SSL certificate on that domain
- SSH access or the cPanel Terminal, useful but not required
- The Node.js version you develop on, so you can match it on the server
If your domain does not open over HTTPS yet, activate the SSL certificate before you begin. Doing it now is simpler than doing it after an application is attached to the domain.
If the domain does not load at all, the problem sits in your DNS rather than your hosting. Our beginner’s guide to DNS explains how nameservers and records fit together.
Step 1: Confirm Your Hosting Supports Node.js
Log in to cPanel and look in the Software section. You want to see the Setup Node.js App icon.
Setup Node.js App is the CloudLinux Node.js Selector, which is what most shared hosting accounts use. It gives you a Node.js version dropdown, an isolated environment for your app, and options for installing dependencies and restarting the application.
It runs your application through Phusion Passenger, so everything below applies to this setup.
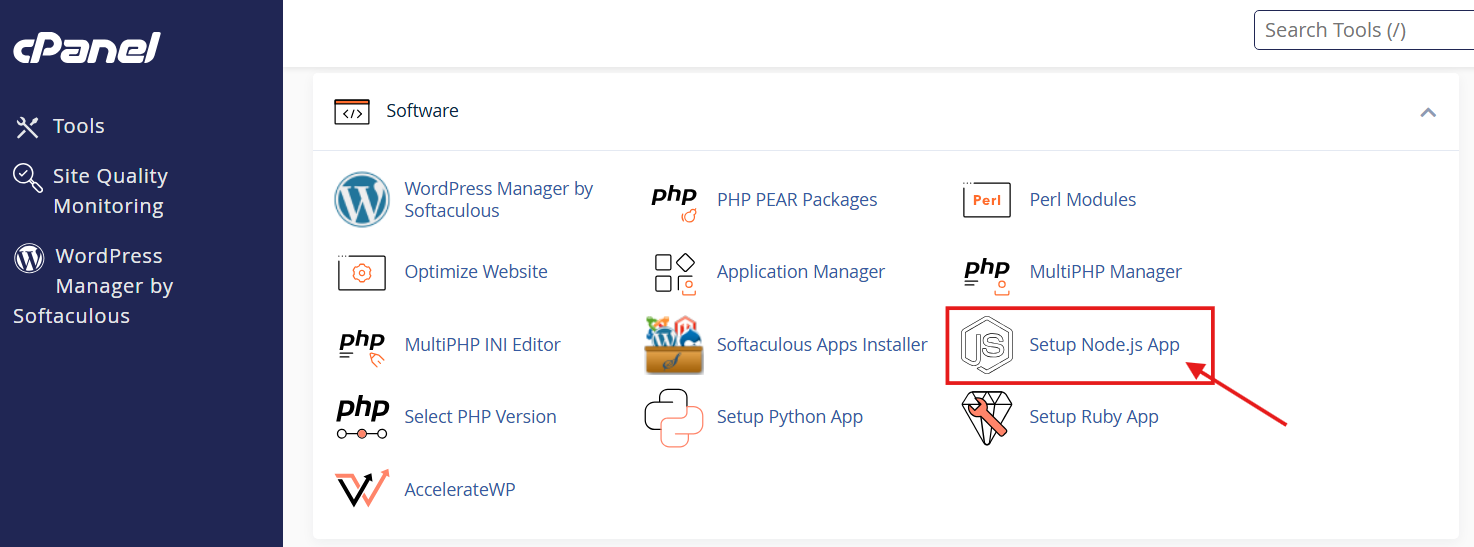
If the icon is not there, your account does not have Node.js enabled, and this is not something you can switch on yourself. The server needs CloudLinux with the Node.js Selector module and the required Passenger components, which must be installed by the hosting provider through WHM, the server-level control panel.
Open a support ticket and ask whether Node.js is available on your current hosting plan. If it is not, ask which plan includes Node.js support.
Check this before you spend an afternoon uploading files. A missing Setup Node.js App icon means the deployment cannot work, however correct your code is.
Step 2: Prepare Your Application Locally
Three things need to be right before your project leaves your machine.
Name your startup file app.js
The startup file is the file Passenger runs first, the entry point of your application. Passenger looks for one called app.js. cPanel’s documentation is direct about this: use that exact name, or add a PassengerStartupFile directive in an Apache include file pointing at a different one.
The Node.js Selector does give you a field for a different filename, which handles the directive for you. Even so, app.js is the path of least resistance, and it is what the platform assumes when the field is left blank.
Check your package.json
Your dependencies must be listed here, because you will not be uploading node_modules. The server installs them itself from this file.
{
  "name": "my-app",
  "version": "1.0.0",
  "main": "app.js",
  "scripts": {
    "start": "node app.js"
  },
  "engines": {
    "node": ">=18.0.0"
  },
  "dependencies": {
    "express": "^4.21.0"
  }
}
The engines field records the minimum Node.js version your app needs. You will use it in Step 3 when choosing a version.
Let Passenger choose the port
This is the one code change most deployments need. Passenger uses reverse port binding, meaning it decides which port your application listens on and overrides whatever you hardcoded. An app that insists on a fixed port can fail to start.
Read the port from the environment, keeping a local fallback:
const express = require('express');
const app = express();

const port = process.env.PORT || 3000;

app.get('/', (req, res) => {
  res.send('Hello from Node.js on cPanel');
});

app.listen(port, () => {
  console.log(`App listening on port ${port}`);
});
One further constraint is worth knowing before you deploy. Passenger installs the first HTTP server your application creates as its request handler, so applications that create several HTTP servers need extra configuration. Phusion documents the approach in its reverse port binding guide.
Step 3: Create the Application in cPanel
Open Setup Node.js App and click CREATE APPLICATION. Five fields appear.
| Field | What to enter | Example |
|---|---|---|
| Node.js version | The version closest to what you develop on. The dropdown lists only versions your host has installed. | 20 |
| Application mode | Production for a live app, Development while testing | Production |
| Application root | The folder for your app files, relative to your home directory | myapp |
| Application URL | The domain or subdomain that serves the app | app.yourdomain.com |
| Application startup file | Your entry file | app.js |
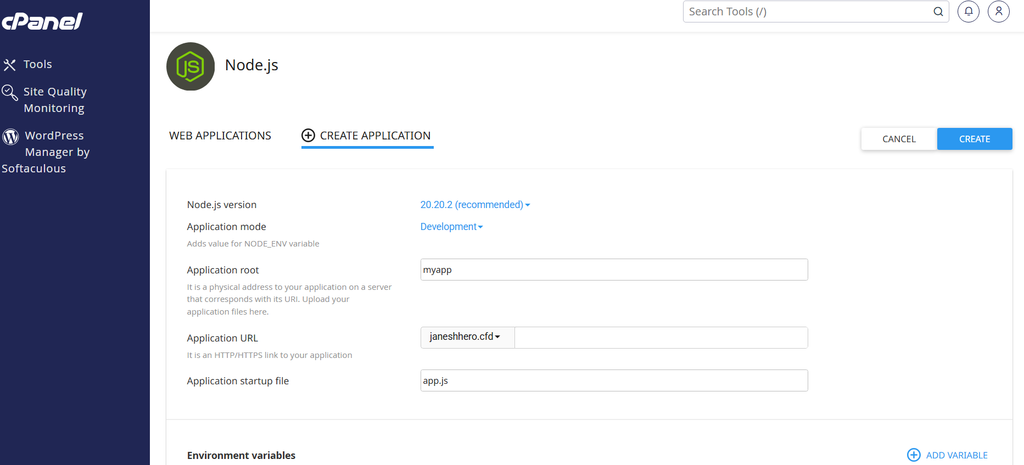
Keep the application root outside public_html. Enter something like myapp, which resolves to /home/yourusername/myapp, replacing yourusername with your cPanel account name. Anything placed inside public_html, your website’s document root, can potentially be served as a plain file, which would expose your source code, your node_modules, and any configuration sitting beside them.
Version mismatches cause real failures. An app built against Node 20 may not run on Node 18. If the version you need is missing from the dropdown, ask your host whether they can add it rather than downgrading your app and hoping.
Click CREATE. cPanel builds an isolated environment for the application, along with the matching folder in your home directory.
Step 4: Upload Your Application Files
Your files go into the application root you just named. Choose whichever method suits how you work.
File Manager. Zip your project locally, leaving out node_modules. Open File Manager, go to the application root, click Upload, then right-click the uploaded archive and choose Extract. Afterwards, confirm that package.json sits directly in the application root rather than one folder deeper. That extra nesting level is a common cause of a failed start.
Git Version Control. For a project you will update regularly, this is the better option. Open Git Version Control, click Create, enter your repository URL, and set the repository path to your application root. Updates then become a pull instead of a re-upload.
FTP or SFTP. Connect with a client such as FileZilla and copy the files across. Leave out node_modules here too, since transferring thousands of small files over FTP is slow and often incomplete.
Whichever route you take, do not upload node_modules. Dependencies compiled on your machine may not match the server’s environment, and the next step installs them correctly.
Step 5: Install Dependencies
Return to Setup Node.js App, find your application in the list, and click the pencil icon to edit it. Click Run NPM Install.
cPanel runs npm install inside your application’s environment, reading package.json and creating node_modules on the server. A greyed-out button means package.json is either missing or not in the application root.
If you prefer the command line, the edit screen shows a source command near the top. Copy it, open Terminal in cPanel or connect over SSH, and paste it in. It looks like this:
source /home/yourusername/nodevenv/myapp/20/bin/activate && cd /home/yourusername/myappCopy the command cPanel generated rather than this example, since yours already contains the correct username, application root, and version. Your prompt changes to show the environment is active. Then run:
npm installInstalls are sometimes killed on shared hosting when a package needs more memory than your account allows. If that happens, cap the memory Node uses during the install:
NODE_OPTIONS='--max-old-space-size=512' npm installStep 6: Add Your Environment Variables
Database credentials, API keys, and secrets belong in environment variables. Not in your source code, and not in a .env file sitting in the application root.
In the application edit screen, scroll to the environment variables section and add each name and value. They reach your code through process.env:
const dbHost = process.env.DB_HOST;
const dbUser = process.env.DB_USER;
NODE_ENV is set for you based on the application mode chosen in Step 3, so there is no need to add it yourself.
If your app uses MySQL, create the database and user through cPanel’s MySQL Databases first, then grant that user ALL PRIVILEGES on the database. cPanel prefixes both names with your account username, so a database you name appdb becomes yourusername_appdb. Use the full prefixed names in your variables, because the short names will not connect.
Step 7: Start the Application and Test It
Click Save, then Start Application, or Restart if it is already running. Click Open beside your application URL.
A correctly configured app serves its own homepage. A newly created application that has no code of yours yet shows cPanel’s default “It Works!” page, which confirms Passenger is running but is not yet serving your project.
Before calling it done, check two things past the homepage:
- Open a real route. Load an actual endpoint from your app, such as
/api/status. A homepage can render from a leftover file while your routes are broken. - Confirm it is your code. Change a visible string, restart, and reload. If nothing changes, Passenger may still be serving a cached process. The restart section below covers that.
If you see an error instead, the next section explains what it means.
Common Problems and How to Fix Them
503 Service Unavailable
This is the error you are most likely to meet. It means Passenger tried to start your application and it did not come up.
Start with the logs. Check the Passenger log file path shown in your application settings, then check Metrics > Errors in cPanel for Apache-level messages. The actual stack trace is usually in one of the two.
Common causes, roughly in order of frequency:
| Cause | Fix |
|---|---|
| Dependencies not installed | Run Run NPM Install again and watch for failures |
| Node.js version mismatch | Match the dropdown version to your app’s requirement |
| Wrong startup file | Confirm the filename in the settings matches a file that exists |
| Files nested one folder too deep | package.json must sit directly in the application root |
| Crash on startup | Read the log, usually a missing module or a syntax error |
| Account resource limits | Check Resource Usage. A process killed for exceeding limits returns 503 |
“Cannot find module”
The named package is not present in node_modules on the server. Run the install again inside the application environment.
If one package keeps failing, it may need compilation tools that shared hosting does not provide. Packages with native bindings, meaning code compiled for a specific system rather than plain JavaScript, often have pure JavaScript alternatives. bcrypt and bcryptjs are the usual example.
Code changes are not appearing
Passenger holds your application in memory, so editing a file does not restart it.
Use Restart in the cPanel interface, or create a restart trigger file over SSH:
mkdir -p ~/myapp/tmp
touch ~/myapp/tmp/restart.txt
Passenger watches this file and restarts the application when its timestamp changes. Replace myapp with your own application root.
“Application root already in use”
Another application, whether Node.js, Python, or Ruby, is already registered against that folder. Check your existing applications in the list, and look inside that directory for an .htaccess file carrying Passenger directives left over from an earlier setup.
“Apache Passenger is required by Node.js Selector”
The server is missing the Passenger module the selector depends on. This is a server-level package your hosting provider installs, so there is nothing to fix from your side. Send them the exact error message.
PM2 does not work
It is not meant to. Passenger is already the process manager, starting, stopping, restarting, and monitoring your application. Running PM2, forever, or nodemon alongside it creates conflicts. Commands such as node app.js or npm start over SSH will run a process, but that process is not the one serving your domain.
Useful Tips
- Match versions locally. Use
nvmon your machine to develop against the same Node.js version selected in cPanel. Most “works locally, breaks on the server” problems begin here. - Set the mode to Production before launch. Development mode can expose stack traces to visitors.
- Run
npm auditregularly. Shared servers are a busy neighbourhood, and outdated dependencies are the easiest way in. - Keep secrets out of Git. If your repository ever held a
.envfile with live credentials, rotate them. - Back up before major changes. When a deployment goes badly, restoring from a backup is faster than debugging under pressure.
- Node.js and PHP can coexist. Your Node app can run on a subdomain while WordPress or another PHP site runs on the main domain within the same account. If you manage a WordPress site there too, our guide on installing WordPress on cPanel covers that side.
Conclusion
Hosting a Node.js application on cPanel comes down to one shift in thinking. You are not running your app. Passenger is.
Let it choose the port, name your startup file the way it expects, keep your code outside public_html, and install dependencies on the server rather than shipping them. Get those four right and the process really is a form and a button. Get one wrong and you get a 503, which is why the logs are the first place to look rather than the last.
For small APIs, side projects, and applications running beside an existing PHP site, cPanel is a practical place to deploy. When you later need WebSockets, custom server configuration, or steady resources under heavy load, that is the point to consider a VPS.
If you are choosing a plan and want to confirm Node.js is available before committing, the details are on our web hosting page, or you can ask our support team directly.
Frequently Asked Questions
Can I run Node.js on shared hosting?
Yes, on plans where the provider has enabled it. Shared accounts normally use the CloudLinux Node.js Selector, which appears in cPanel as Setup Node.js App. If that icon is missing from your Software section, your plan does not currently support it. Ask your provider before assuming otherwise.
Which Node.js version should I choose?
The one closest to what your application was built and tested against, picked from the versions your host has installed. The engines field in your package.json records the minimum your project needs. For anything running in production, prefer an LTS release, meaning a long-term support version that receives security fixes for an extended period.
Where should the application root be?
Anywhere in your home directory except inside public_html. Something like /home/yourusername/myapp works well. Placing it inside your document root risks exposing your source files to the web.
Why does my app show “It Works!” instead of my site?
That page is what a newly created application serves before your own code takes over. Confirm your files extracted into the application root, that the startup file name matches what you set, and that dependencies installed. Then restart.
Do I need SSH access?
No. Everything in this guide can be done through the cPanel interface. SSH, or cPanel’s built-in Terminal, is useful for reading logs and running installs with more control, but it is not required.
Can I use PM2 to keep my app running?
No. Passenger already manages the process lifecycle, and adding a second process manager causes conflicts. Use the Restart button, or the tmp/restart.txt trigger file described above.
Can I deploy Next.js or another SSR framework?
Sometimes, though it is harder than a plain Express app. Build locally rather than on the server, since build steps are memory-hungry and often exceed shared hosting limits, then upload the built output and point the startup file at your server entry. For anything substantial, a VPS is the better fit.
How do I read my application’s logs?
Check the Passenger log file path shown in your application settings, and Metrics > Errors in cPanel for Apache errors. Anything your app writes with console.log and console.error generally lands in one of these.